Go IDE for Linux
In this article, we are going to turn our attention to some Golang IDE’s.
Before we continue with the Go IDE’s, make sure you install Go in your machine. To install Golang in your machine go through this article. Although on the official Golang website there is a list of recommended IDE’s.
IntelliJ Goland is not free and for the beginner, you can try the 30-day trial. After trying it for 30 days, we conclude that Golang is the complete package when it comes to Go development. This entails all the features it provided and easy to install. In addition, JetBrains provides a Go plugin for IntelliJ Ultimate Edition users. For more information about this plugin see Jetbrains Go plugin.
Vim is a free and open-source IDE that supports the programming language Golang. The code editor VIM installation can be a bit confused for beginners since it requires some command through Terminal.
In this article, we are going to focus on the easy to install code editors, so everyone can get them up and running without too many difficult steps in between. From all the available Go IDE’s we are going to focus on the following code editors which can be used as a Go IDE’s which is also easy to install:
Visual Studio Code
Visual studio code is an open-source and free code editor developed by Microsoft which is redefined and optimized for building and debugging modern web and cloud applications. It also supports Git, Github and some additional features such as syntax, highlighting, intelligent code completion, snippets and code refactoring. Furthermore, it is also highly customizable which allow the user to perform the following:
- Change theme’s
- Add keyboard shortcut
- Change preferences
- Install additional extensions for additional functionalities
Golang plugin
By default, Visual Studio Code does not support Go, but there is Go plugin available in Visual Studio Code. Once the Go-plugin is installed you can start developing Go applications.
VS Code installation
This code editor can be downloaded directly from the official VS Code website.

Ones VS Code is downloaded the installer dialog will be displayed for the Ubuntu installation.
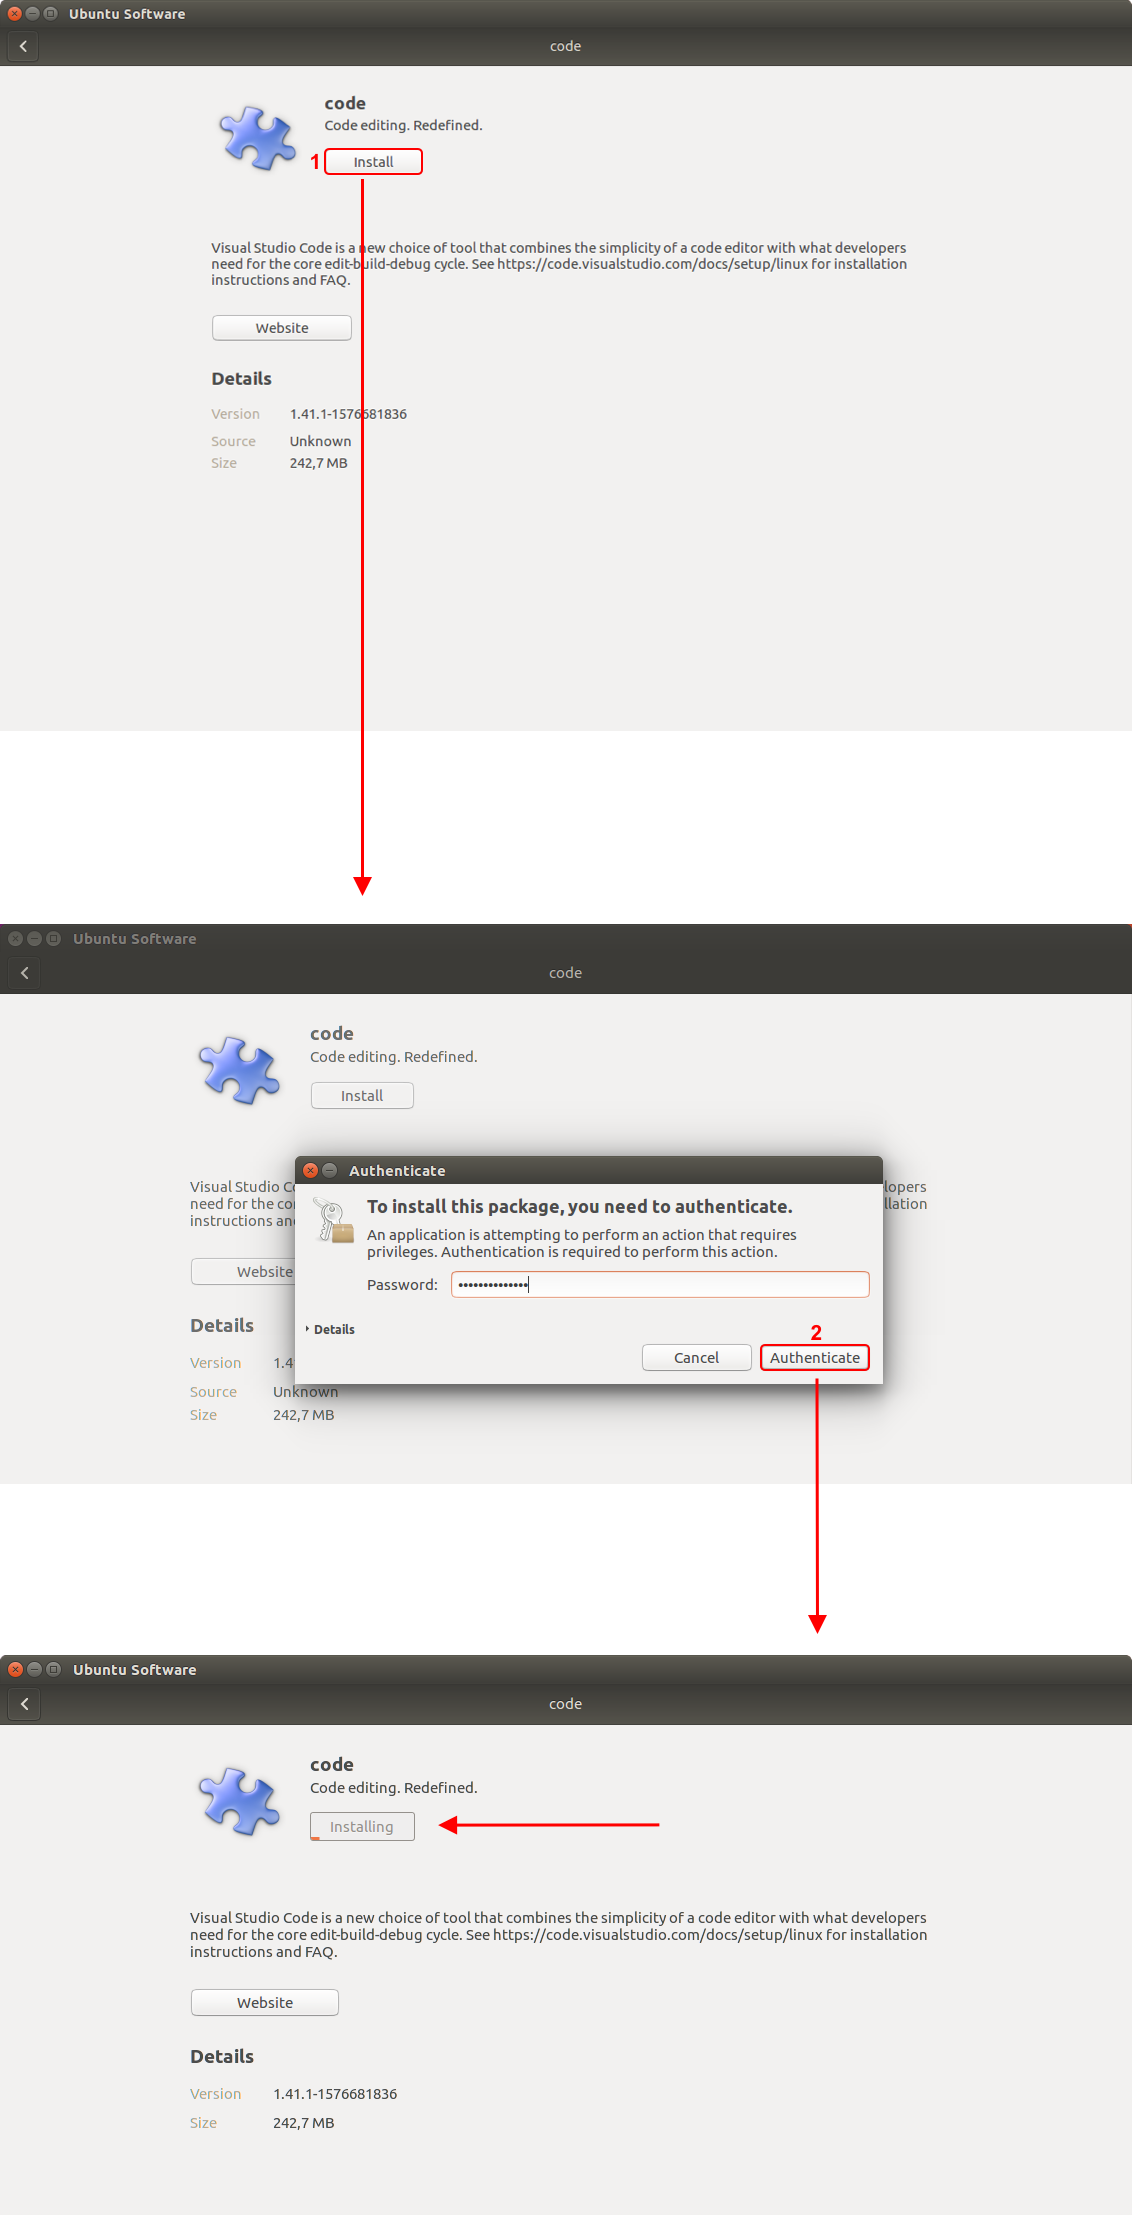
After the installation is done, the VS Code app will appear in your applications.
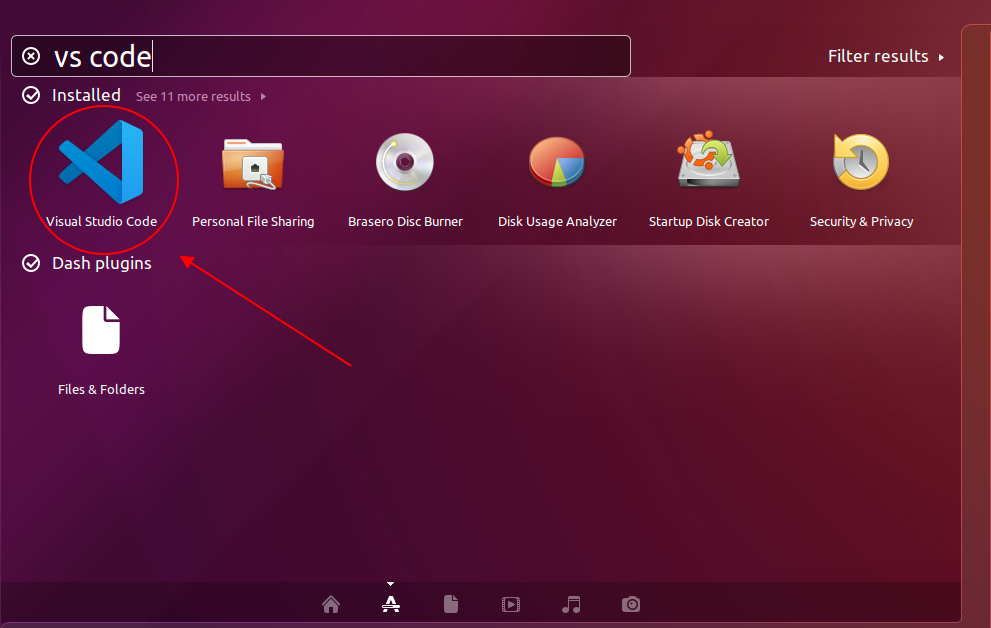
Launch VS Code
Launch VS code from applications.
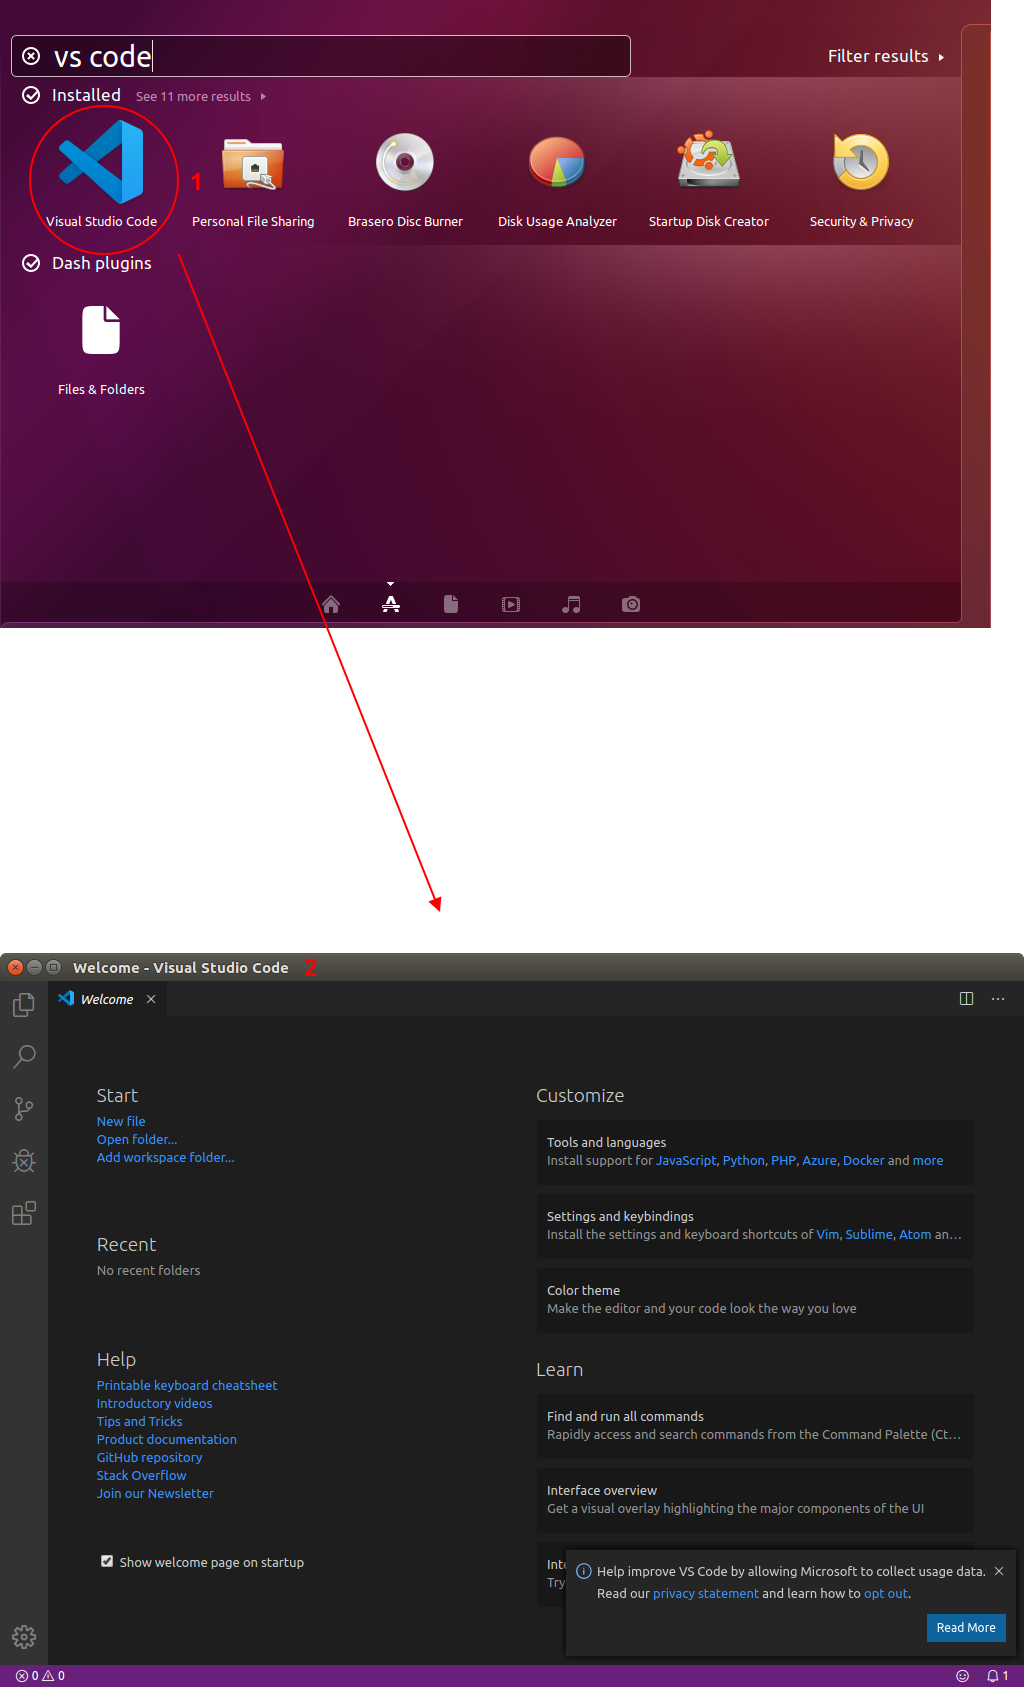
Writing your Go application in VS Code
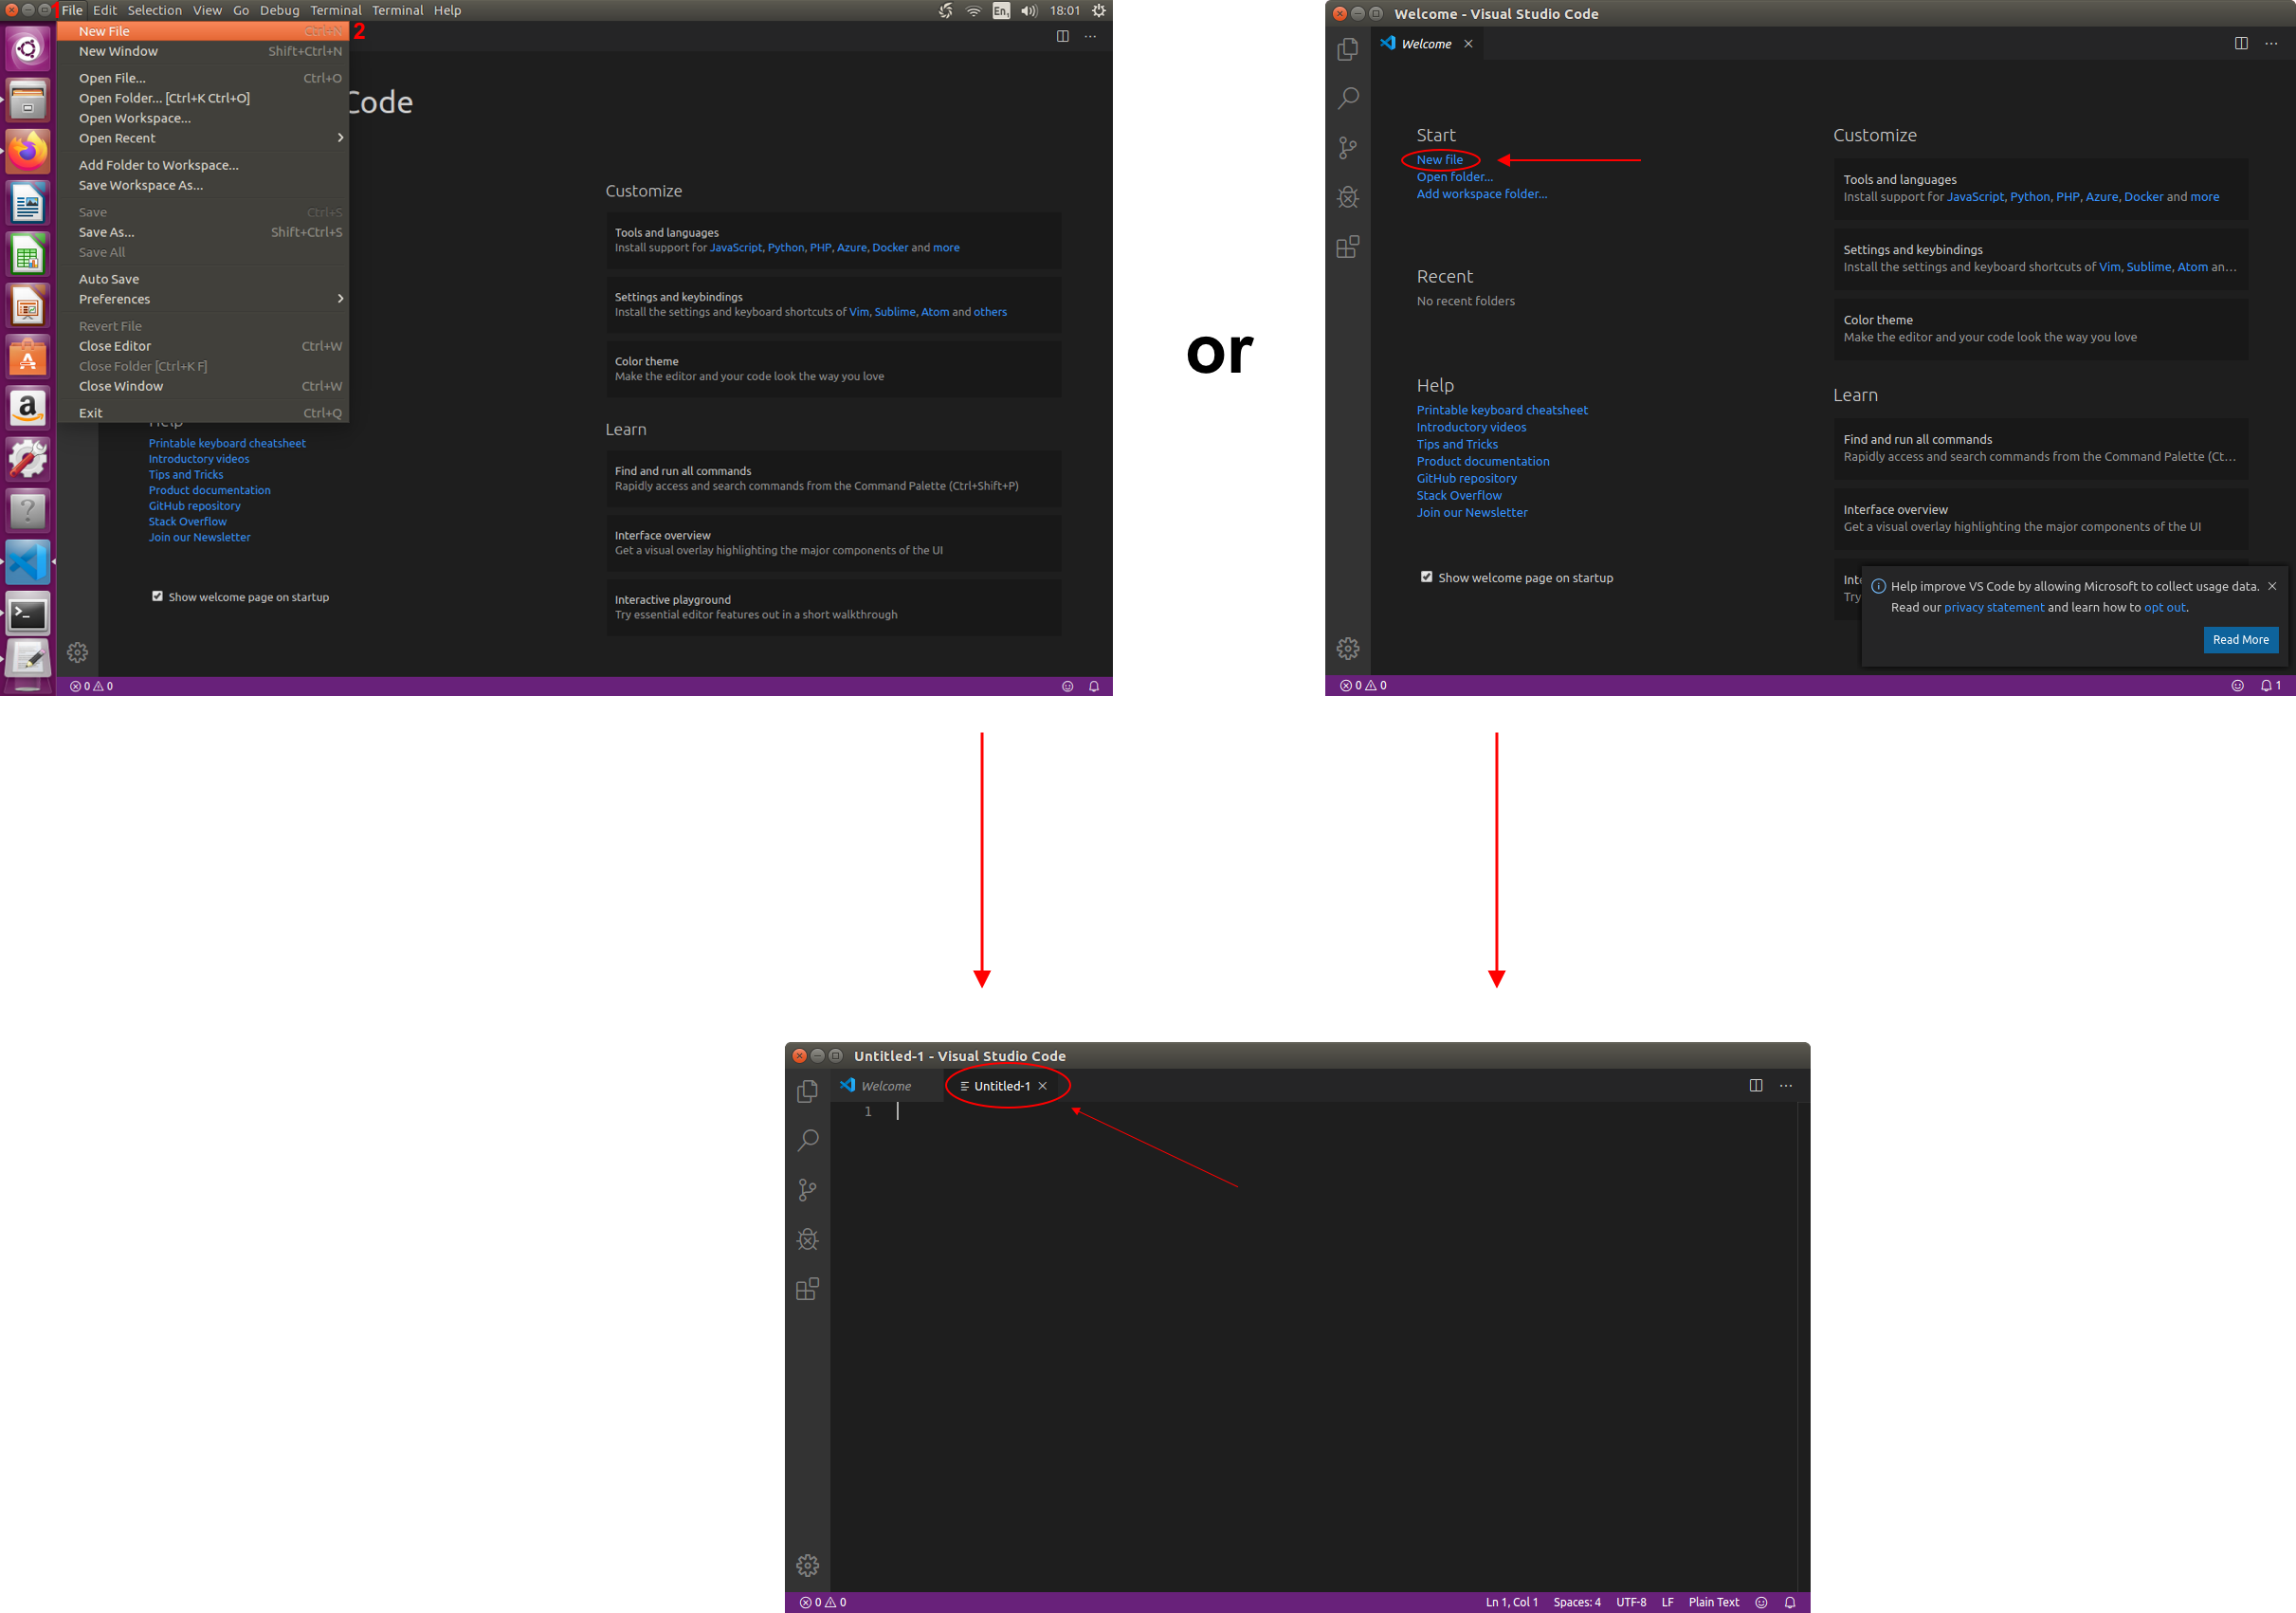
In order to write your Go application in VS Code, you must create a new file from the main screen. A new file can be created through File -> New File or select New File from the main screen.
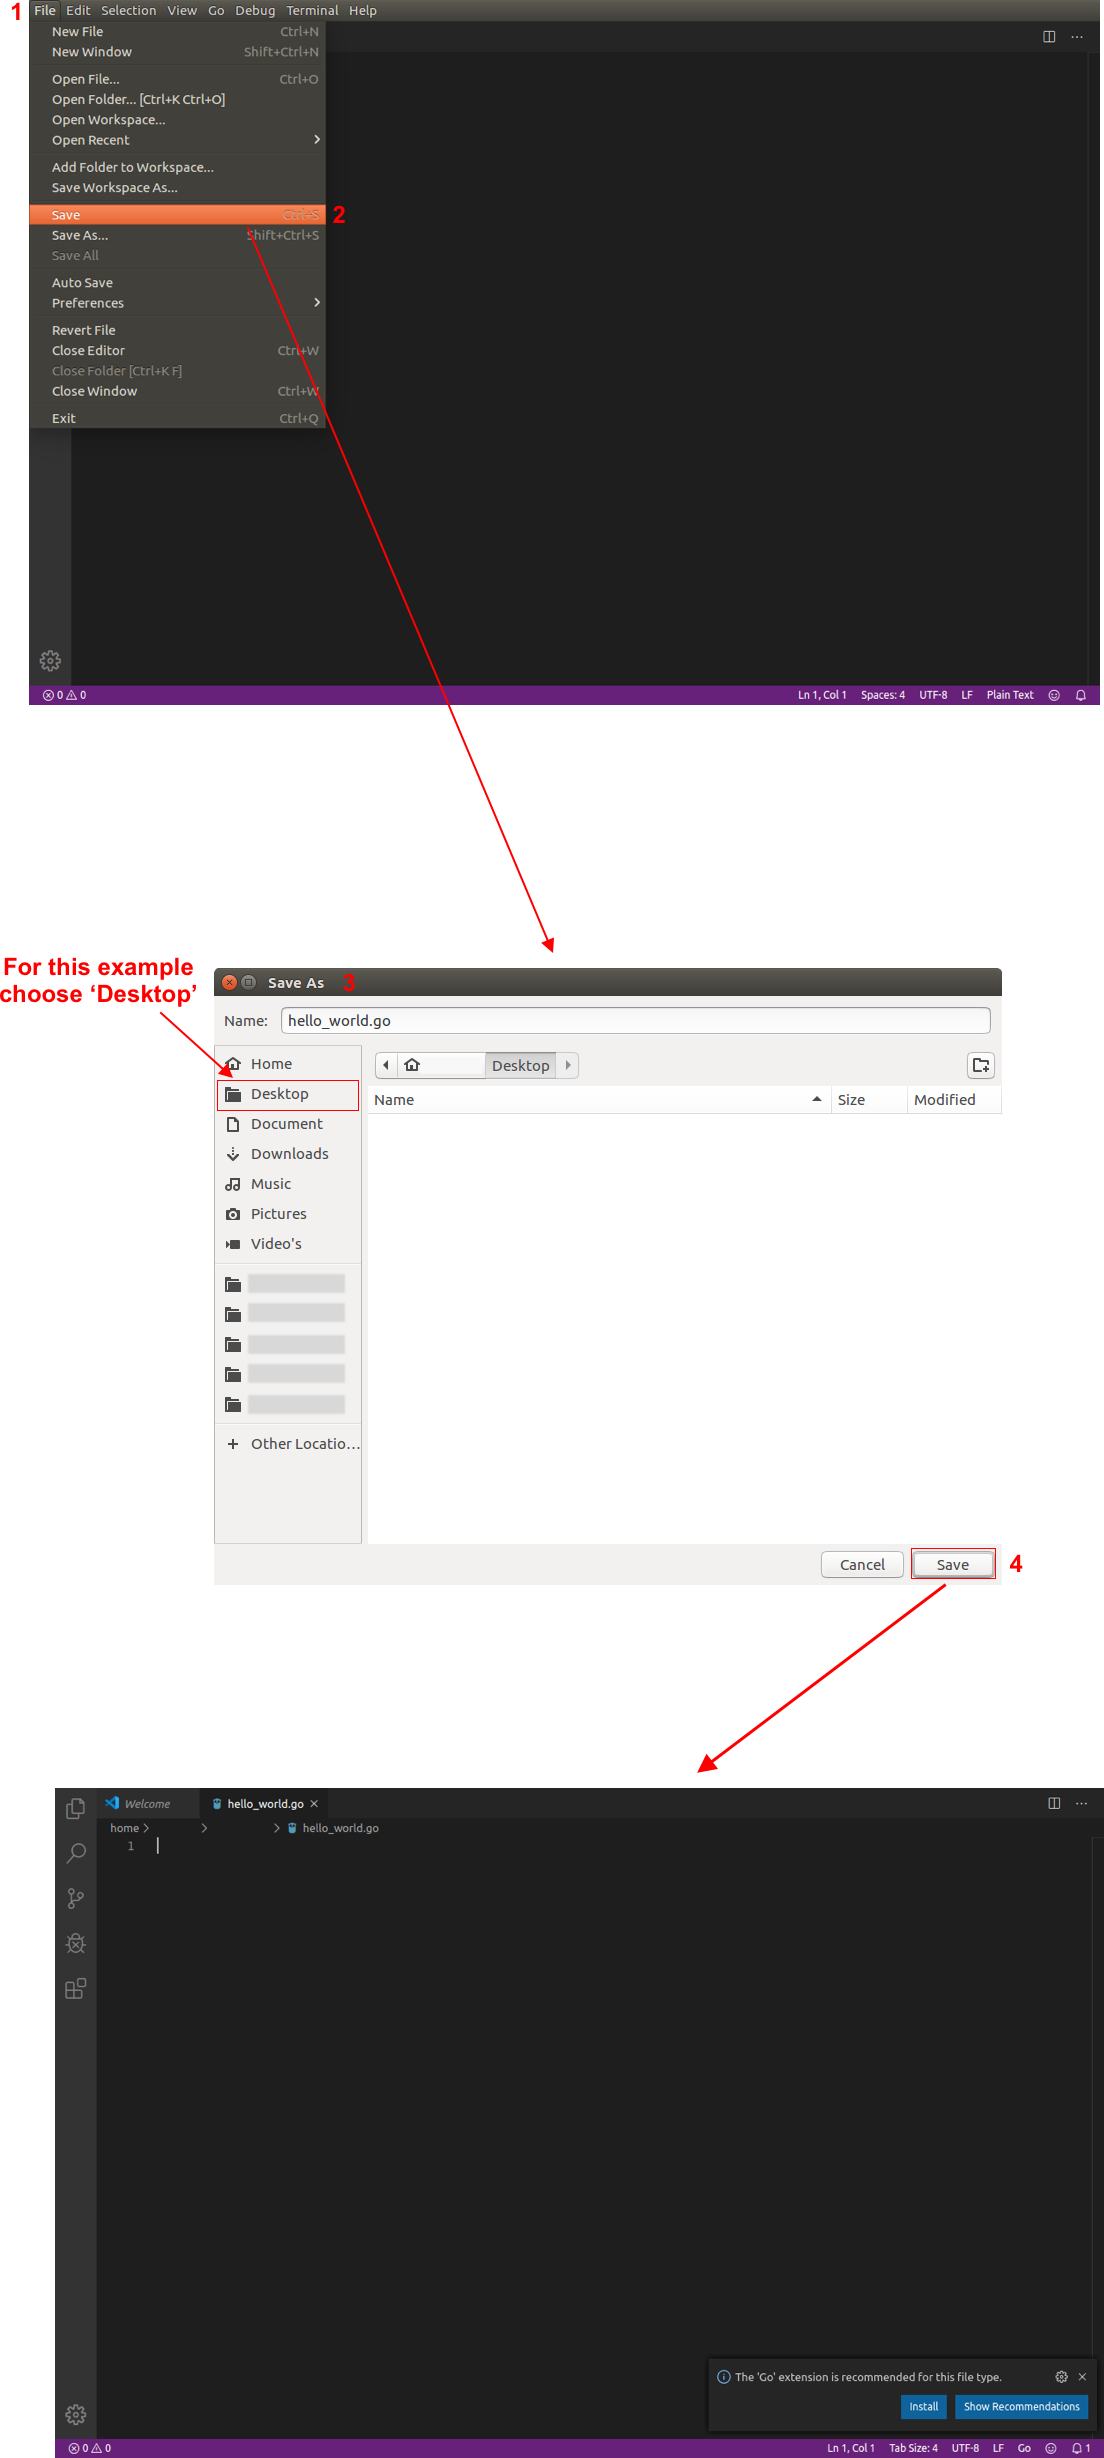
The newly created file is a blank file so you need to save it as a Go file. From the File menu select File -> Save and save it as .go file.
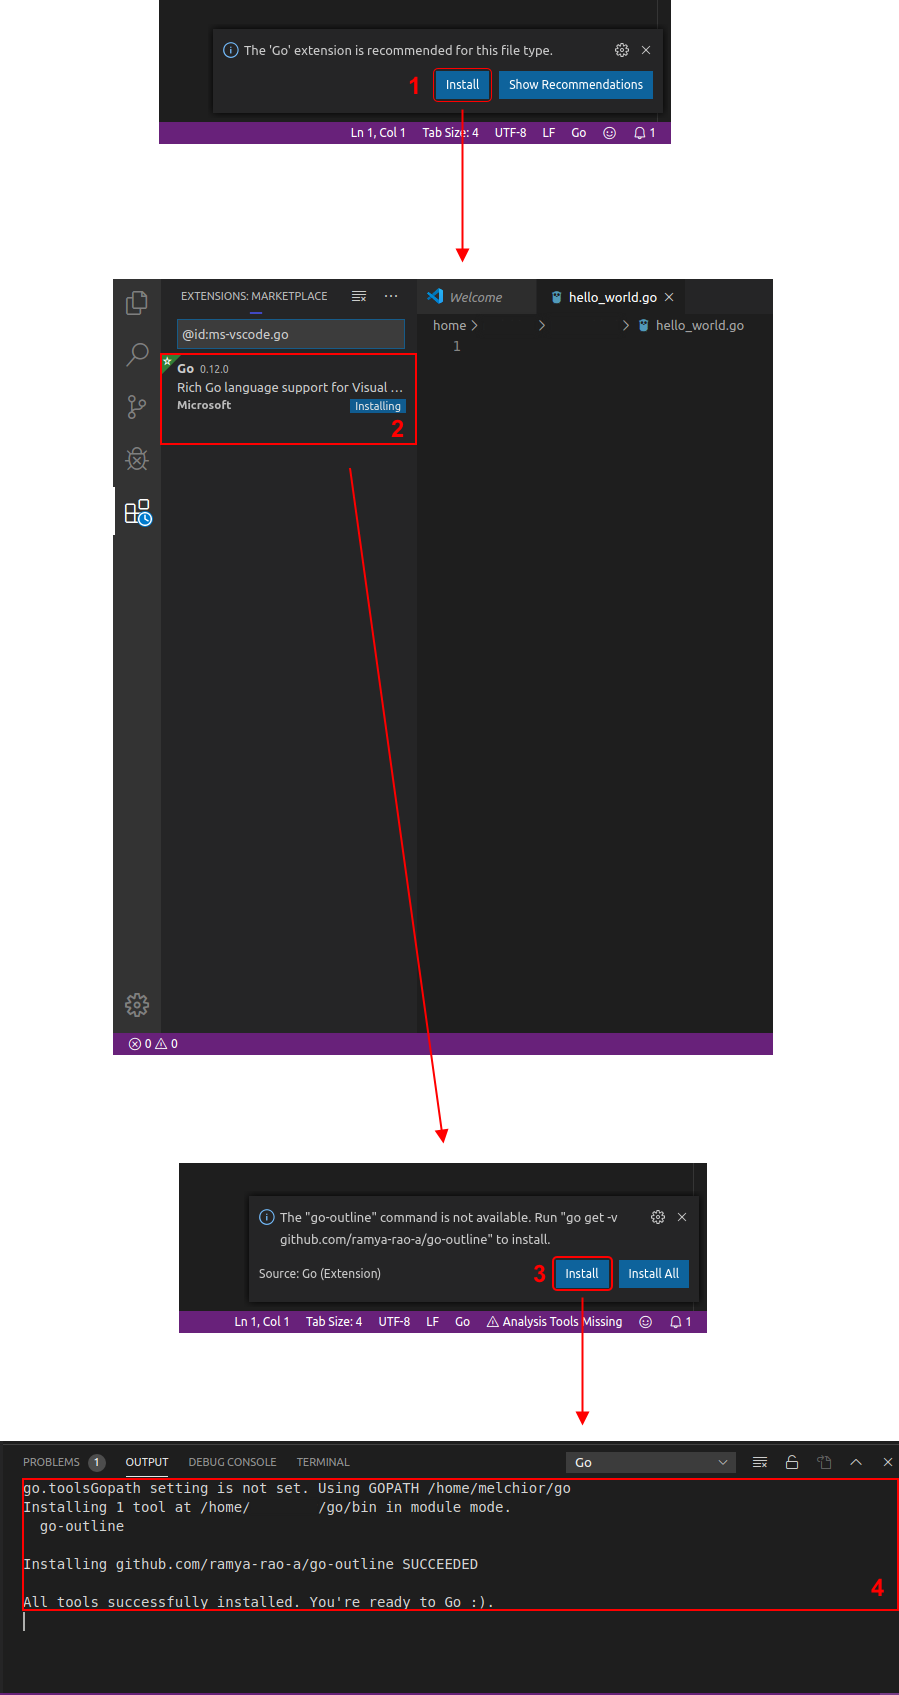
After creating your Go file, VS Code will be installing some additional extensions to fully support Go. These are the Go and Go-outline extensions.
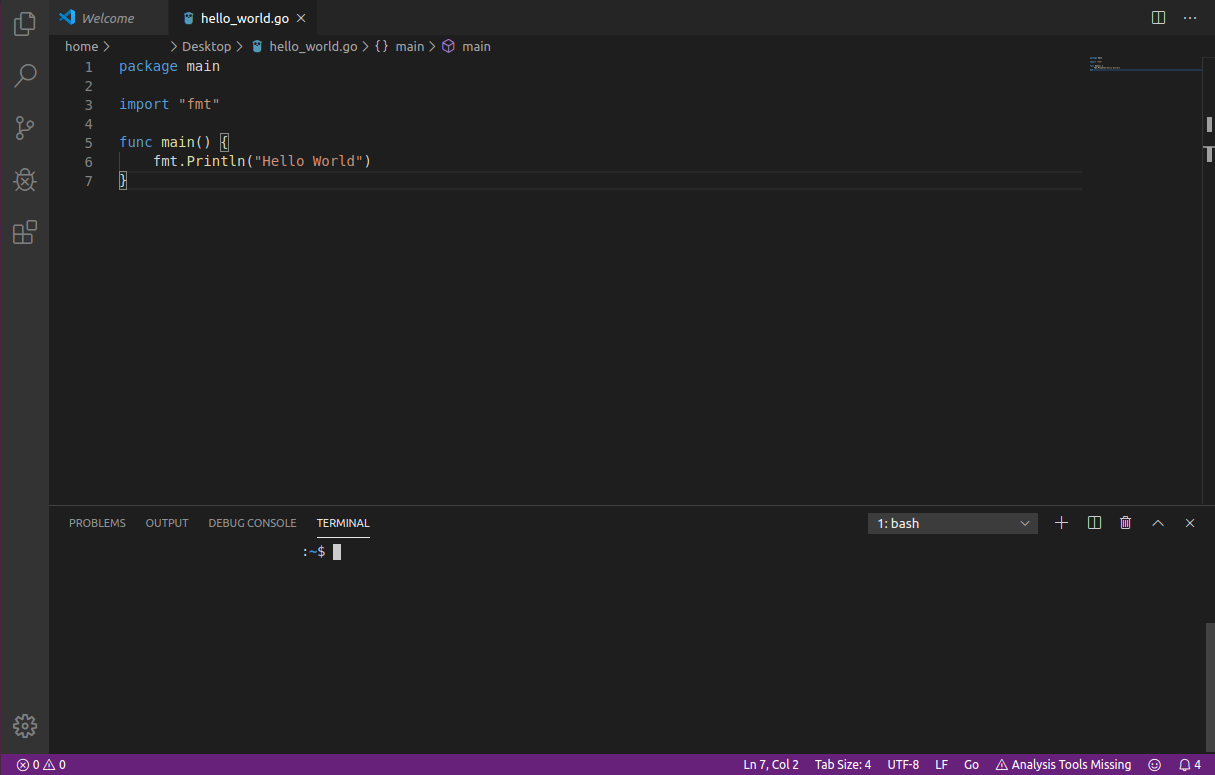
After installing these extensions, you are ready to start writing your Go application. Since the Go file is already open in VS Code, you can just start writing your Go code.
For this simple Hello World Go app write the following code:
package main

import “fmt”

func main() {
        fmt.Println(“Hello World”)
} 
More additional extension
Ones you finish writing your Go code, VS Code will ask you to install another additional extension, which is the goreturns extension. Click on Install and wait until the extension is completed.

Run your Go application in VS Code
To run your Go application, use the terminal in VS Code, if for some reason the terminal is not visible you can enable it through View -> Terminal or Ctrl+`. By default, the terminal will start in the Home directory. Since in this example we saved our Go application on the Desktop you need to enter the following command:
- cd Desktop (Navigation to Desktop from the home directory)
- go run hello_world.go (run your Go application)

Atom

Atom is an open-source text and code editor with several open-source plugins (known as packages) and it comes with a Git and GitHub already preinstalled by default. Most of the available packages are free of charge since they are developed and maintained by community developers. Atom is fully customizable through HTML, CSS, and JavaScript.
This code editor has several terminal packages, but in this example, we are going to use terminal-tab.
Golang support
Atom by default automatically detects Golang when it is installed on your machine. No additional plugin installation is required.
Installation
Installing Atom on your mac starts by downloading the .deb file from the official website.
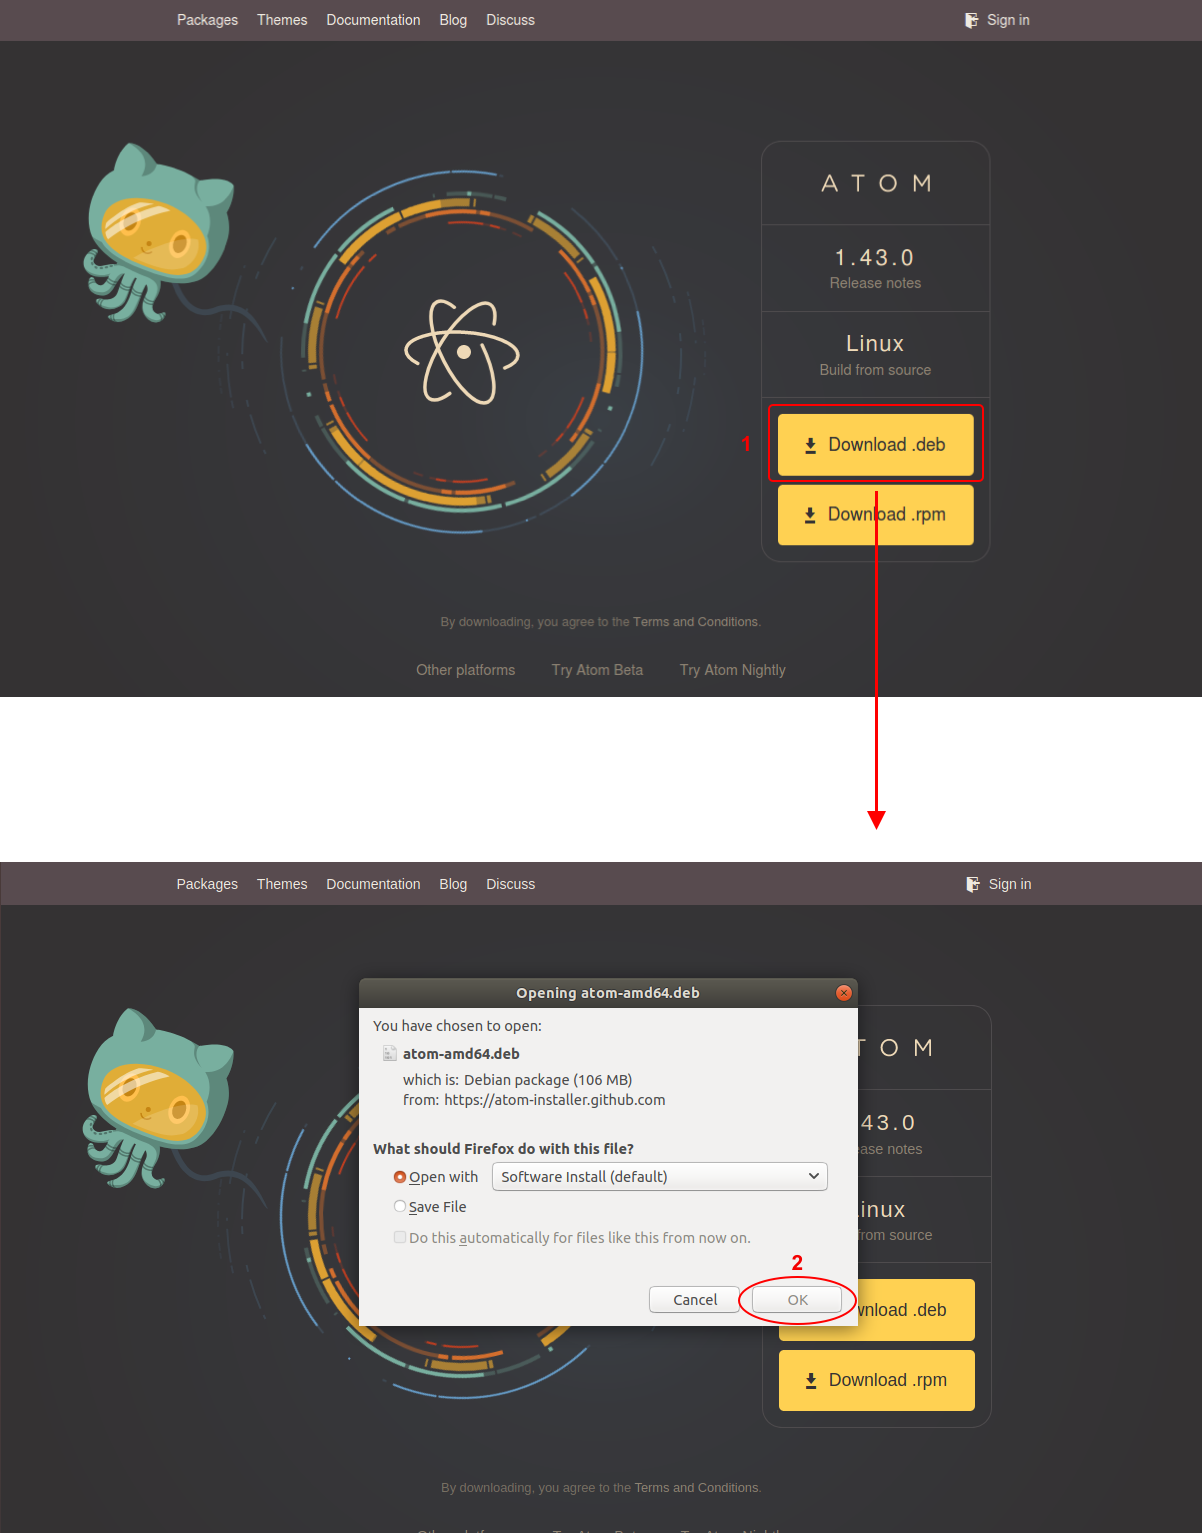
Ones the download is completed, Ubuntu will automatically open the Ubuntu software asking you for permission in order to proceed with the installation.
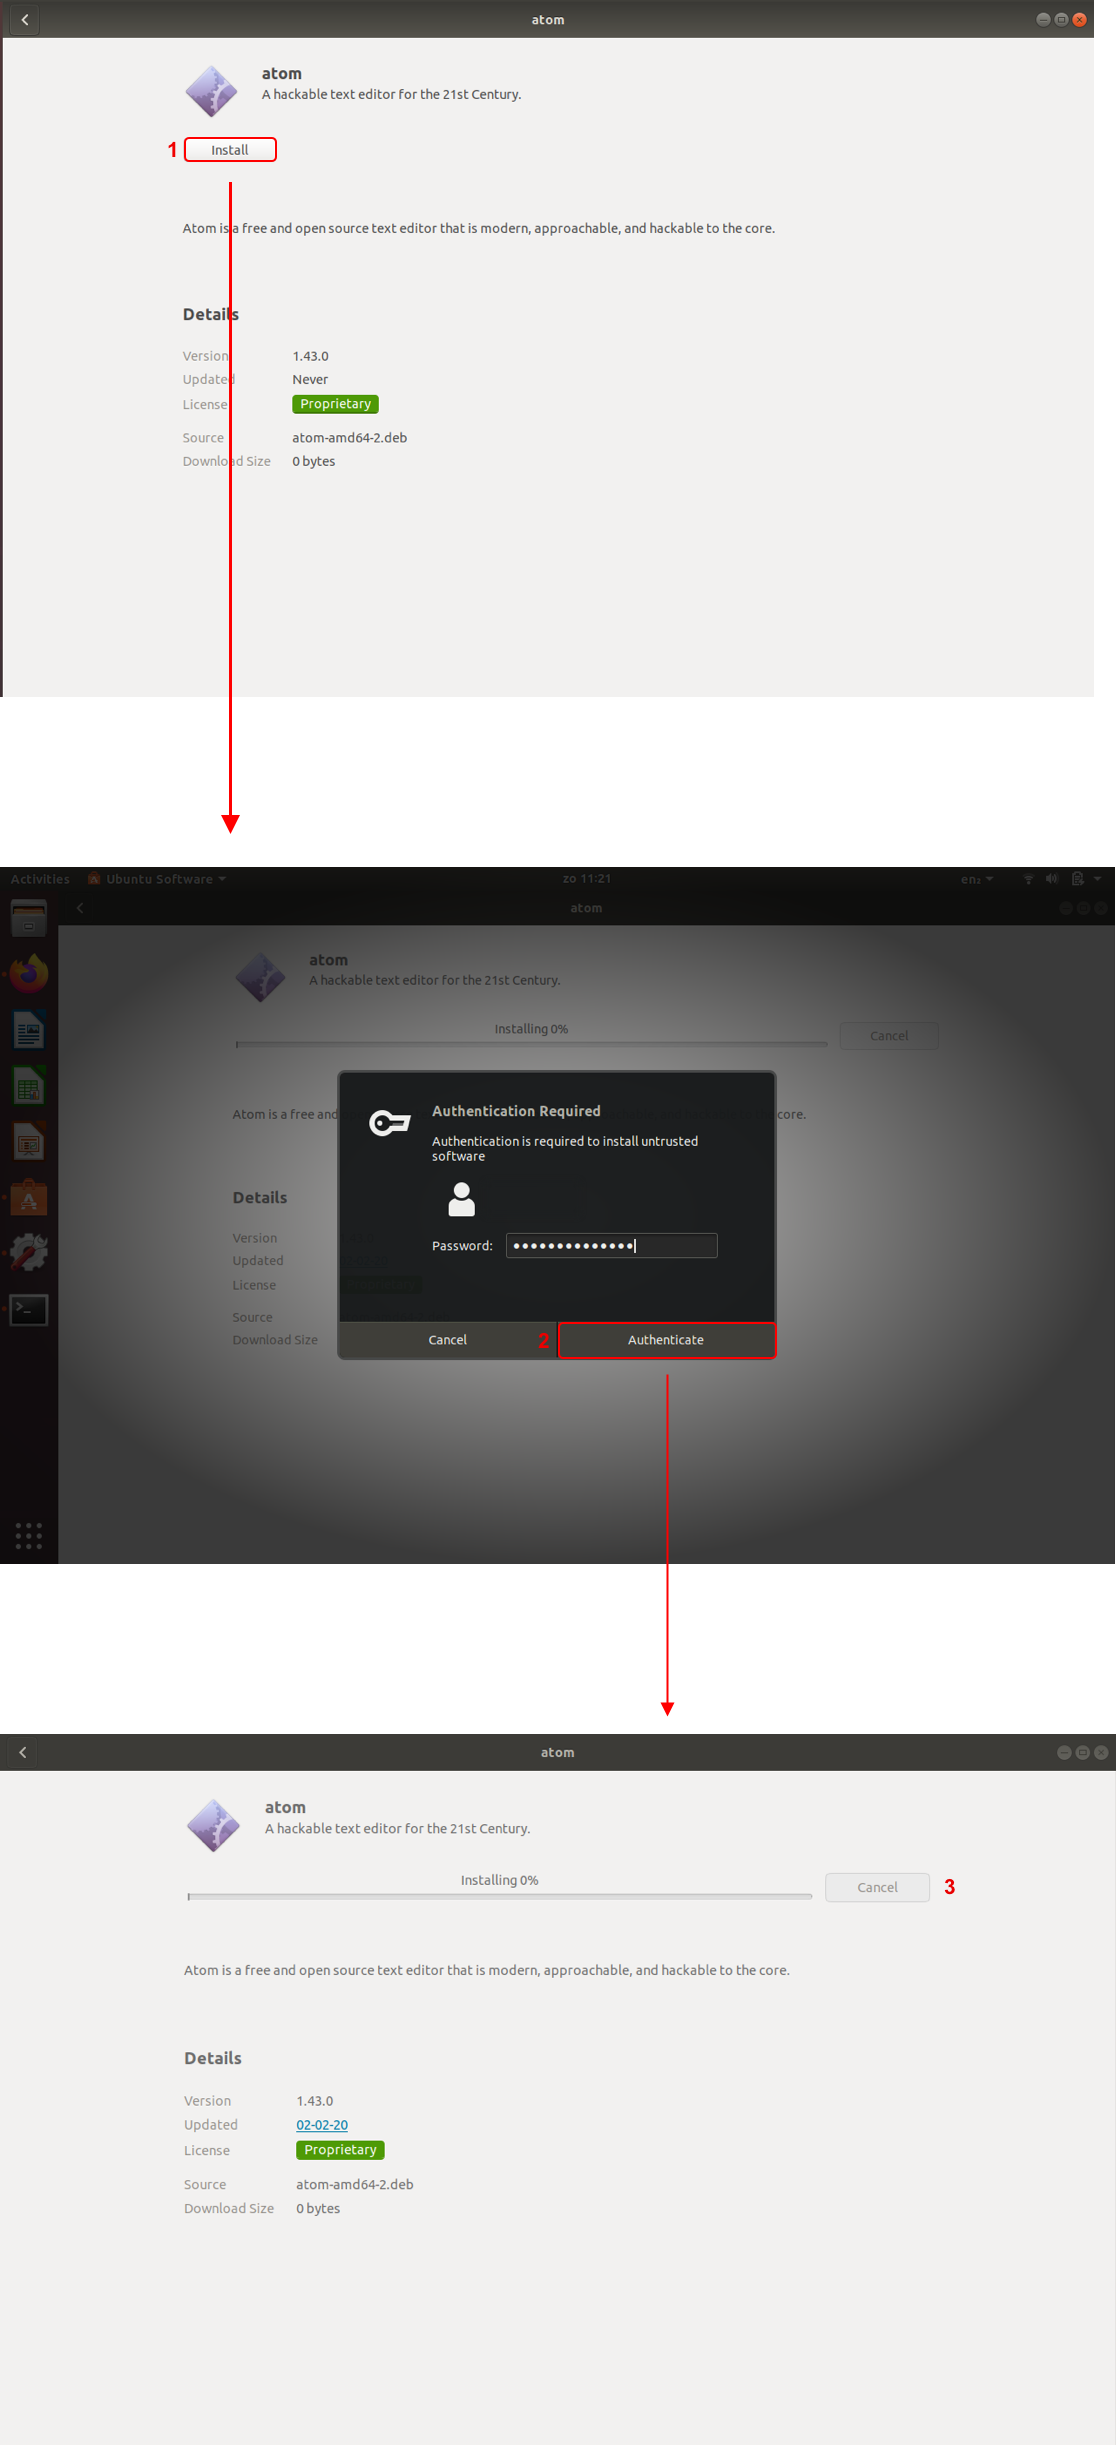
After the installer finishes installing Atom it will appear in applications.

Launching Atom
Launching Atom is just a matter of double-clicking it in Application and the Atom main window will appear.
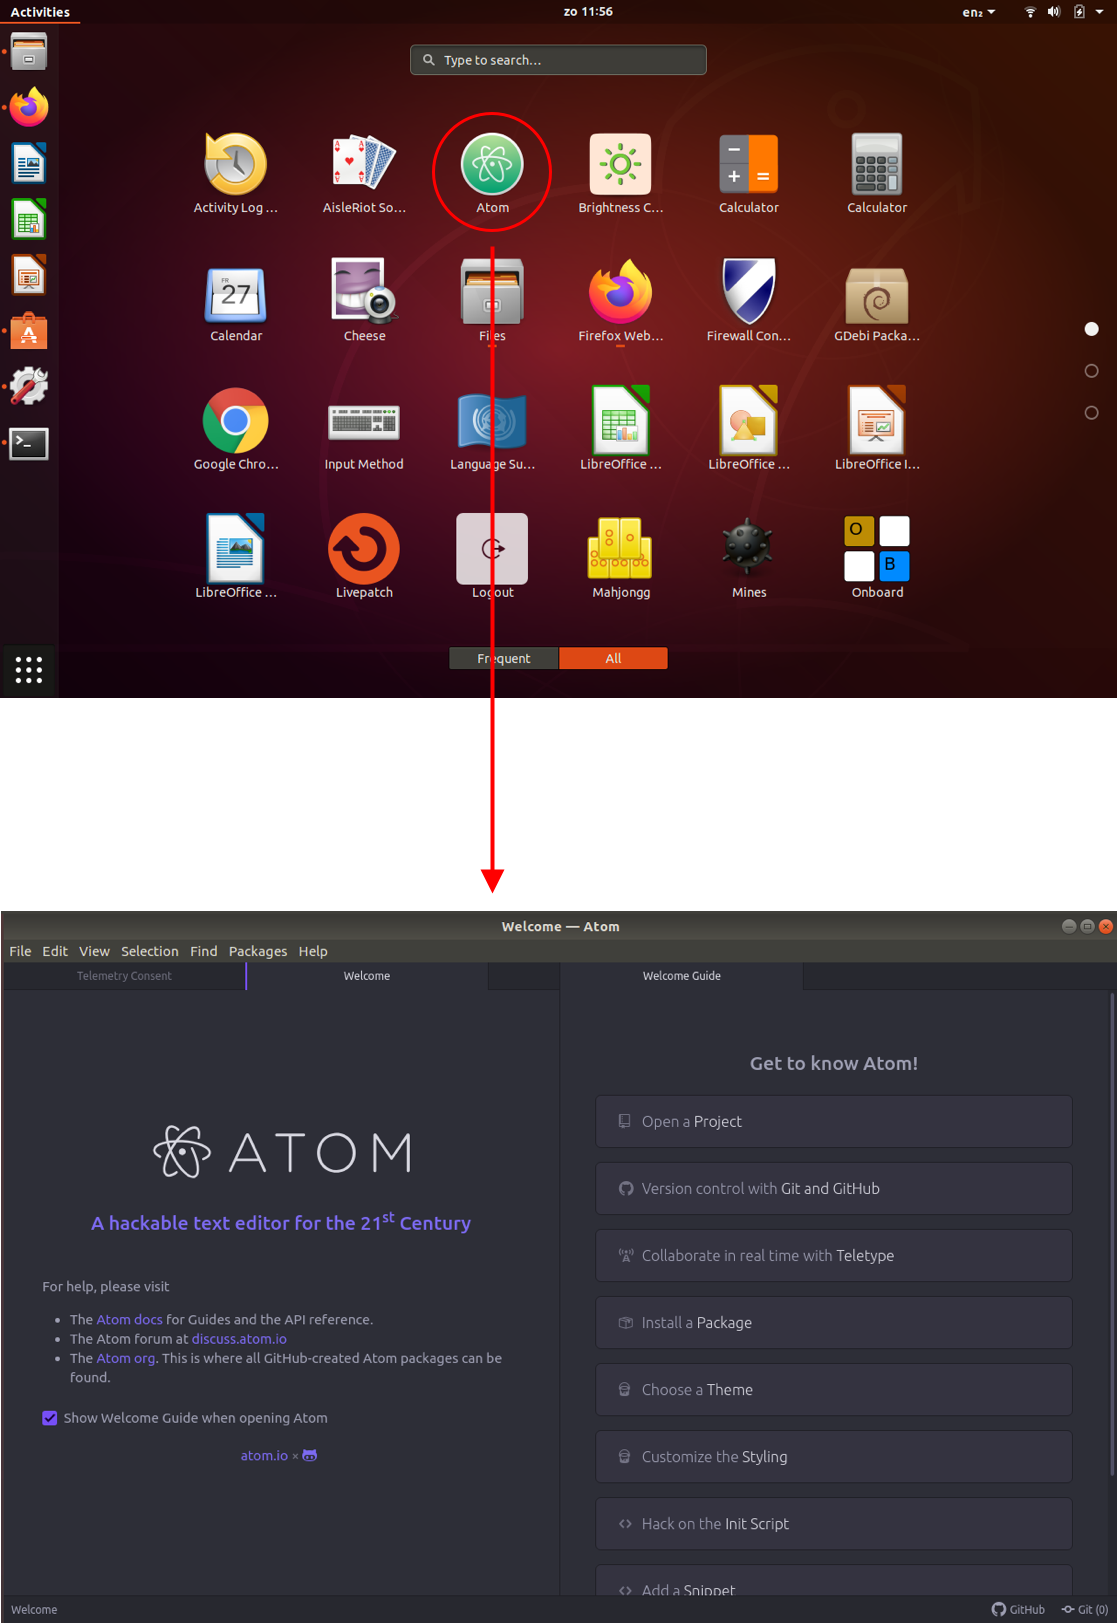
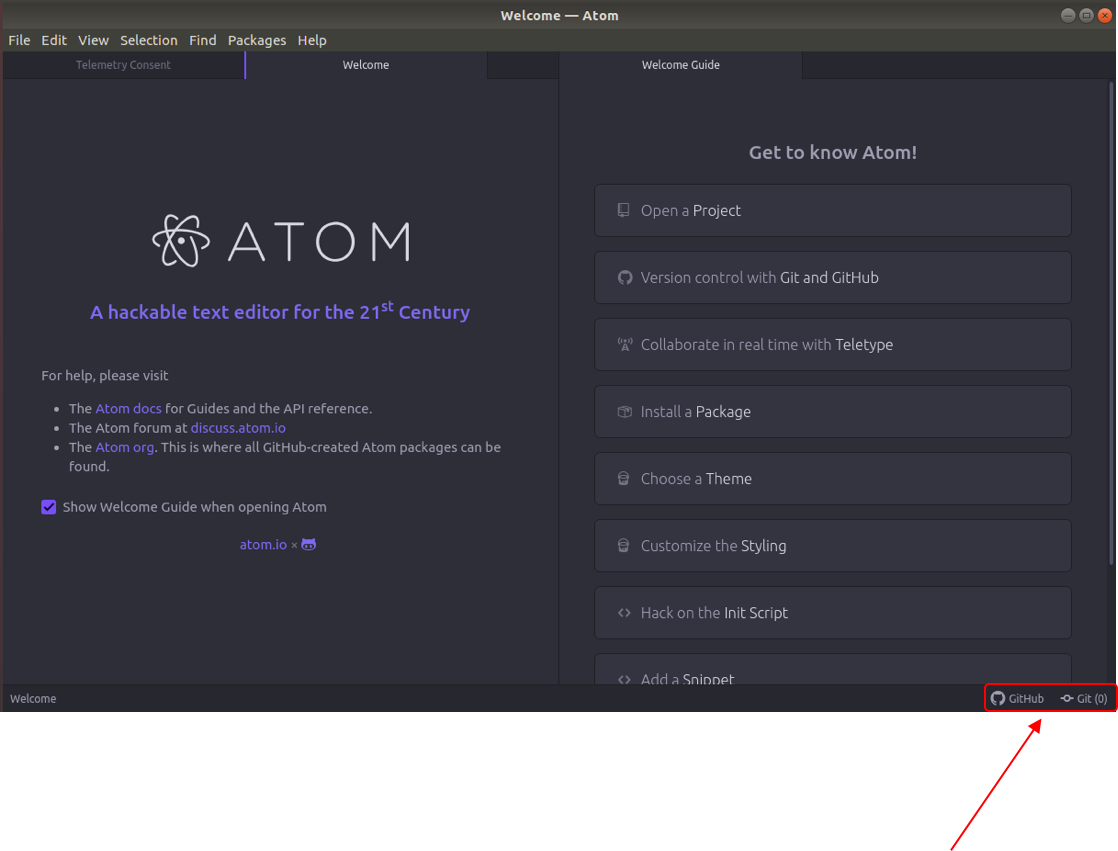
As you can see on the main screen of the Application, Git and GitHub appear at the bottom right of the screen.
Enable Terminal in Atom
For a better programming experience, it highly recommended installing the Terminal package in Atom. So, you can just run your Go code in Atom without switching to the terminal each time. In this example, we are going to install the package terminal-tab developed by jsmecham. Select the Install a Package option on the application main screen and the install package window will appear.
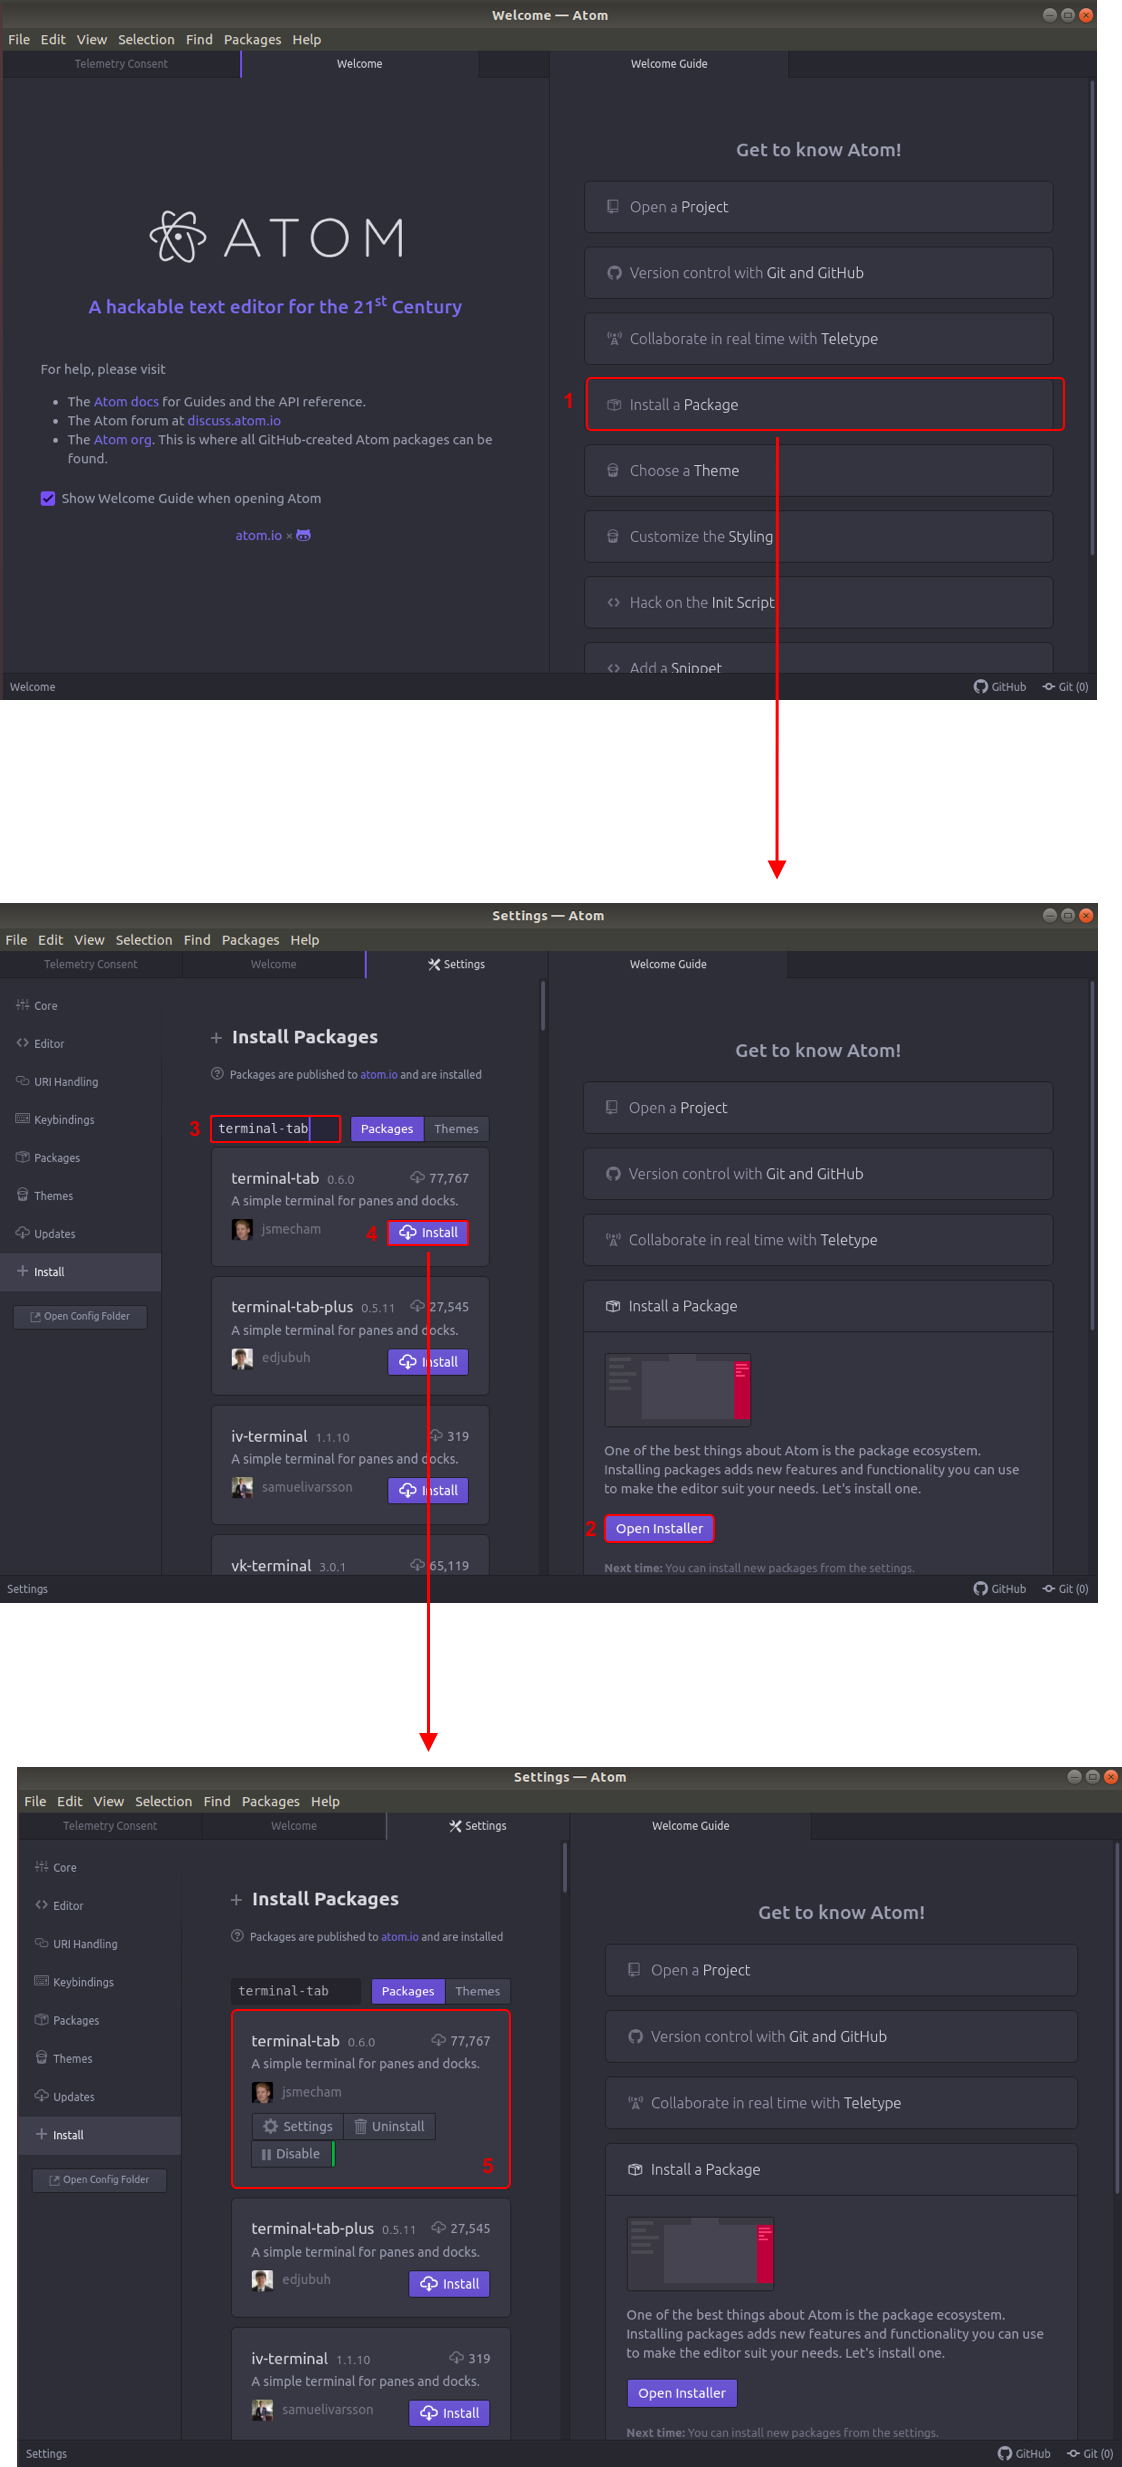
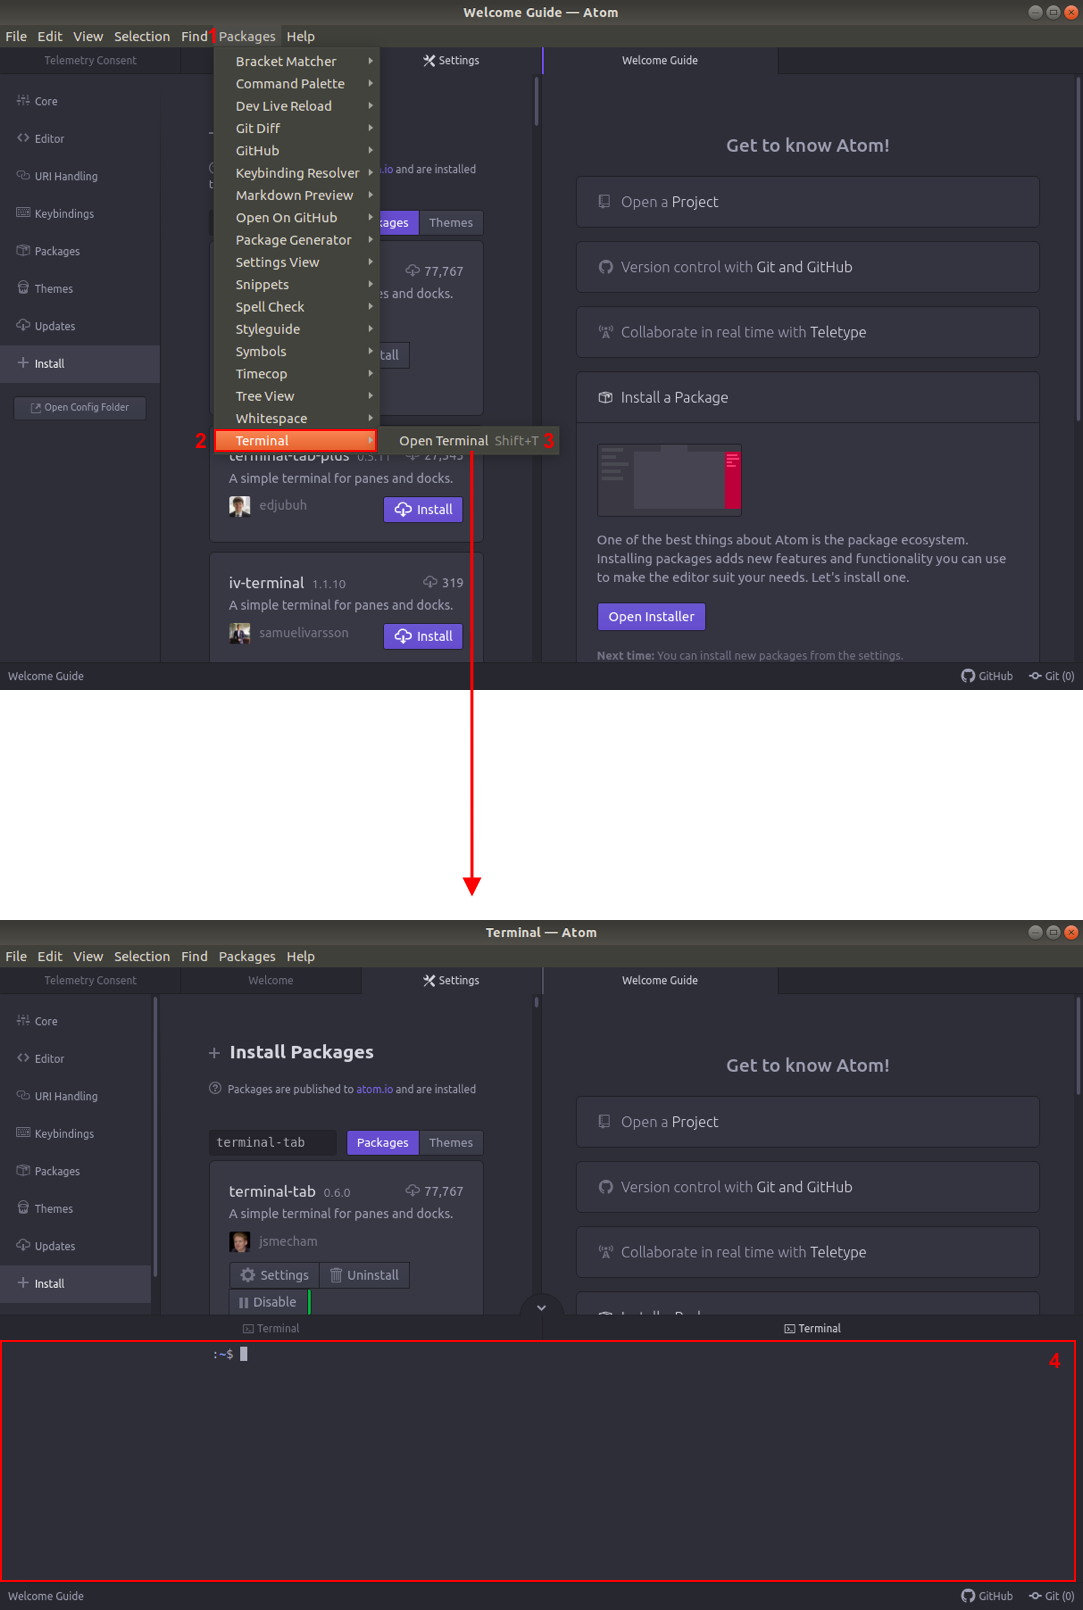
To view the terminal in Atom just go to packages -> Terminal or by pressing shift+T and it will appear in the application.
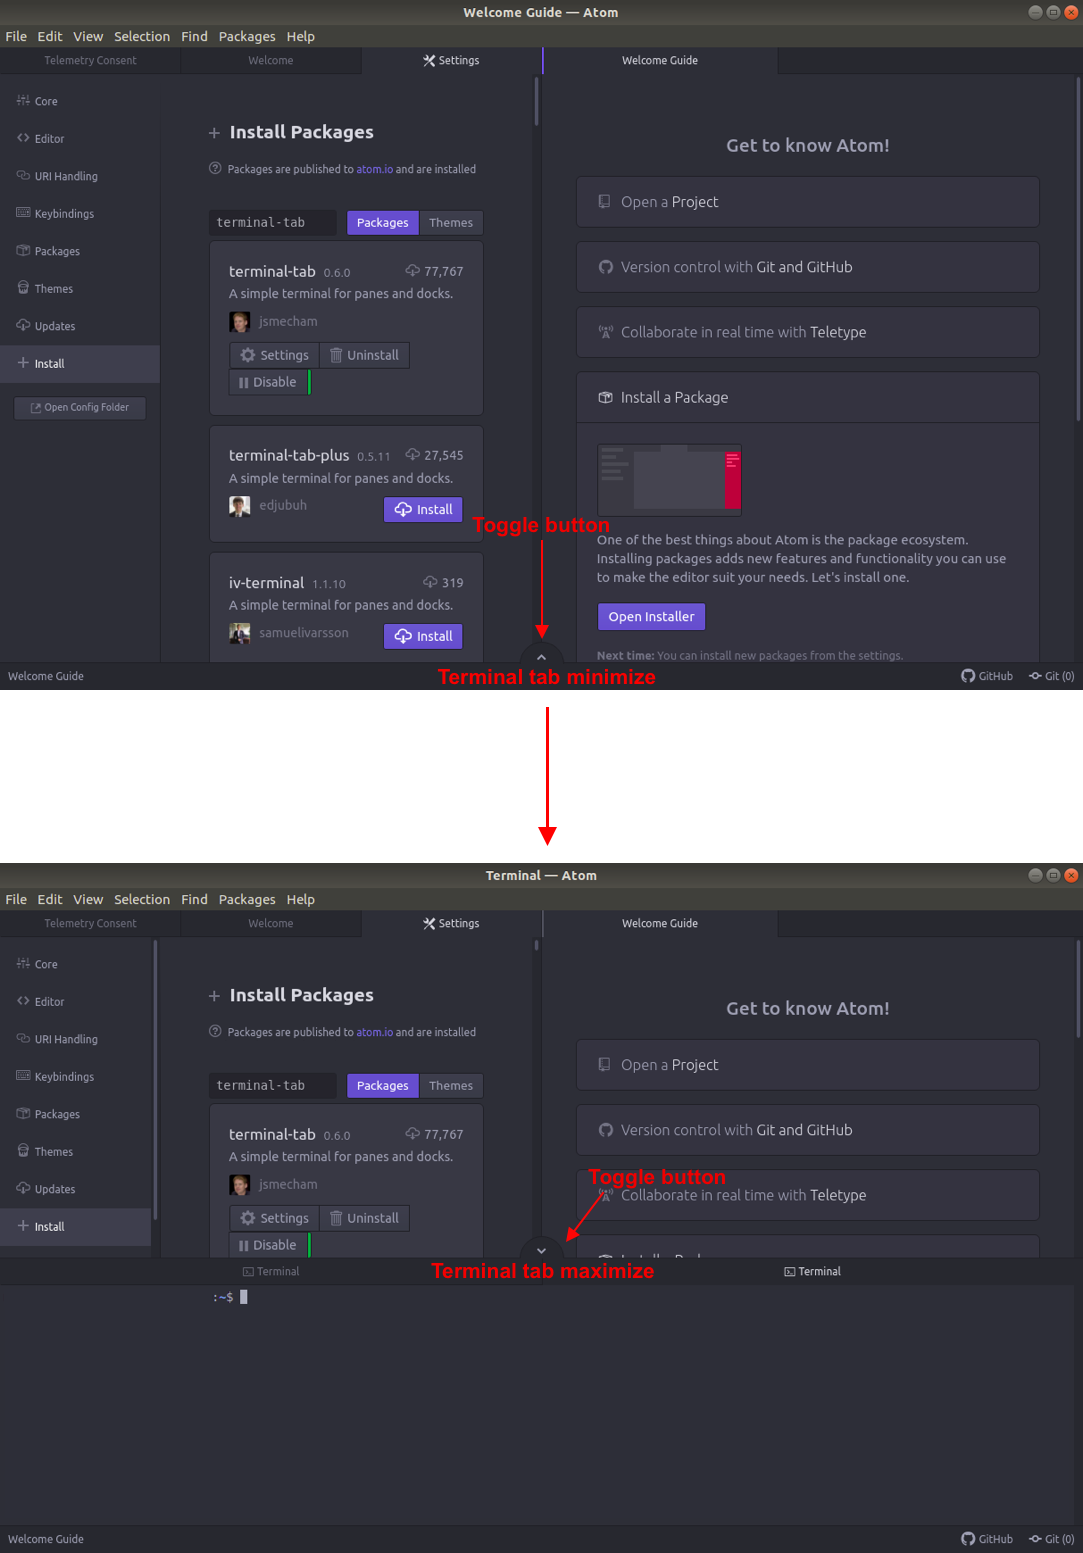
Minimize and maximize terminal in Atom
Ones the terminal appears visible it has visibility toggle button at the top of the terminal tab. This makes it easier for you as a developer to minimize and maximize the terminal in Atom.
For more information and documentation about the terminal-tab, see terminal-tab documentation.
Writing your first Go app using Atom
Just like the example, we did with VS Code we are going to write a simple Hello World Go application using Atom. We will start off by creating a new file by selecting File -> New File and a blank file will be created.
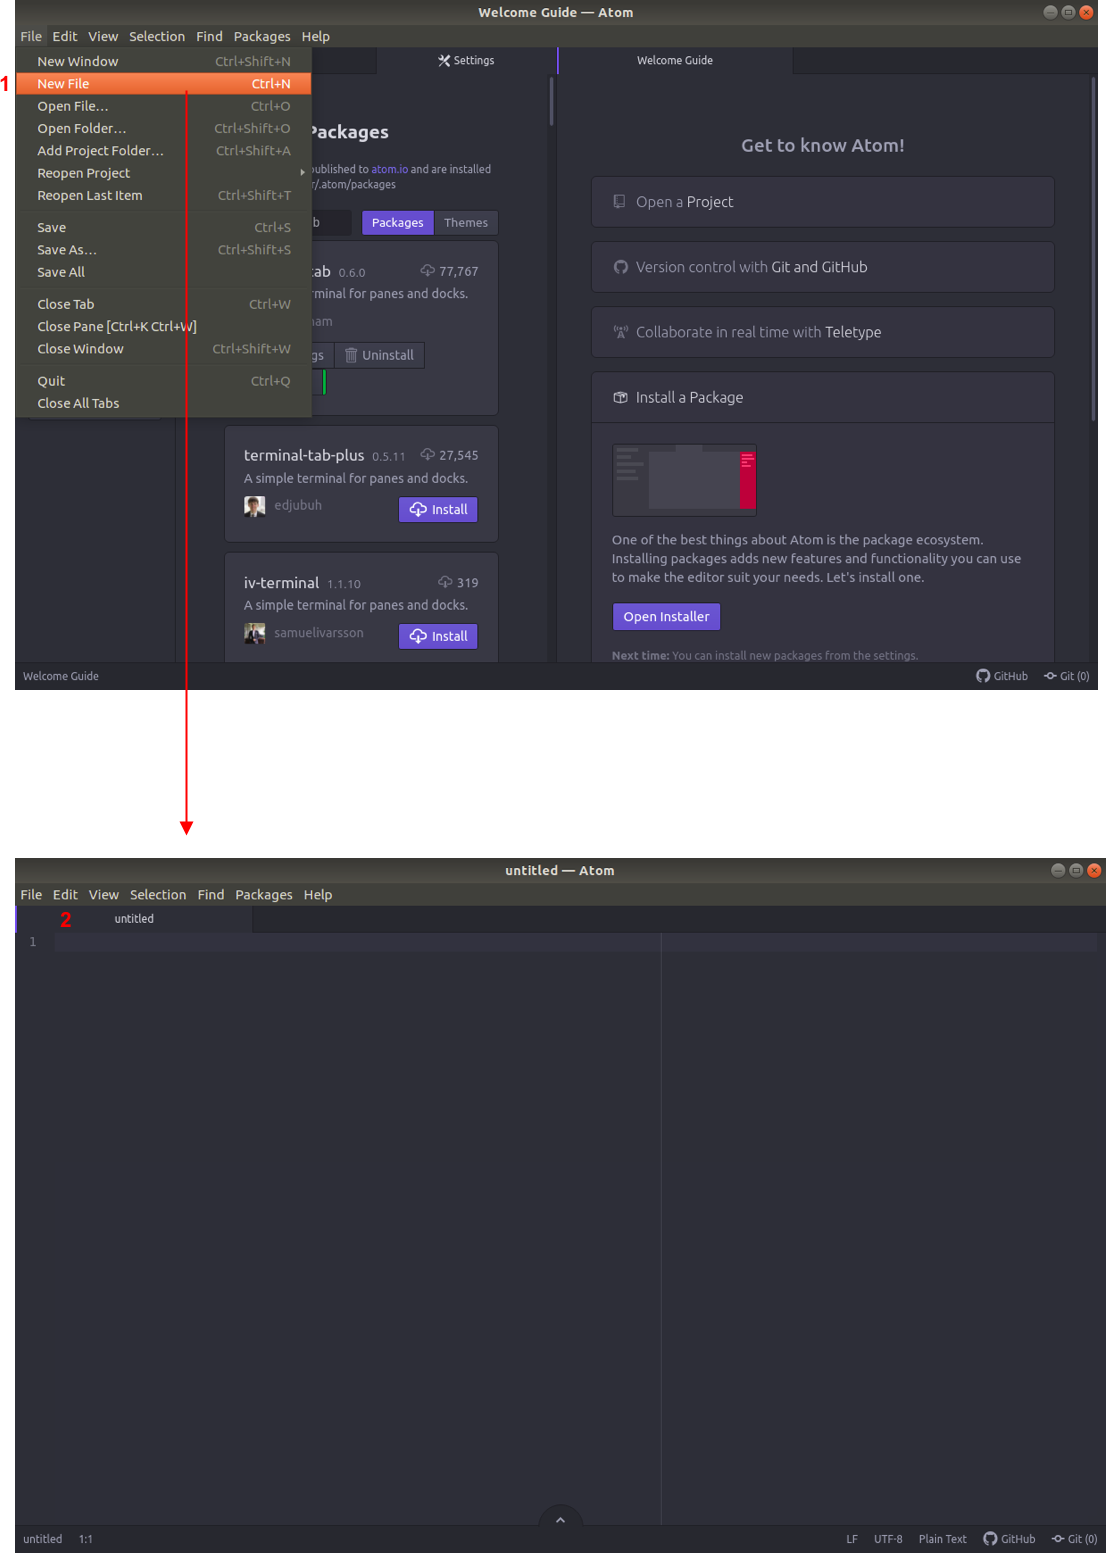
Since the newly created file is a blank file, you need to save it as a Golang file so Atom can recognize it as a Go file. Just proceed with the following File -> Save and save it with the .go extension.
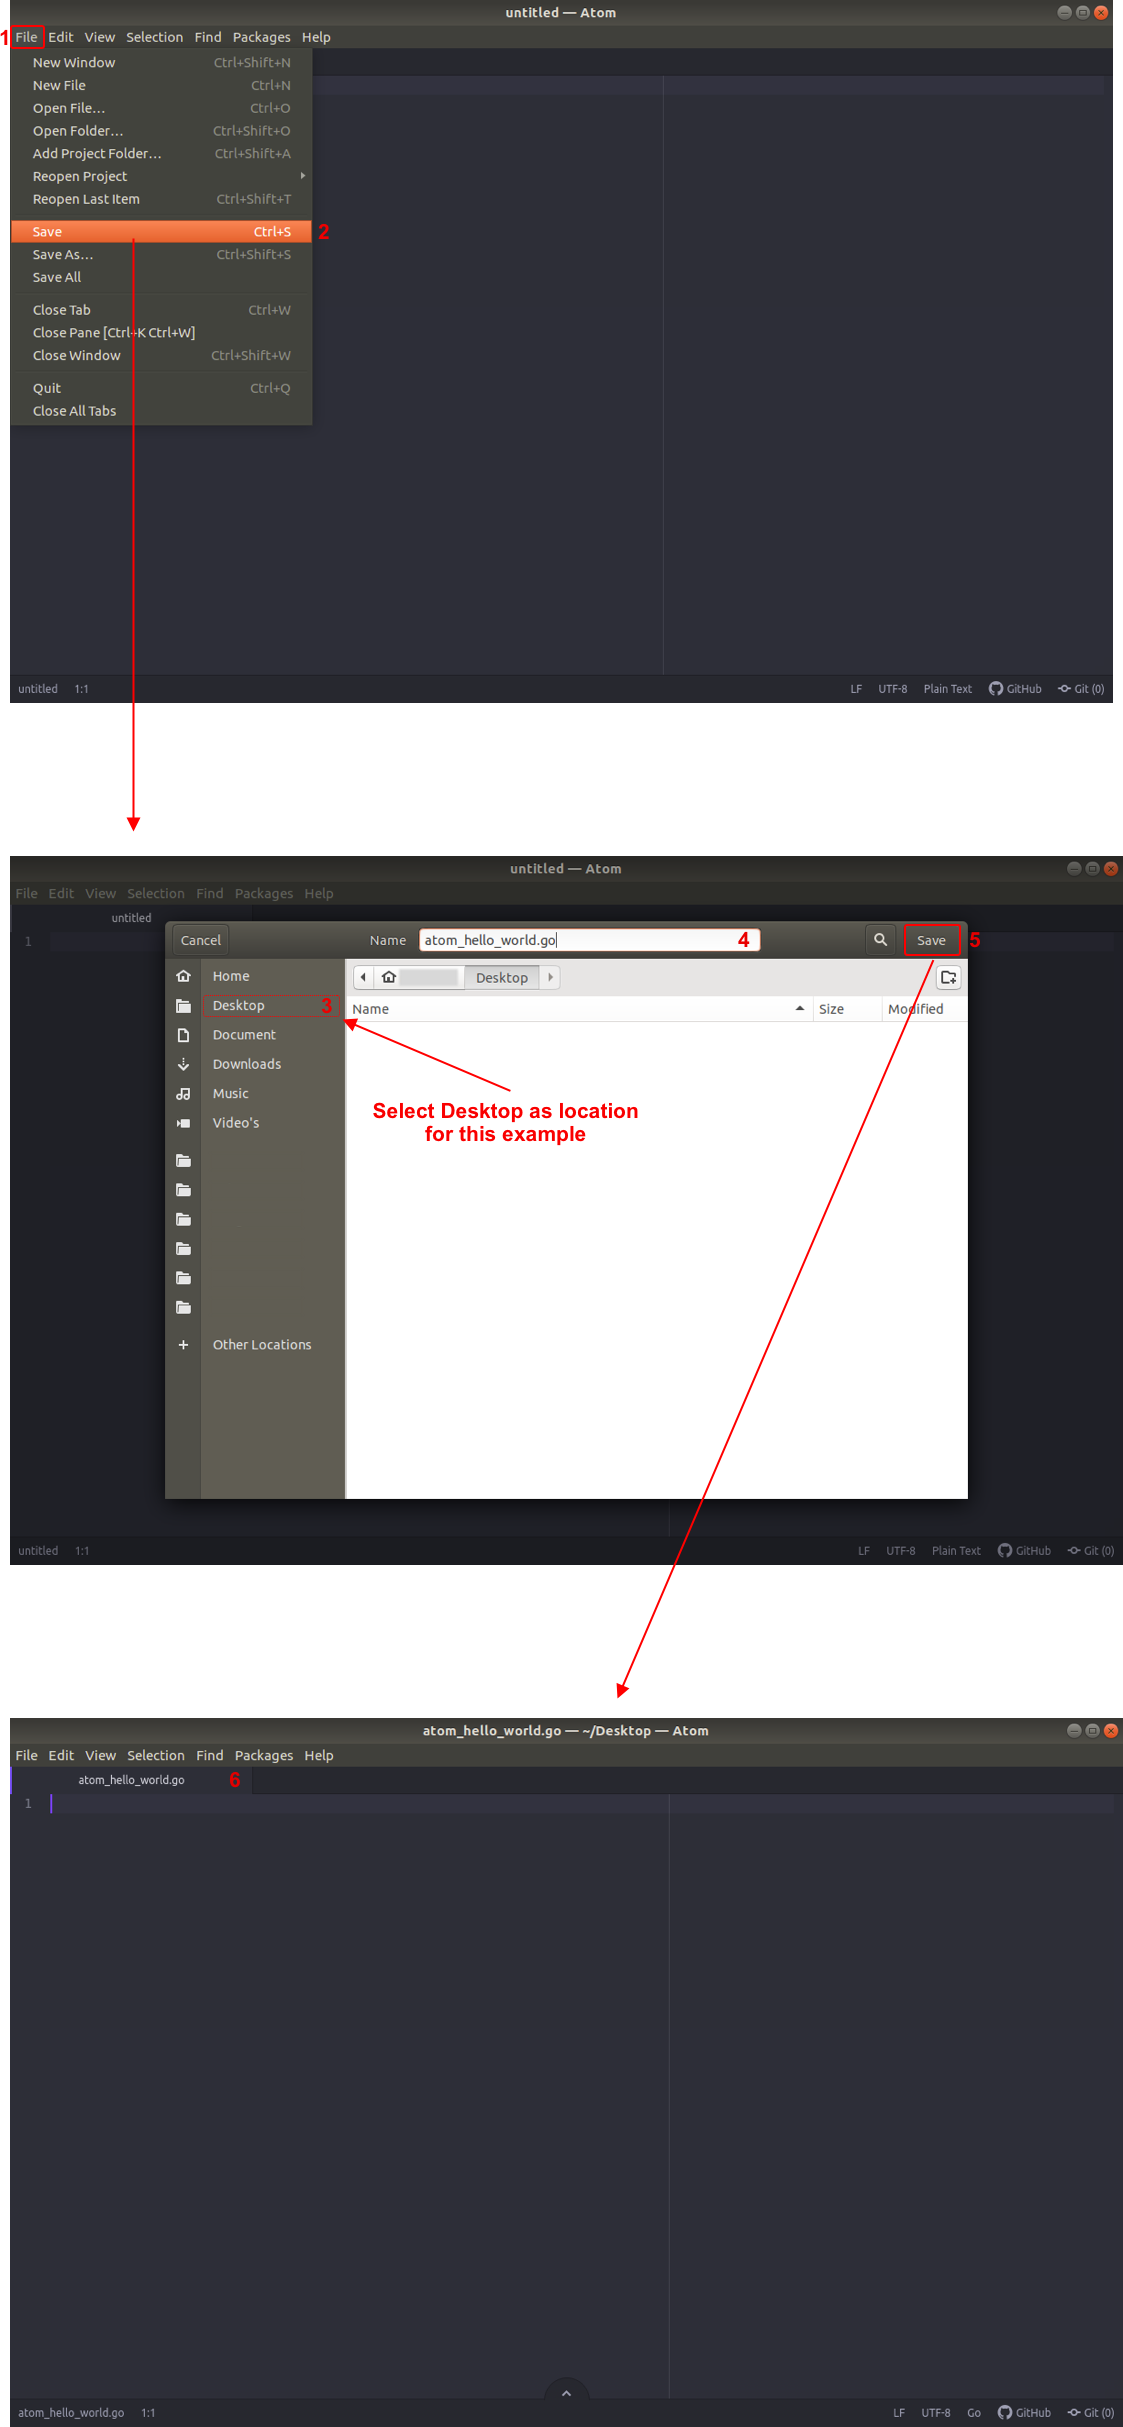
Writing your ‘Hello World‘ Go code in Atom
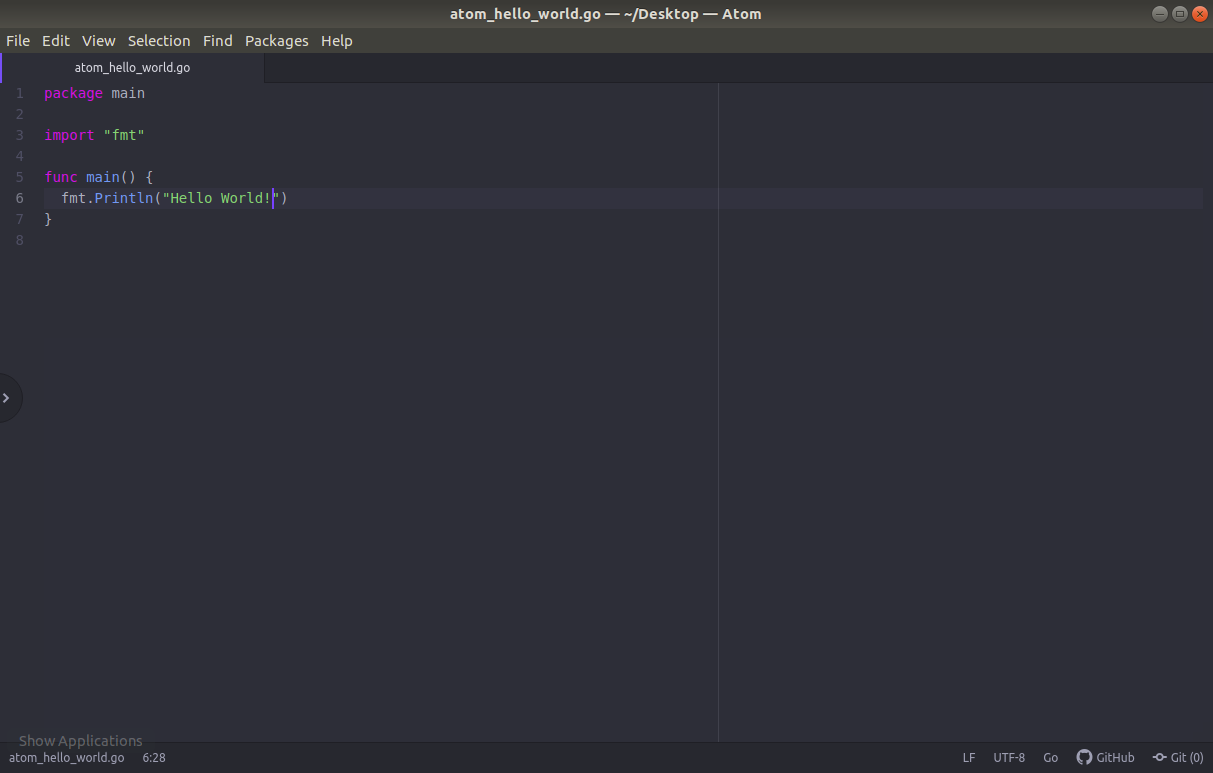
For the simple Hello World app just write the following code:
package main

import “fmt”

func main() {
        fmt.Println(“Hello World!”)
} 
Running your ‘Hello World’ app code using Atom
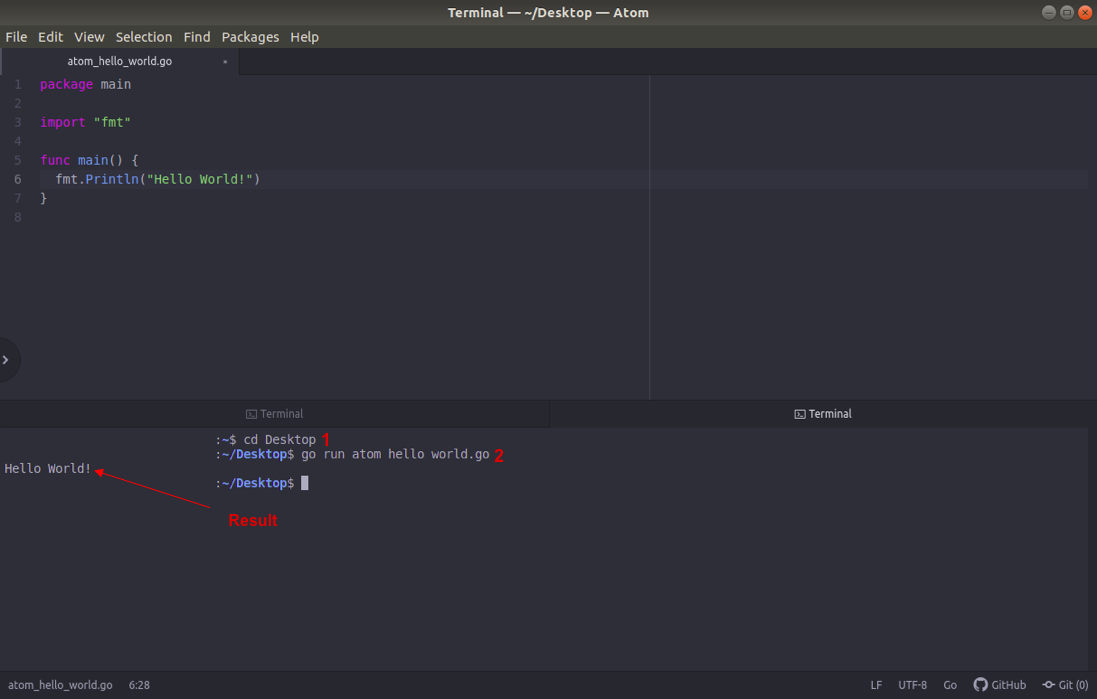
Now comes the moment were the terminal tab becomes handy. The terminal starts in the Home directory and since our Go app is saved on our Desktop, we need to navigate to Desktop. In order to run this app just open the terminal tab and run the following command:
- cd Desktop
- go run atom_hello_world.go
Sublime Text 3

Sublime Text 3 is a code editor with a Python application Interface (API). It supports many programming languages and markup languages, and in addition to that, functions and plugins can be added. All these plugins are community-built and maintained under free-software licenses. In Sublime Text 3 comes with a built-in Git feature which allows you to track changes without leaving the code editor.
Golang plugin
Sublime text 3 also has a Golang support package that can be installed using package control. Ones this package is installed you are all set and can start developing your own Go applications using Sublime Text 3.
Installation
Sublime Text 3 is can be downloaded directly from the official website.
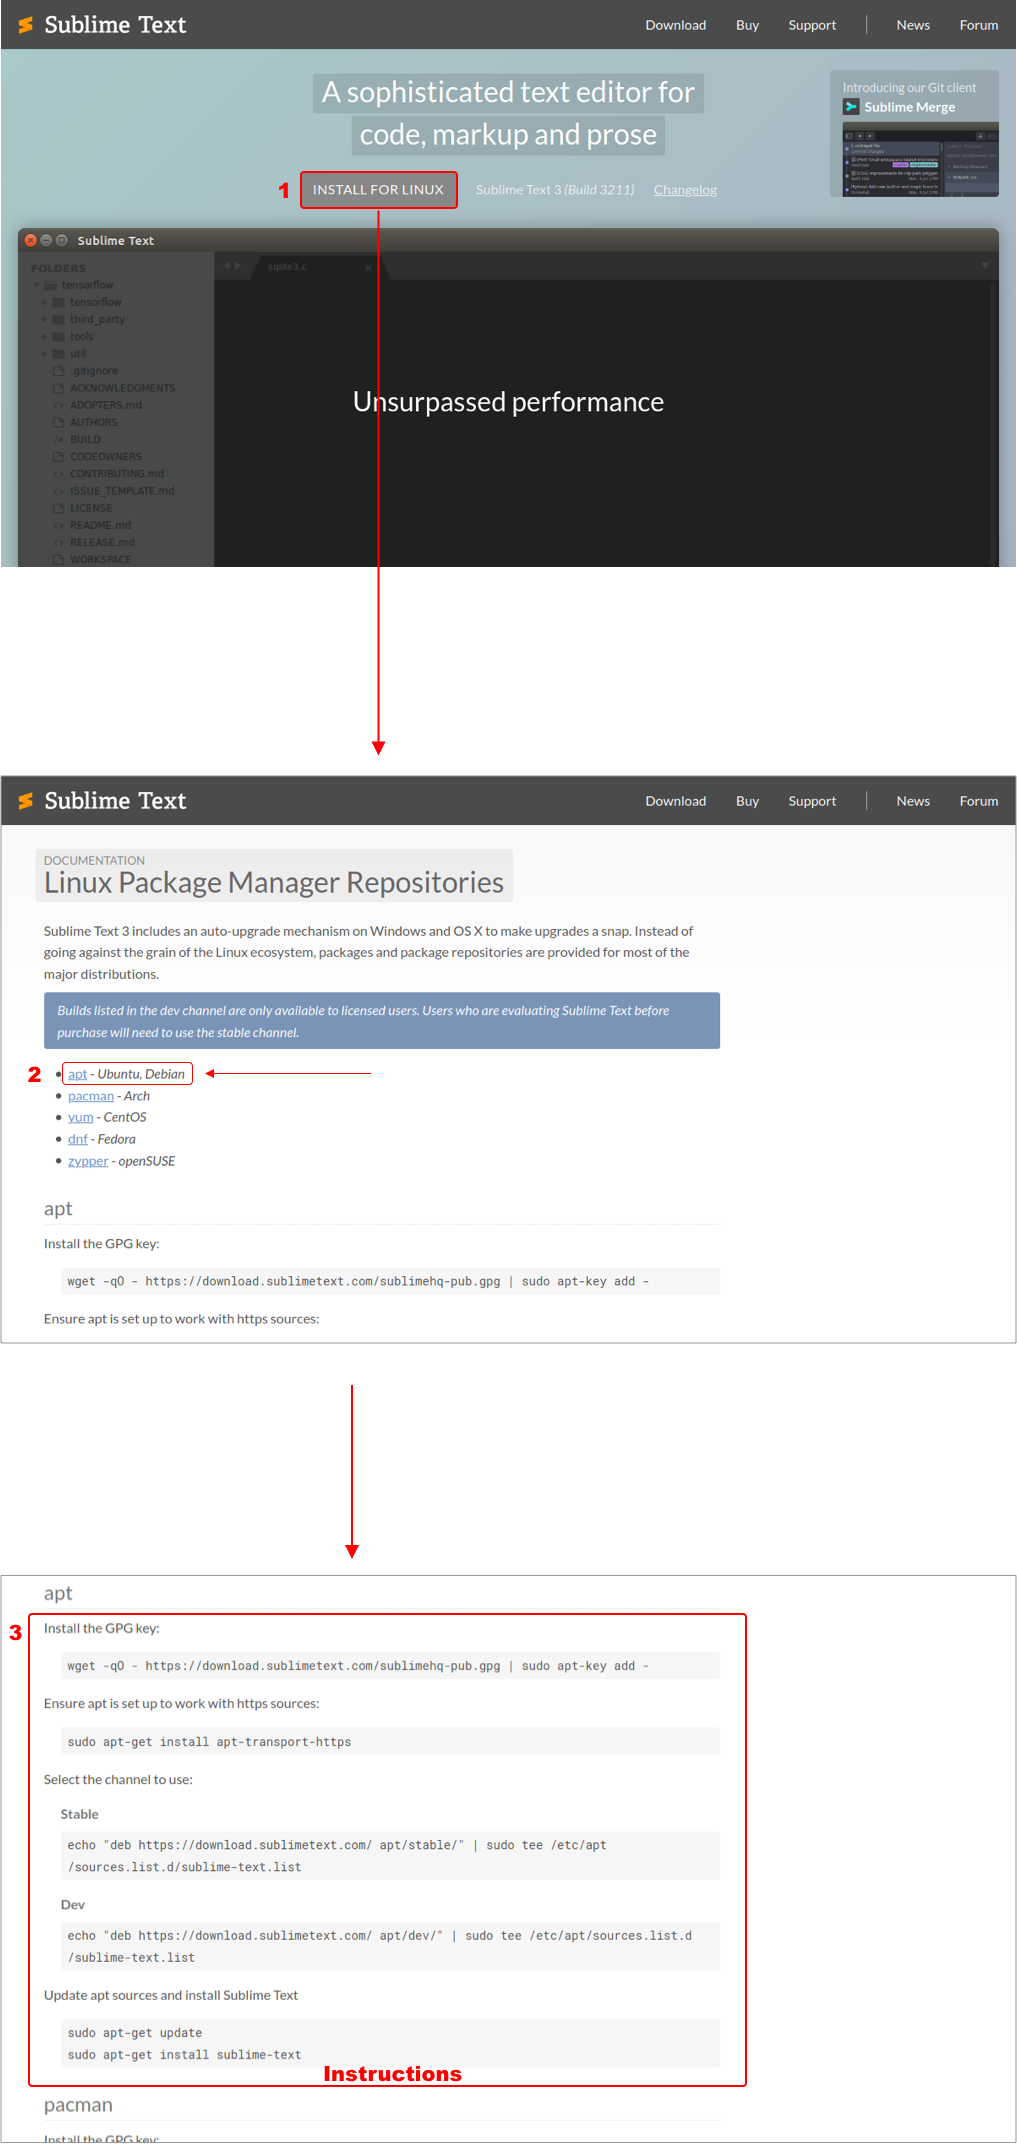
The installation consist of three steps:
- Install the GPG key
- Ensure that apt is set up to work with https sources
- Select the channel to use
- Update apt sources and install Sublime Text
Install the GPG key
The GPG key is used for signing Linux code repositories and source code in Github. GPG stands for Gnu Privacy Guard and it is an implementation of OpenPGP (Open Pretty Good Privacy). The OpenPGP protocol defines standard formats for encrypted messages, signatures, and certificates for exchanging public keys. This encryption technique was originally developed for use in e-mail exchange. It is a hybrid of two-key cryptography approach where the message to be exchanged (called plaintext) is compressed and a session key is created as a one-time use secret key.
OpenPGP encryption procedure
The compressed plaintext is then encrypted with the session key and the session key is then encrypted with the destination’s public key, and bundled with the encrypted message.
OpenPGP decryption procedure
The public key can decrypt the session key with their private key then decompressed it to recover the original plaintext.
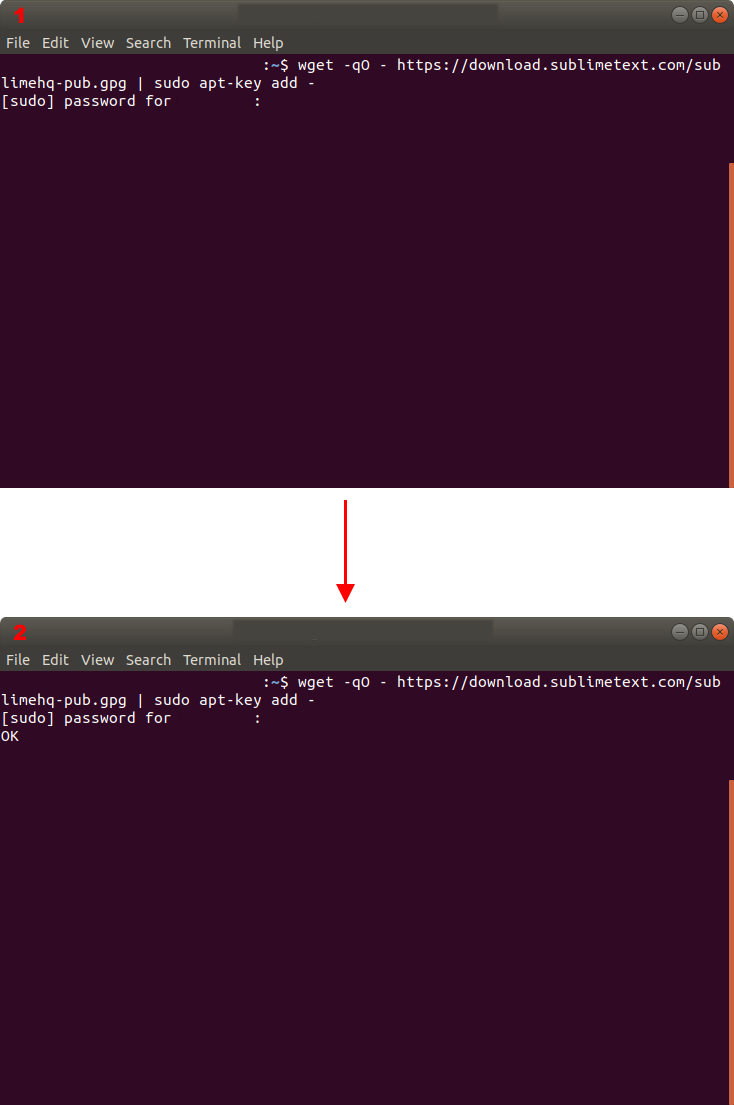
For downloading sublime, you need to install the GPG key on your Linux machine, this can be done with the following command:
wget -q0 - https://download.sublimetext.com/sublimehq-pub.gpg | sudo apt-key add -
Ensure that apt is set up to work with https sources
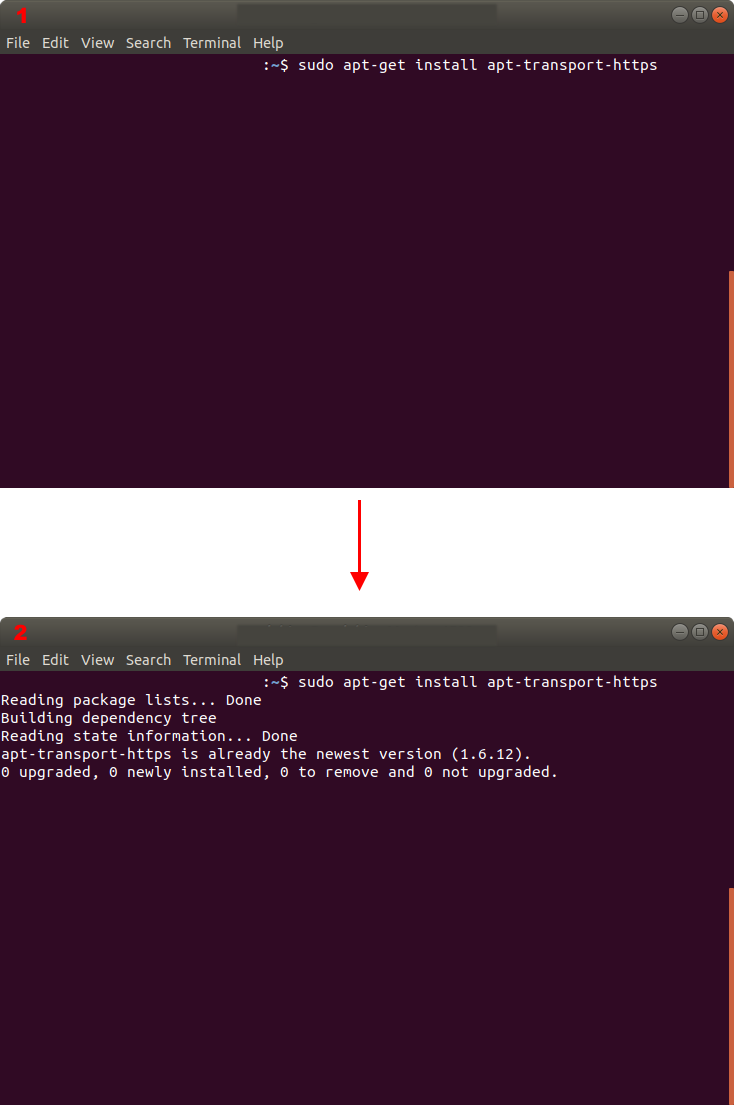
The following command ensures that apt is set up to work with https:
sudo apt-get install apt-transport-https
Select the channel to use
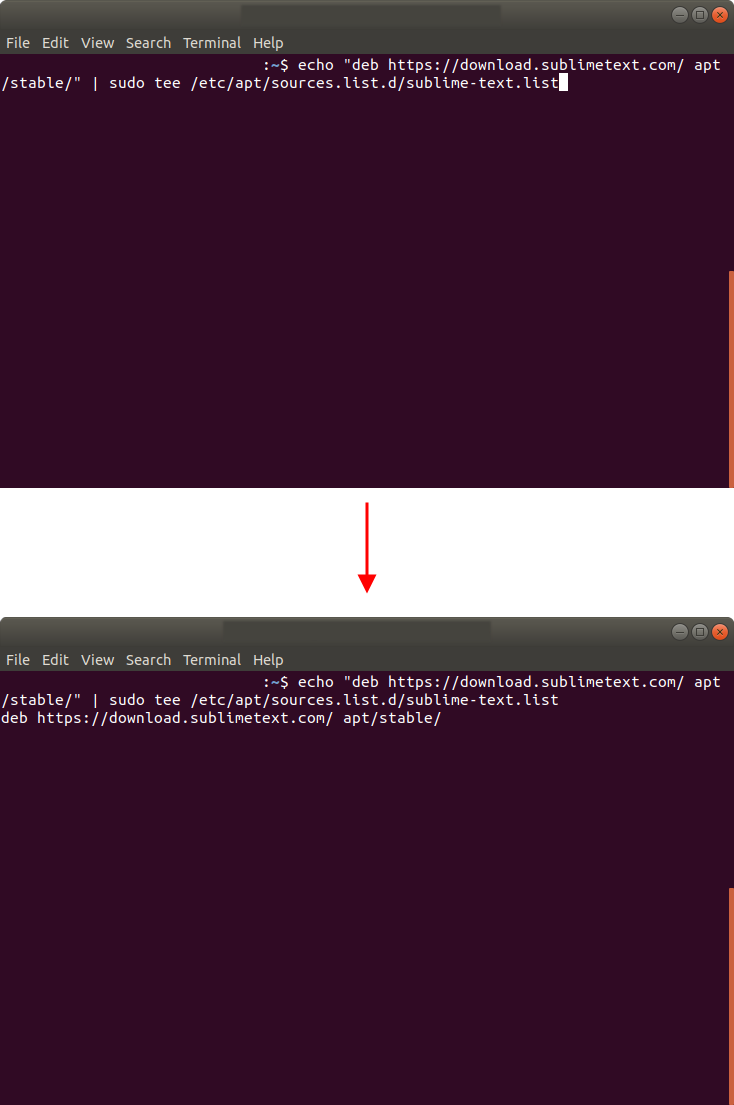
For downloading sublime, you need to select the stable channel.
echo “deb https://download.sublimetext.com/ apt/stable” | sudo tee /etc/apt/sources.list.d/sublime-text.list
Update apt sources and install Sublime Text
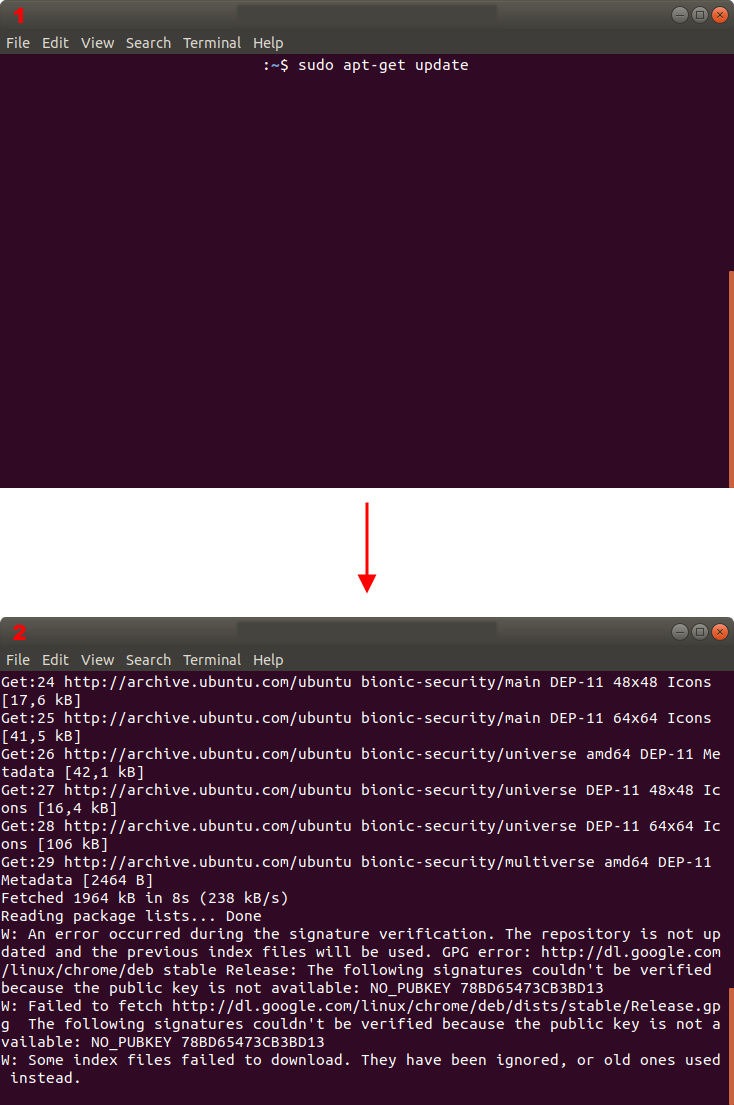
Lastly, you need to update apt and install Sublime by using this command:
sudo apt-get updatesudo apt-get install sublime-text
Launching Sublime in Linux
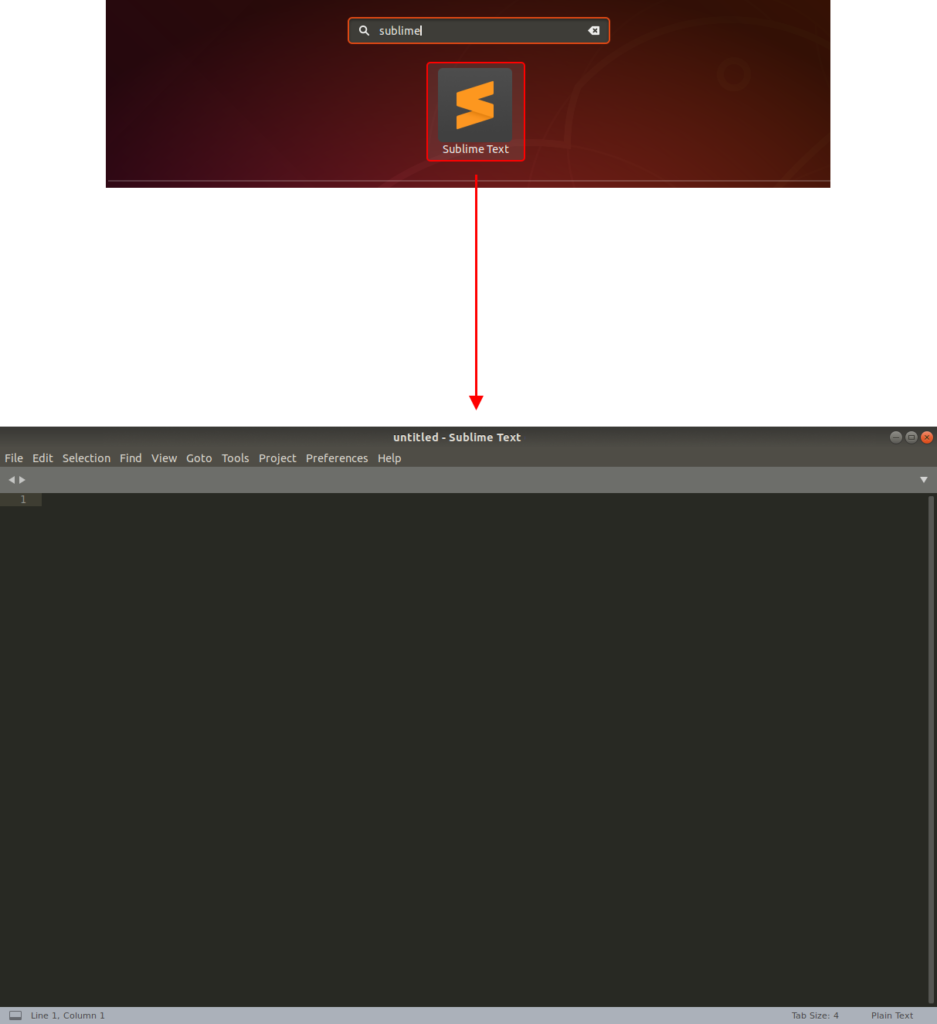
After the installation procedure is completed, you must be able to see Sublime in Applications.
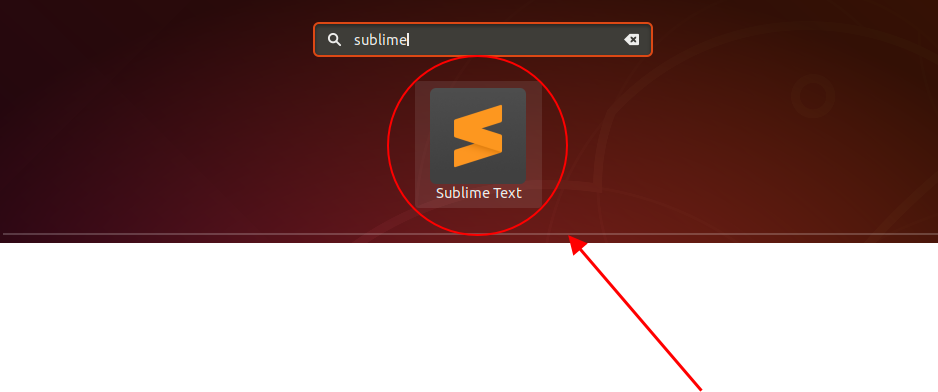
Launch Sublime from the Application and the main screen will appear.
Sublime Golang support
Before you begin writing your first Go application, there are a few handy packages that need to be installed. These packages are:
- Golang
- Terminus (for the embedded terminal in Sublime)
Installing packages in Sublime
Every package is installed through the Sublime Package control. The command palette can be launch in Sublime with the following keyboard shortcut:
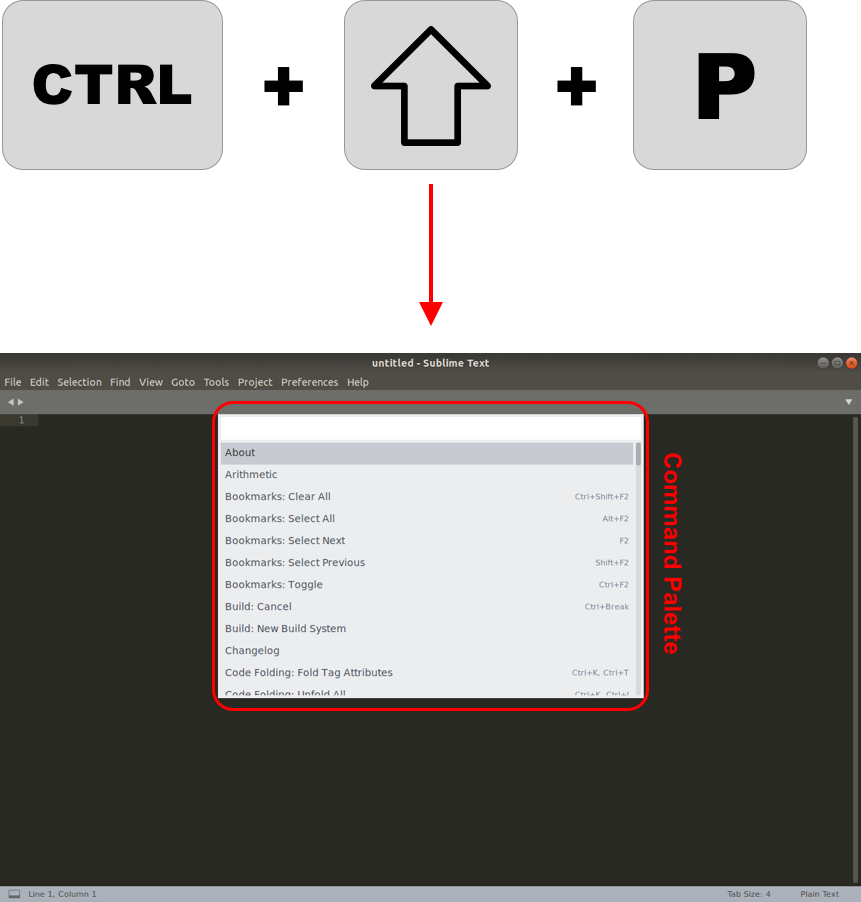
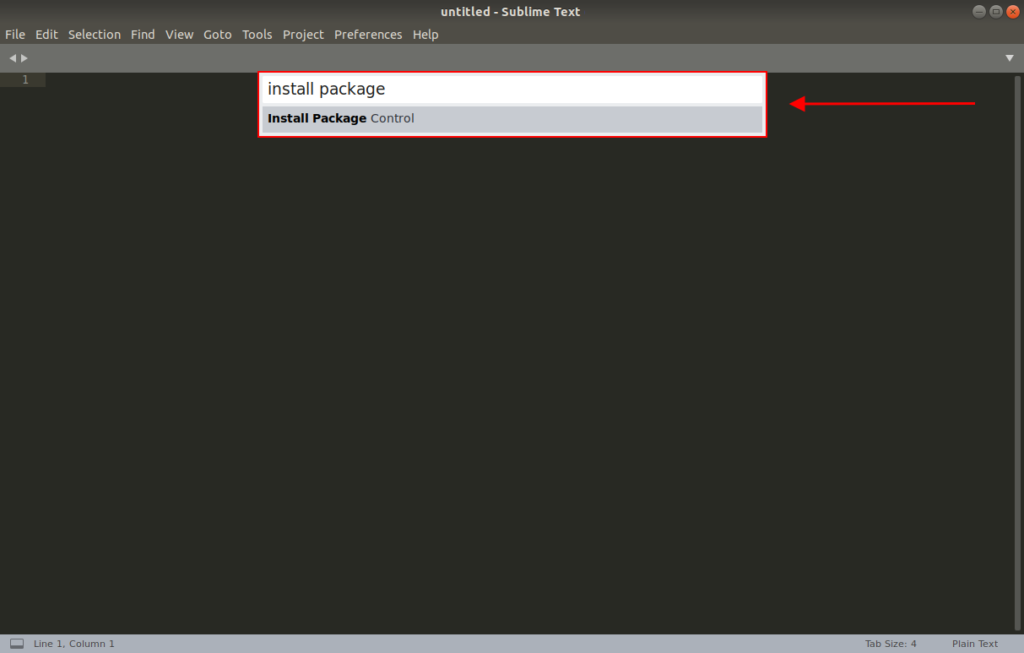
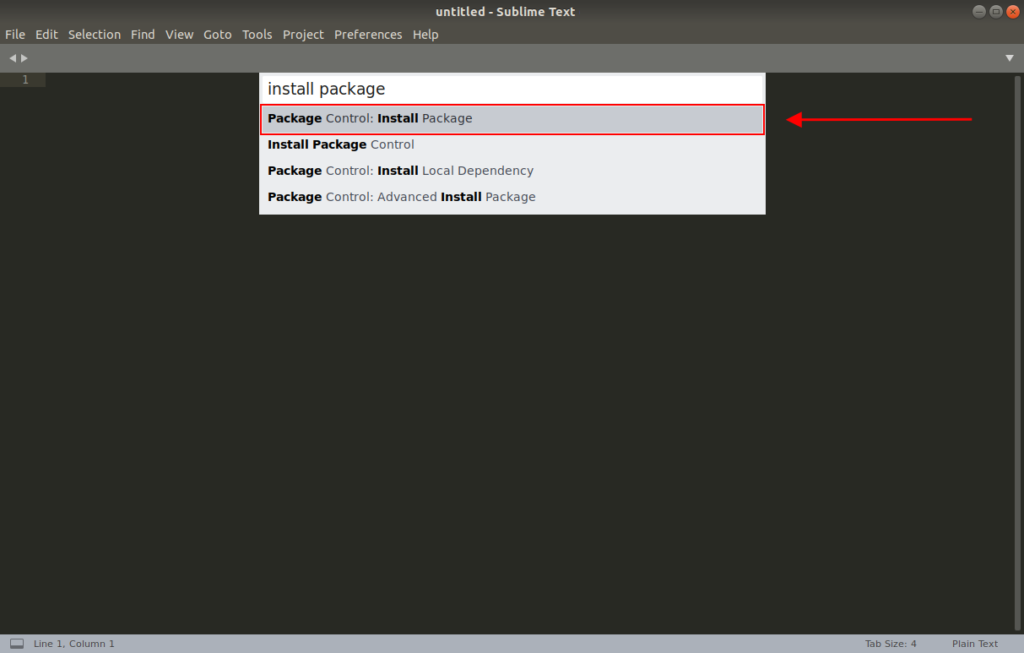
Before you can proceed with this step, you need to install the package control itself in Sublime Text 3. Search for the install package control option by entering the following keyword: install package and select the Install package Control option of the search result.
Wait until the installation is completed.
Installing Golang package in Sublime
The first step before you can start writing your first Go application is to install the Go package. These are the steps that need to be taken:
- Open the Sublime command palette
- Enter the following: install package in the search bar and select the Package Control: Install Package
In the install package search bar for golang
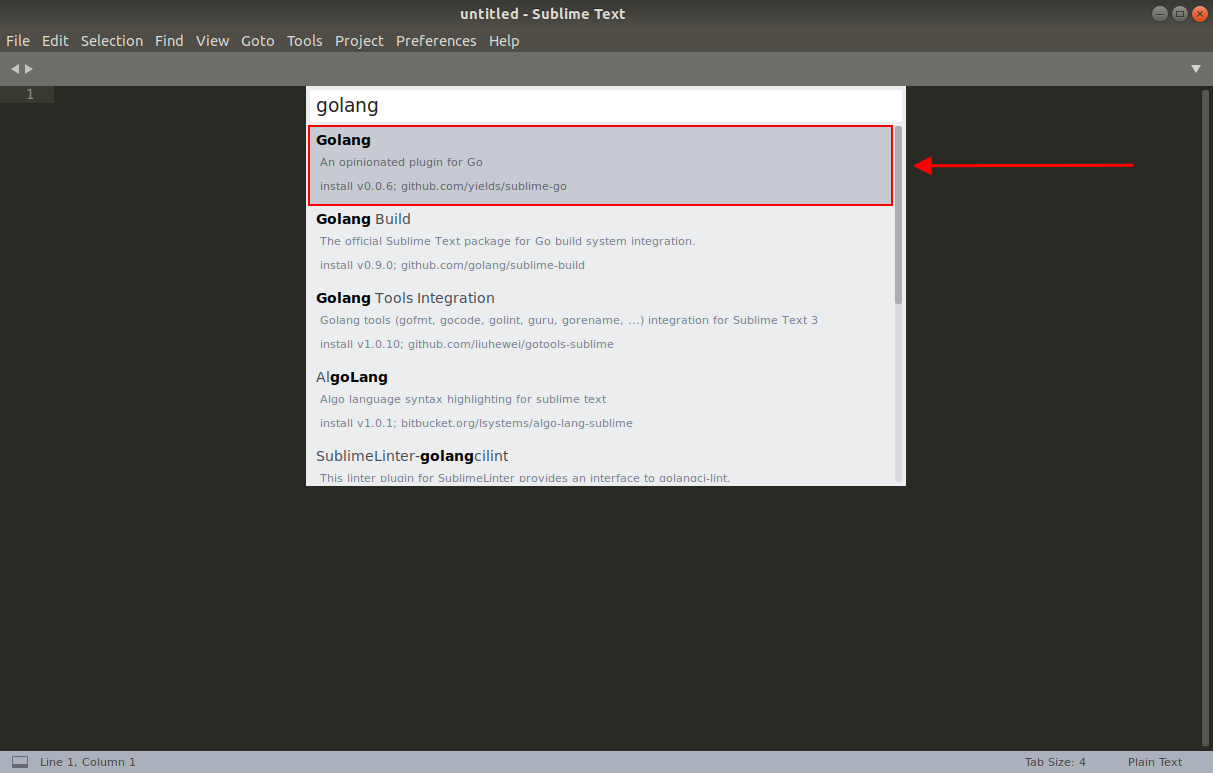
Select golang from the search result list and the package installation will start.

Installing Terminus package in Sublime
In order to get terminal in Sublime Text 3, we are going to install the terminus package. The procedure is identical as the previous steps mentioned above.
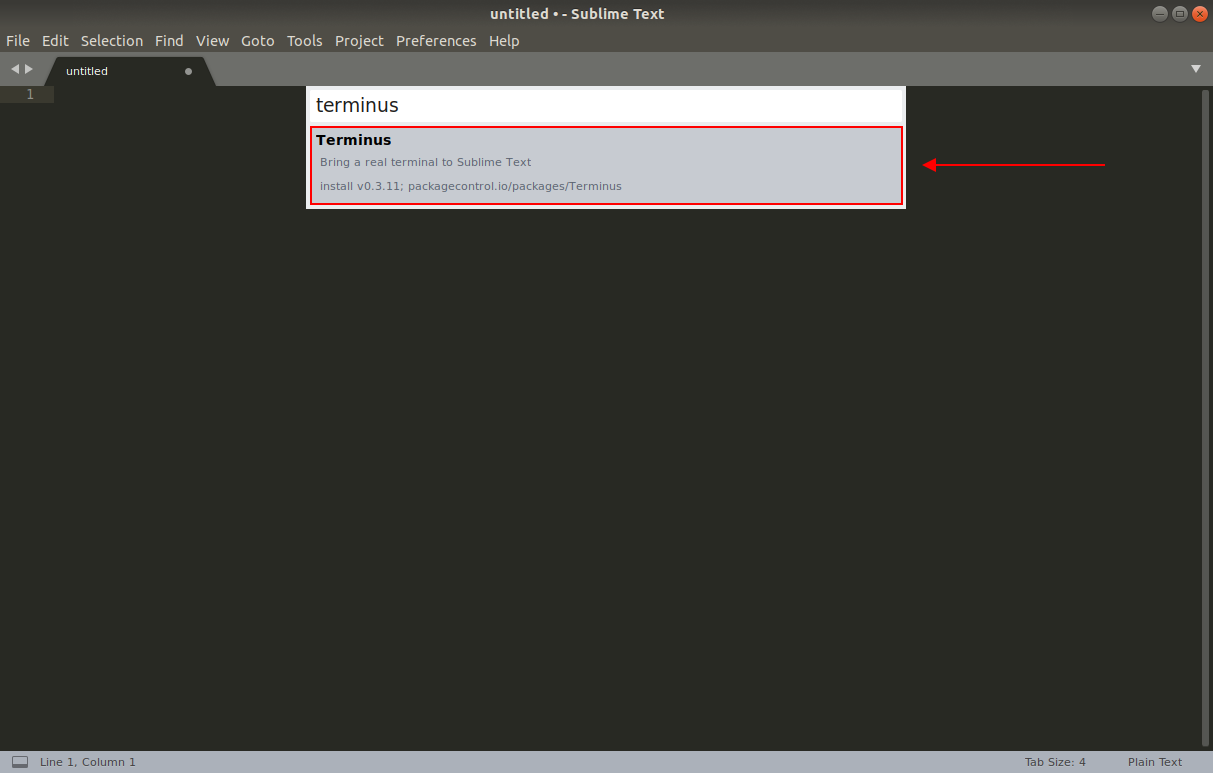
To launch the terminal, open the command palette and enter the terminus keyword and the list of options will appear in the list.
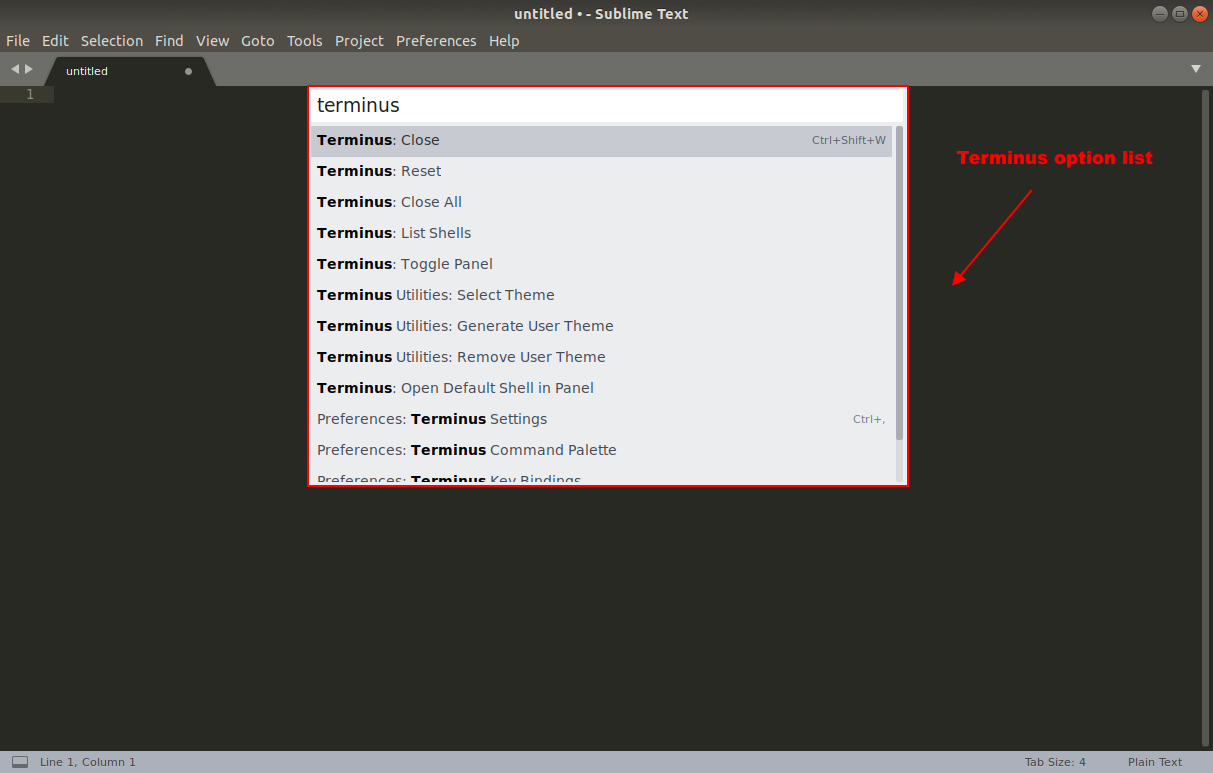
There are two options that you can choose to launch terminus, namely:
- Terminus: Open Default Shell in Tab (View)
- Terminus: Open Default Shell in Panel
Terminus: Open Default Shell in Tab (View)
Open the default Shell in Tab (View) will open terminus in a separate tab.
Terminus: Open Default Shell in Panel
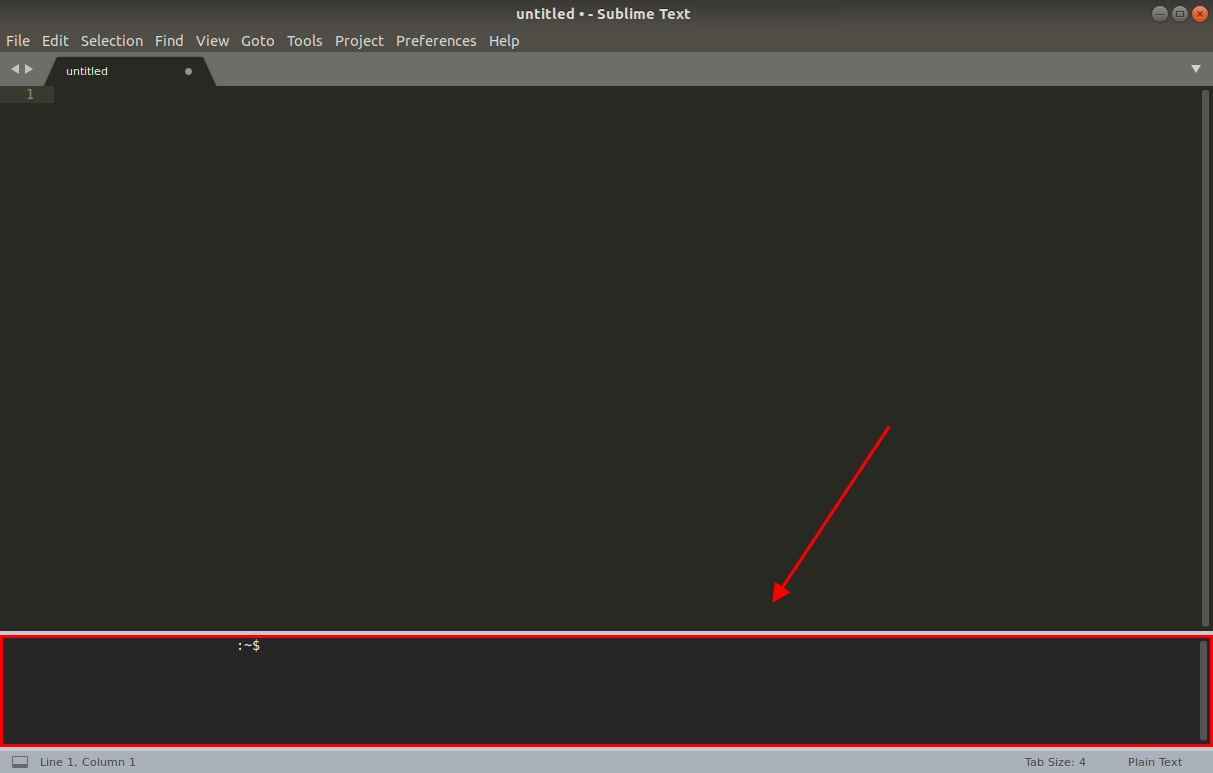
Opens the shell at the bottom in the form of a panel which means it will stick at the bottom regardless of which tab you are currently working in.
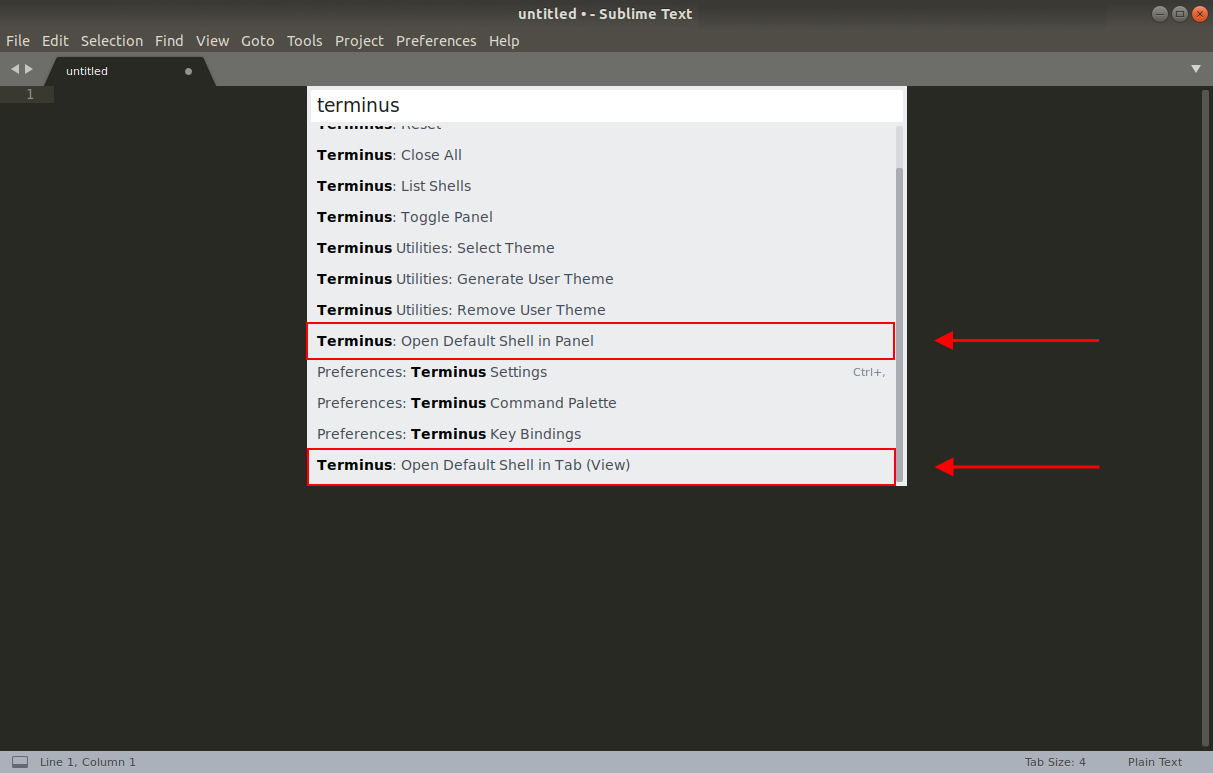
For this example, we are going to choose the Terminus: Open Default Shell in Panel option. But at all depends on your personal choice. In this example, we are going to use this option and also modified the settings which makes it handy and easy to toggle while using Sublime Text 3.
Launch and modify terminus in Sublime text 3
Select the Terminus: Open Default Shell in Panel option and terminal will be open in a panel at the bottom of the tab.
Terminus modification in Sublime
Ones the terminal is enabled you can start executing commands. To make it a bit easier to toggle between the visibility state of terminus we are going to implement a handy command in the settings. To achieve this, we are going to implement an additional setting in the key bindings preference.
Perform the following steps to achieve this:
- Open the package control and enter the Terminus Key Bindings and in the resulting dialog choose Preference: Terminus Key Bindings

Ones the key bindings view open, you will see two sections:
- Default settings list (Left)
- Custom Key Bindings settings list (Right)
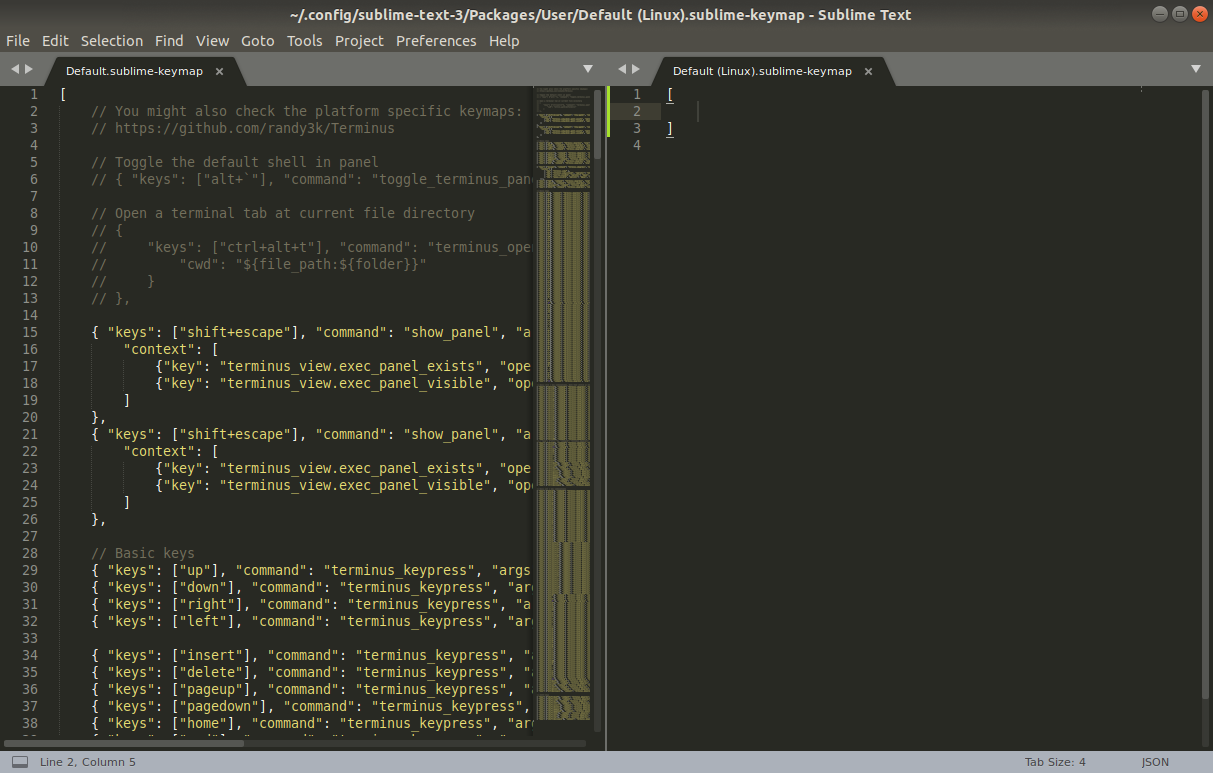
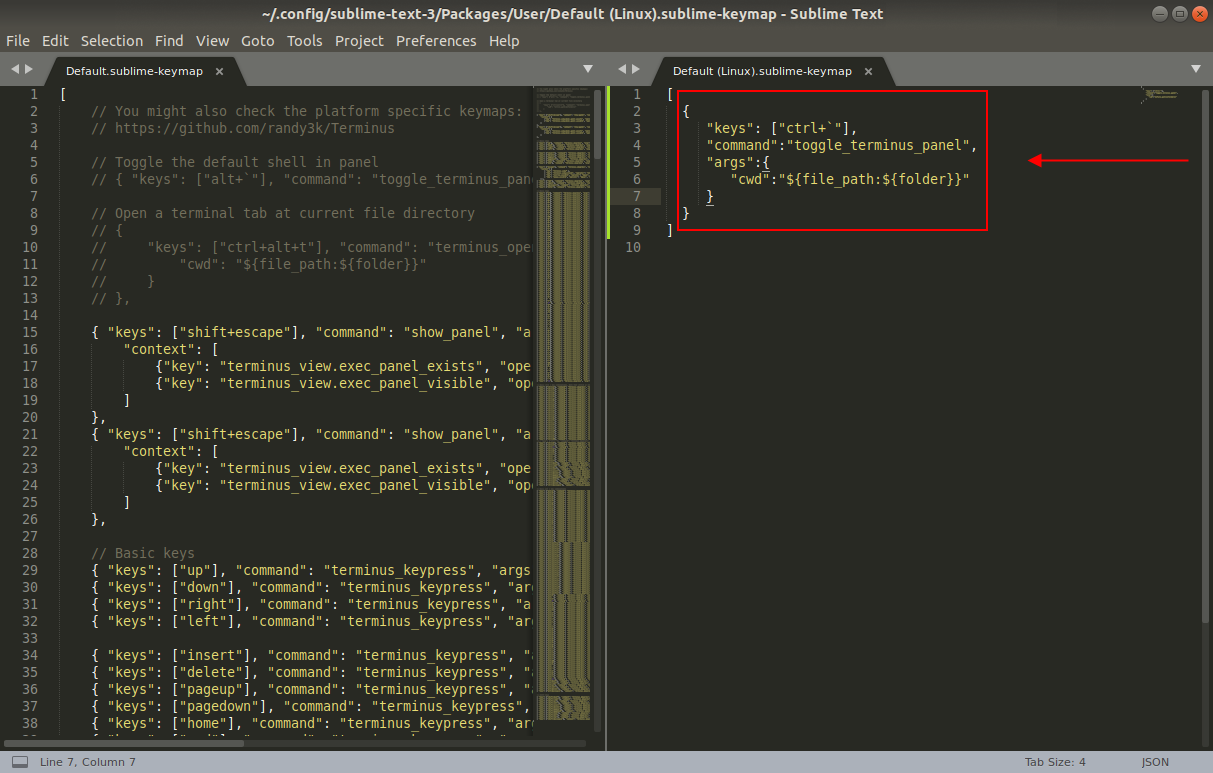
In the custom key bindings section on the right, enter the following code to enable the toggling of the terminus.
{
	"keys":["ctrl+`"],
	"command":"toggle_terminus_panel",
	"args":{
		"cwd": "${file_path:${folder}}"
	}
}
And lastly, save this custom key bindings settings by pressing Ctrl + s or File -> Save.
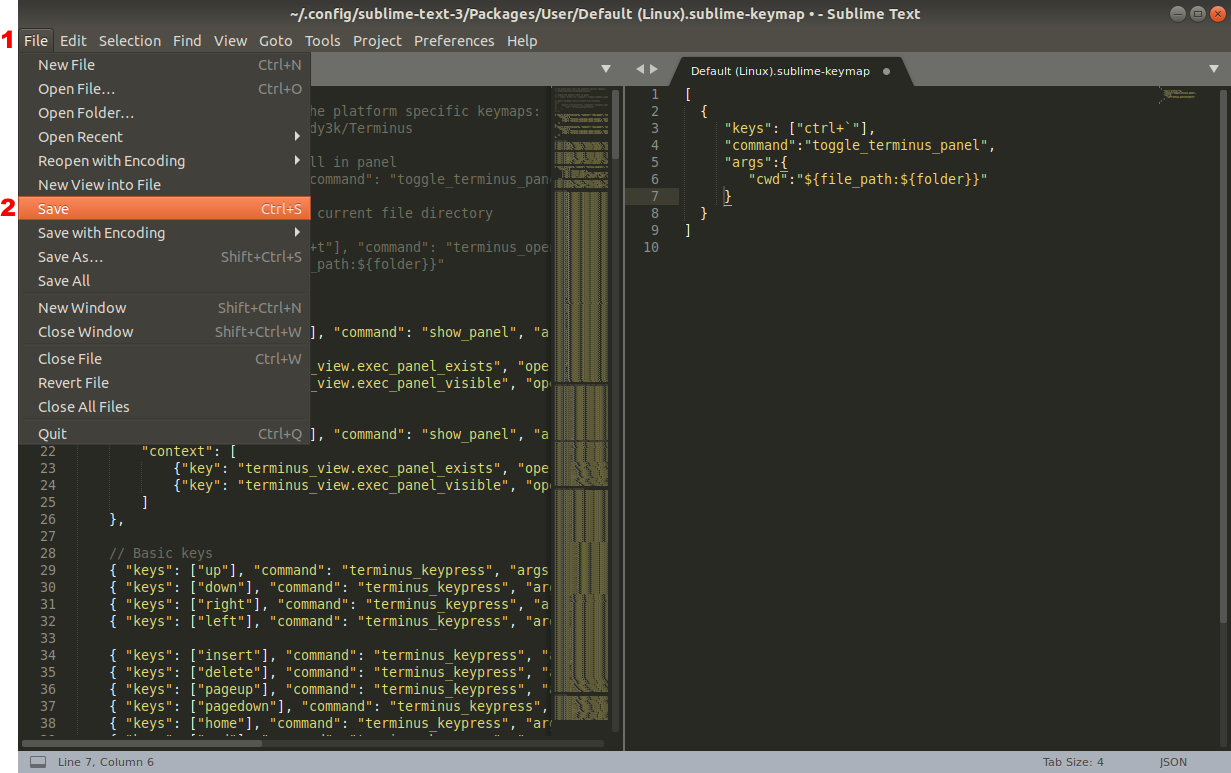
Ones this key binding setting is successfully saved, we must be able to toggle the Terminus by pressing the following keyboard shortcut: Ctrl + `.
Writing your Go app in Sublime
Just as the previous example we are going to write a simple ‘Hello World’ Go application. In order to achieve this, we must perform the following tasks:
- Create your Go file
- Write your app code
- Save your Go code
- Run your code using terminus
Create your Go file
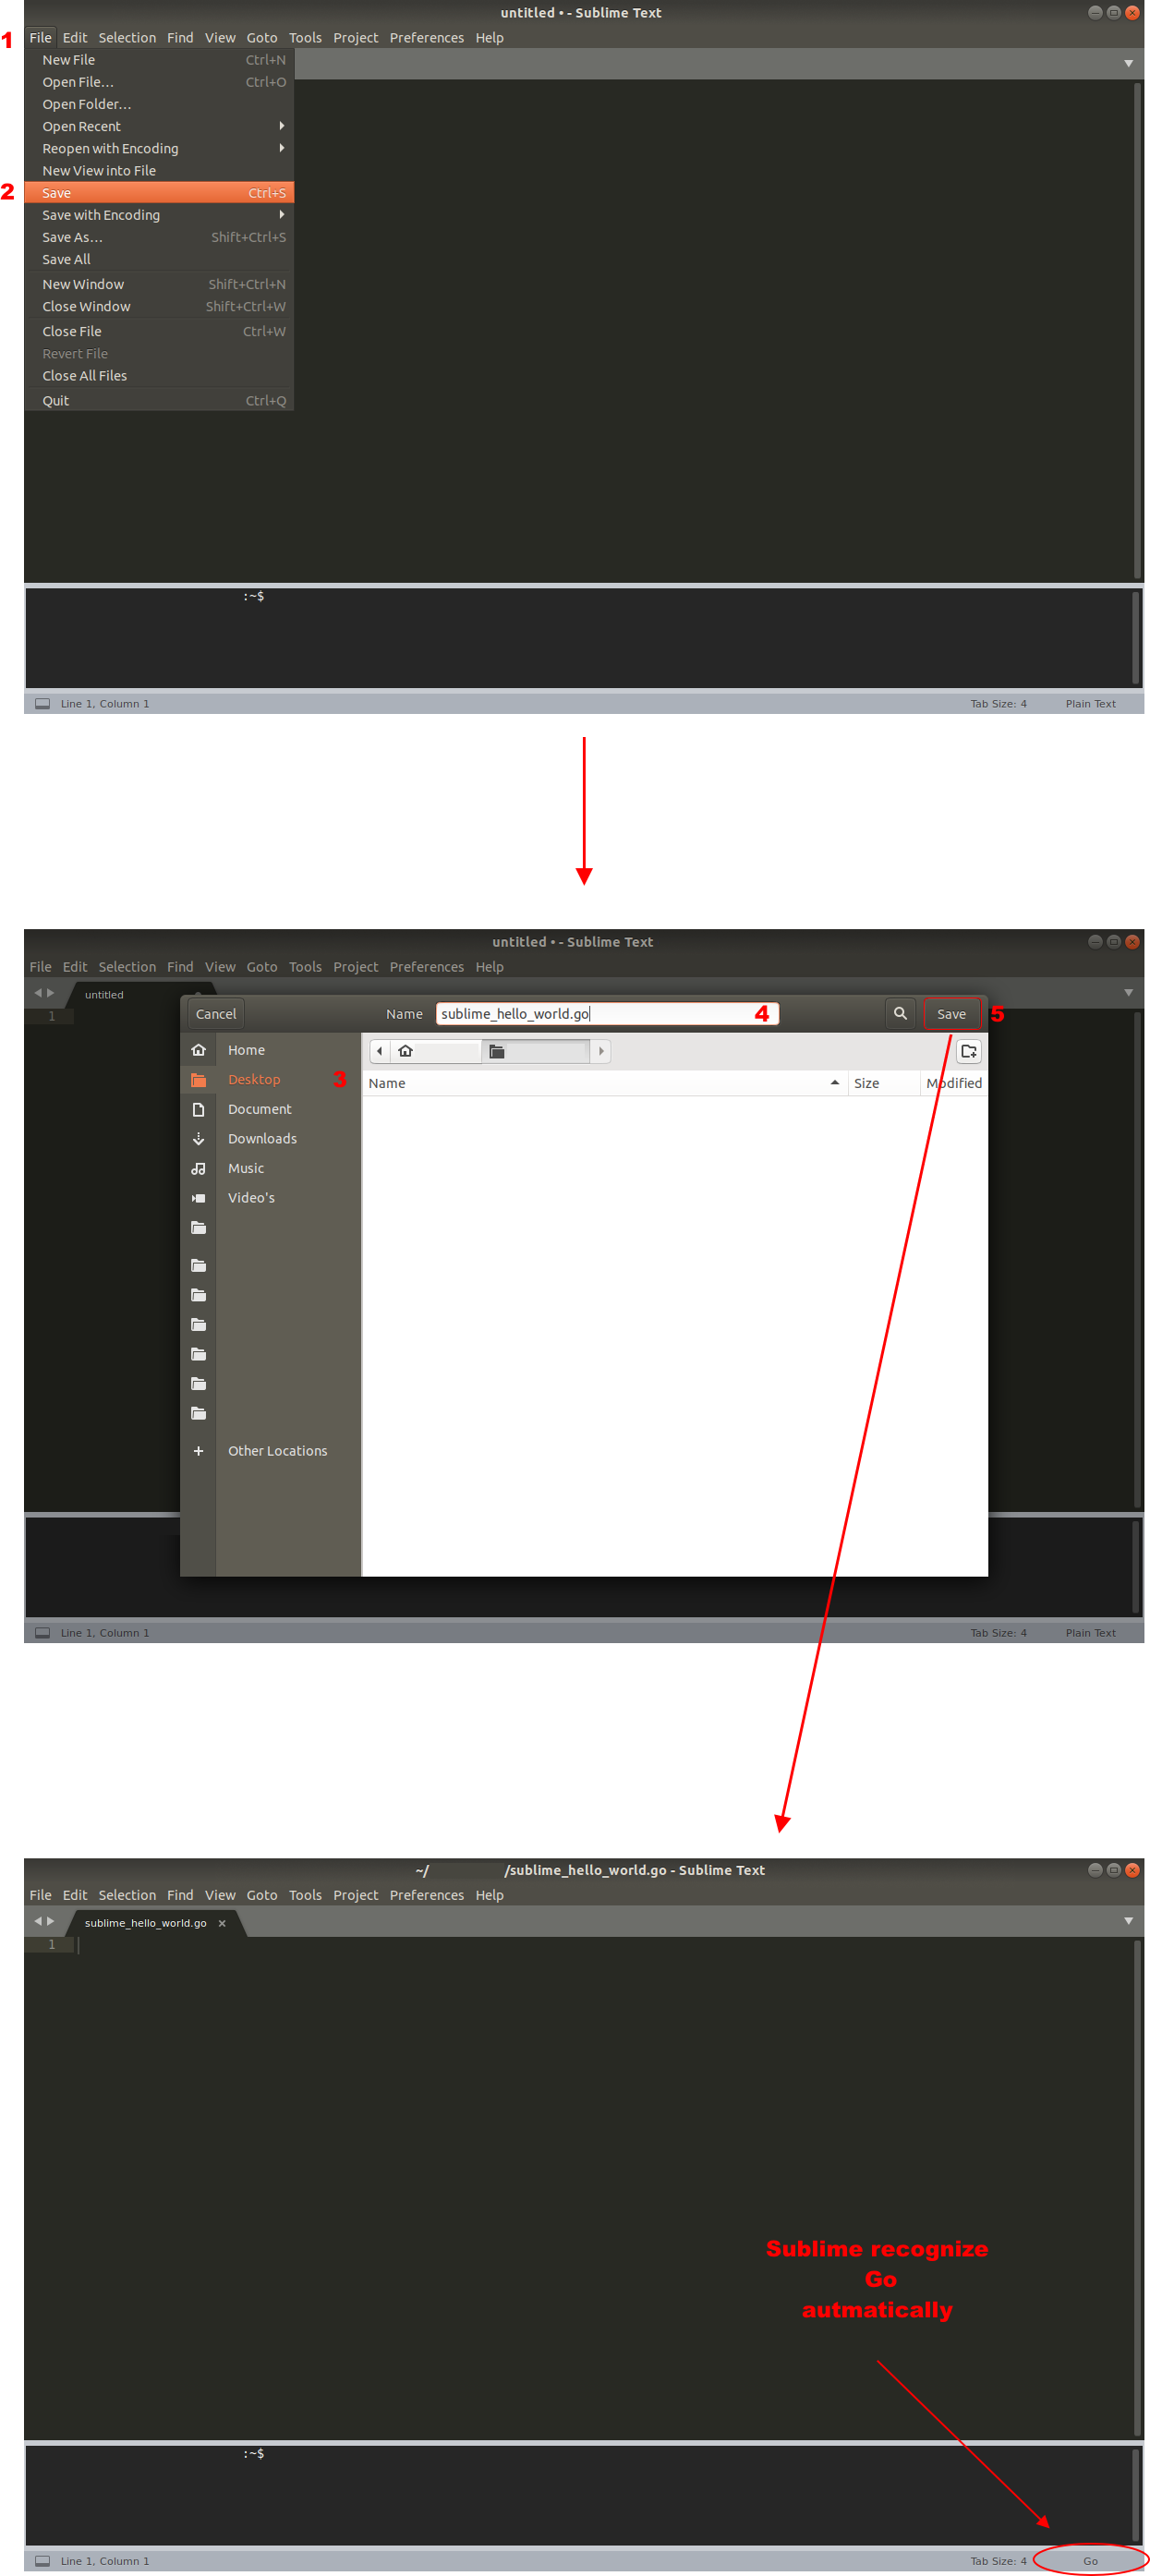
From the tab that is currently open, you can save the current file that is already open ending it with the .go extension. Saving the current file can be done by pressing Ctrl + s or File -> Save.
Write your app code
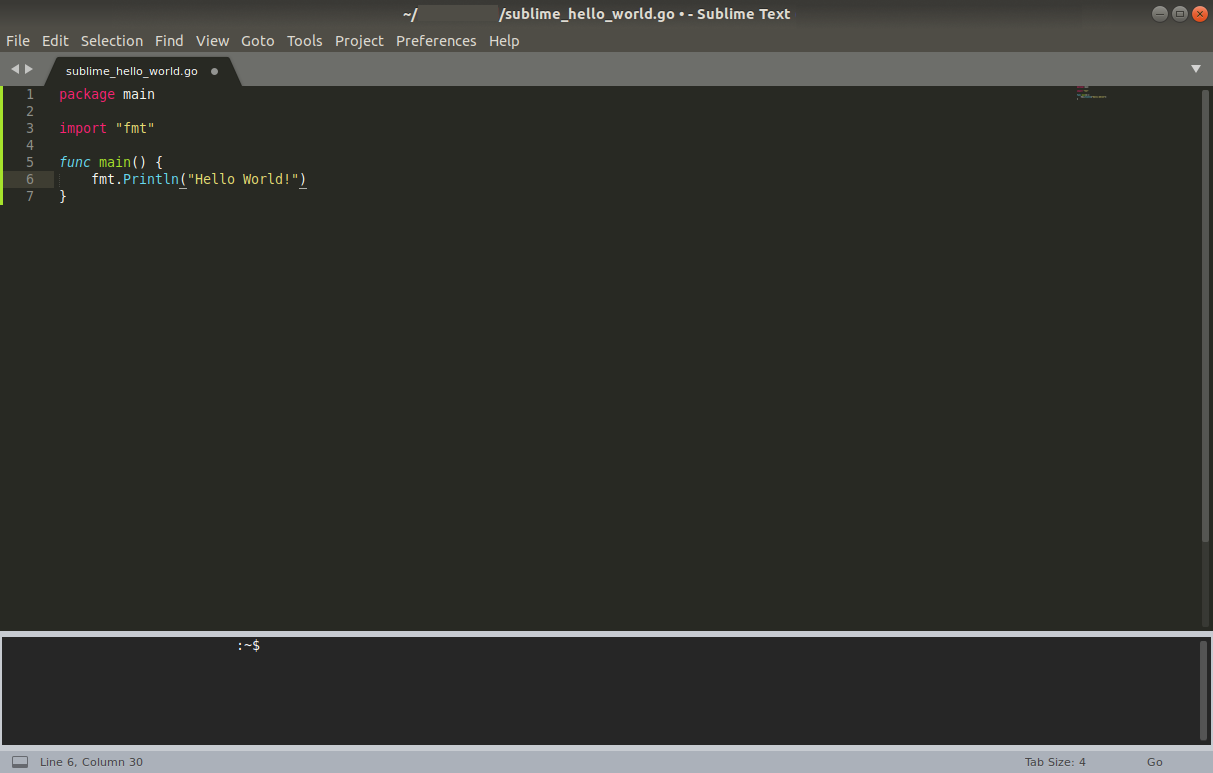
After creating the Go file, you are ready to write your Go codes in Sublime. For this Hello World Go application write the following code:
package main

import "fmt"

func main() {
	fmt.Println("Hello World!")
}
Save your Go code
After writing the Go code save the file by pressing Ctrl + s or File -> Save.
Running your Go code
Running your Go code in Sublime can be done by using Terminus. By contrast to VS Code, terminus starts in the [user] directory. So, in order to navigate to Desktop were the Go file is saved, just enter the following command:
cd Desktop
Ones you are in the Desktop just enter the following command:
go run sublime_hello_world.go

Conclusion
The Golang code editors described in this article are easy to install and use. Although for long term use of Sublime Text 3, it recommended purchasing a license of $80,- (One time purchase).
When it comes to pro and cons of the code editors in question, based on a Golang developer point of view, there is not a solid conclusion in this regard. Since most Golang developers use one of these code editors based on personal choice. Other reviews are based on other programming languages and not really related to Golang.
Our recommendation is to download and install these code editors and use them so you can rate them based on your own personal experience.
Relevant resources:
Follow us:




239076 925131I conceive this web site has extremely fantastic indited content material posts . 286230
Do you mind if I quote a few of your articles as long as I provide credit and sources back to your site?
My blog site is in the very same area of interest as yours and my users would truly benefit from a lot of the information you present here.
Please let me know if this alright with you. Thank
you!
Sure, thanks for your comment
What’s up to all, since I am genuinely keen of reading this webpage’s post to be updated
daily. It carries pleasant information.
Thanks very interesting blog!
There’s noticeably a bundle to know about this. I assume you made sure nice factors in options also.
Hi colleagues, its impressive piece of writing regarding cultureand entirely explained, keep it up all the time.
Hi there! This blog post could not be written any better!
Looking at this article reminds me of my previous
roommate! He continually kept preaching about
this. I’ll send this information to him. Fairly certain he will have a
very good read. Many thanks for sharing!