Workspaces, building, cross-compilation and execution in Windows
In this article, we are going to explain how to build, compile, cross-compile, execute Go binary files and create workspaces. These topics are very important if you consider developing and deploying large scale Go applications in a production environment.
First off, we must explain what is a workspace and why do you need it.
workspaces
The workspace itself is a directory consist of the following hierarchy:
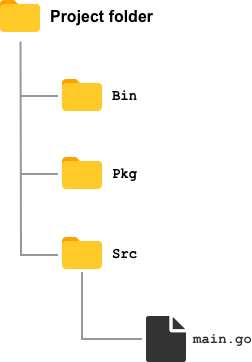
Bin
The bin directory stands for binary which includes the binary files of the project that has been created.
Pkg
The pkg directory stands for packages that include all external packages that belong to the specific project.
Src
The src defines the source directory which includes your source codes and dependency.
When installing Go on Windows, your default environment is located in C:\Go which is defined during the installation instruction of this article. In this environment all necessary default files/packages are being stored. Now the question is: why create a workspace? Creating a workspace is important if you want to create your own custom project that includes only the necessary packages that belong to that specific project. In all our previous example we were using the default environment (well-known as GOROOT) to run our Go codes. A workspace provides you with the ability the import packages and codes into your own workspace. Ones your workspace is created, all your packages that you imported for your project will be stored in the pkg directory of your workspace.
Before you can start using your workspace, you must set the GOPATH to point to your project directory in the environment variables.
When you specify the GOPATH environment variable, Go expects an executable to exist in the specified directory. Furthermore, GOPATH tells Go where your workspace is to import packages, install binaries and store intermediate archives.
In Windows, this is specified in your Environment Variables in Control panel. The following instructions demonstrate how to set your base directory for the workspace and GOPATH in the environment variables.
Start off by creating the project directory. In this example, we are going to create this folder on our desktop.
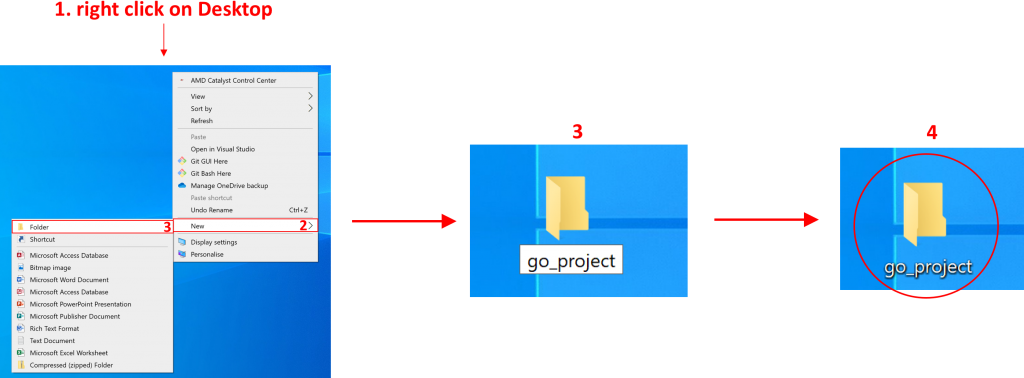
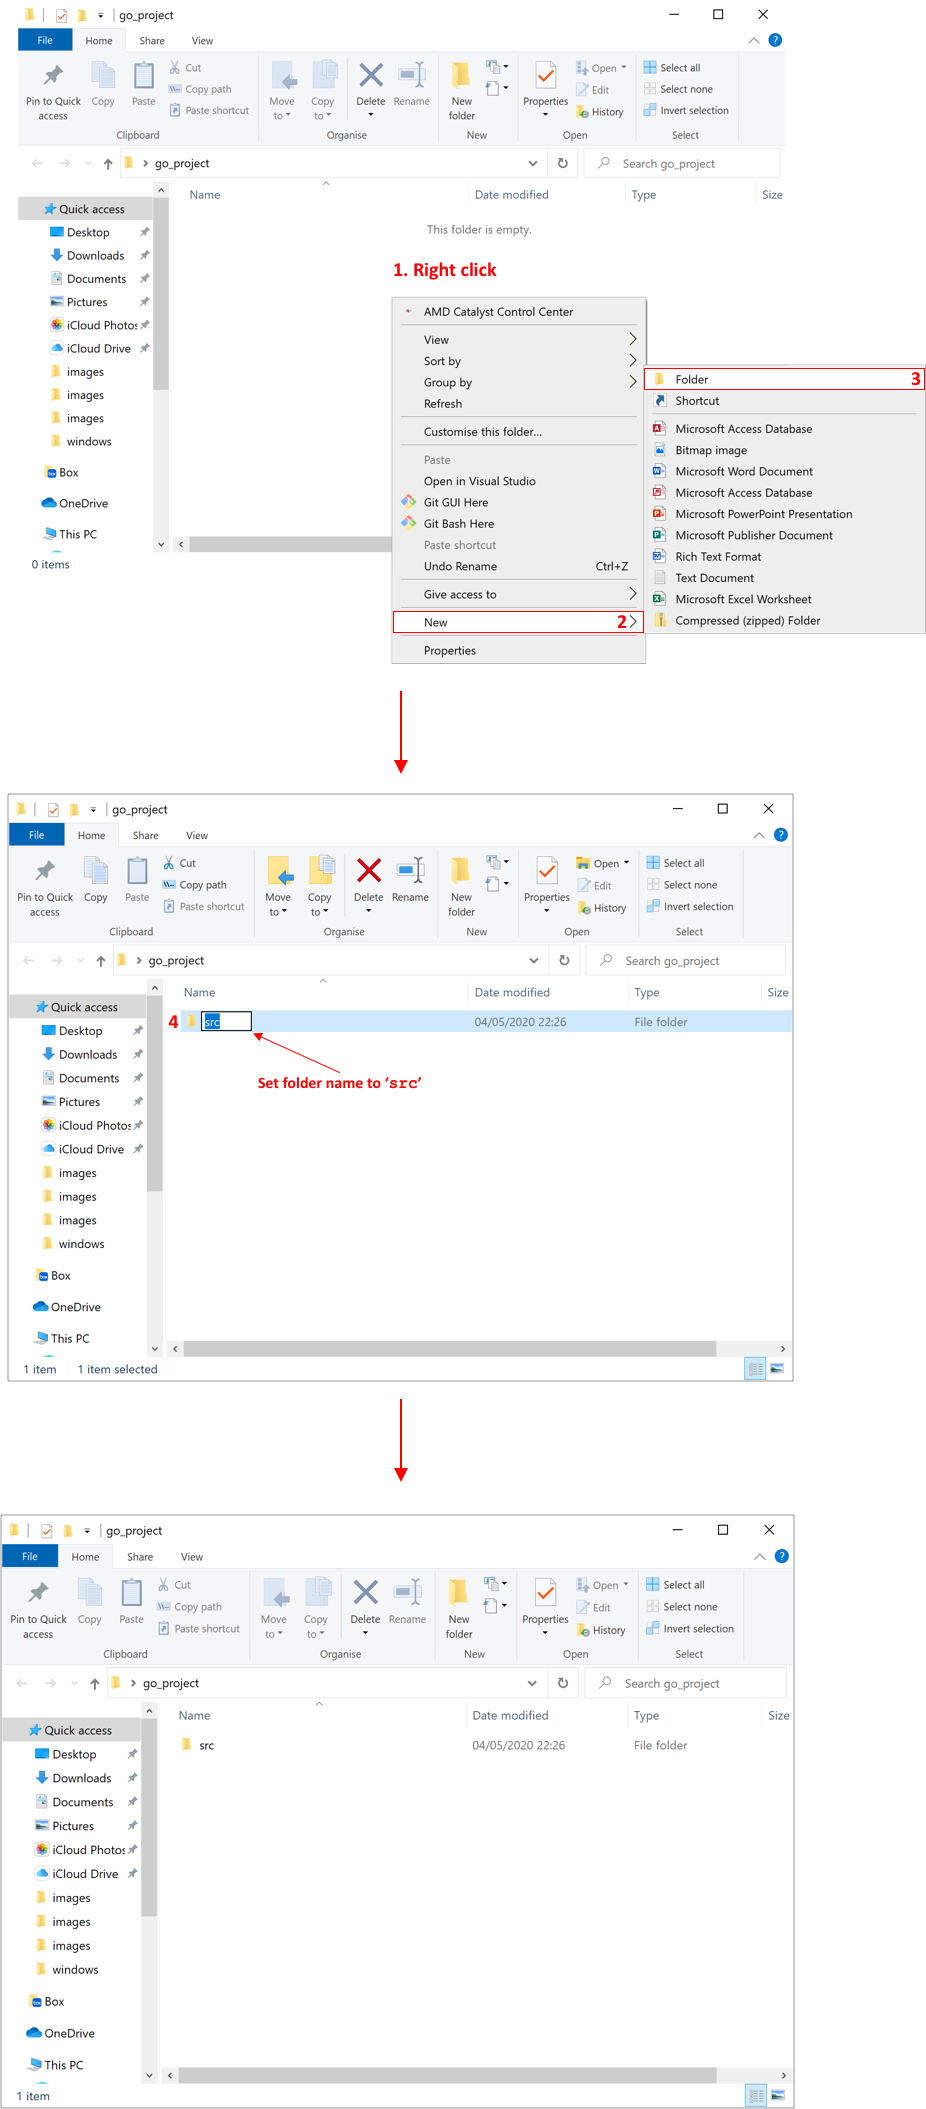
After creating the project directory, you must create the src folder on which our source code will be stored.
Next, the Go file which contains the main package file since it requires at least one .go file in the specified directory. For this example, we will be using Atom as our code editor, but it all depends on your personal preference. For more information about code editors that can be used read this article.
Create a new blank file
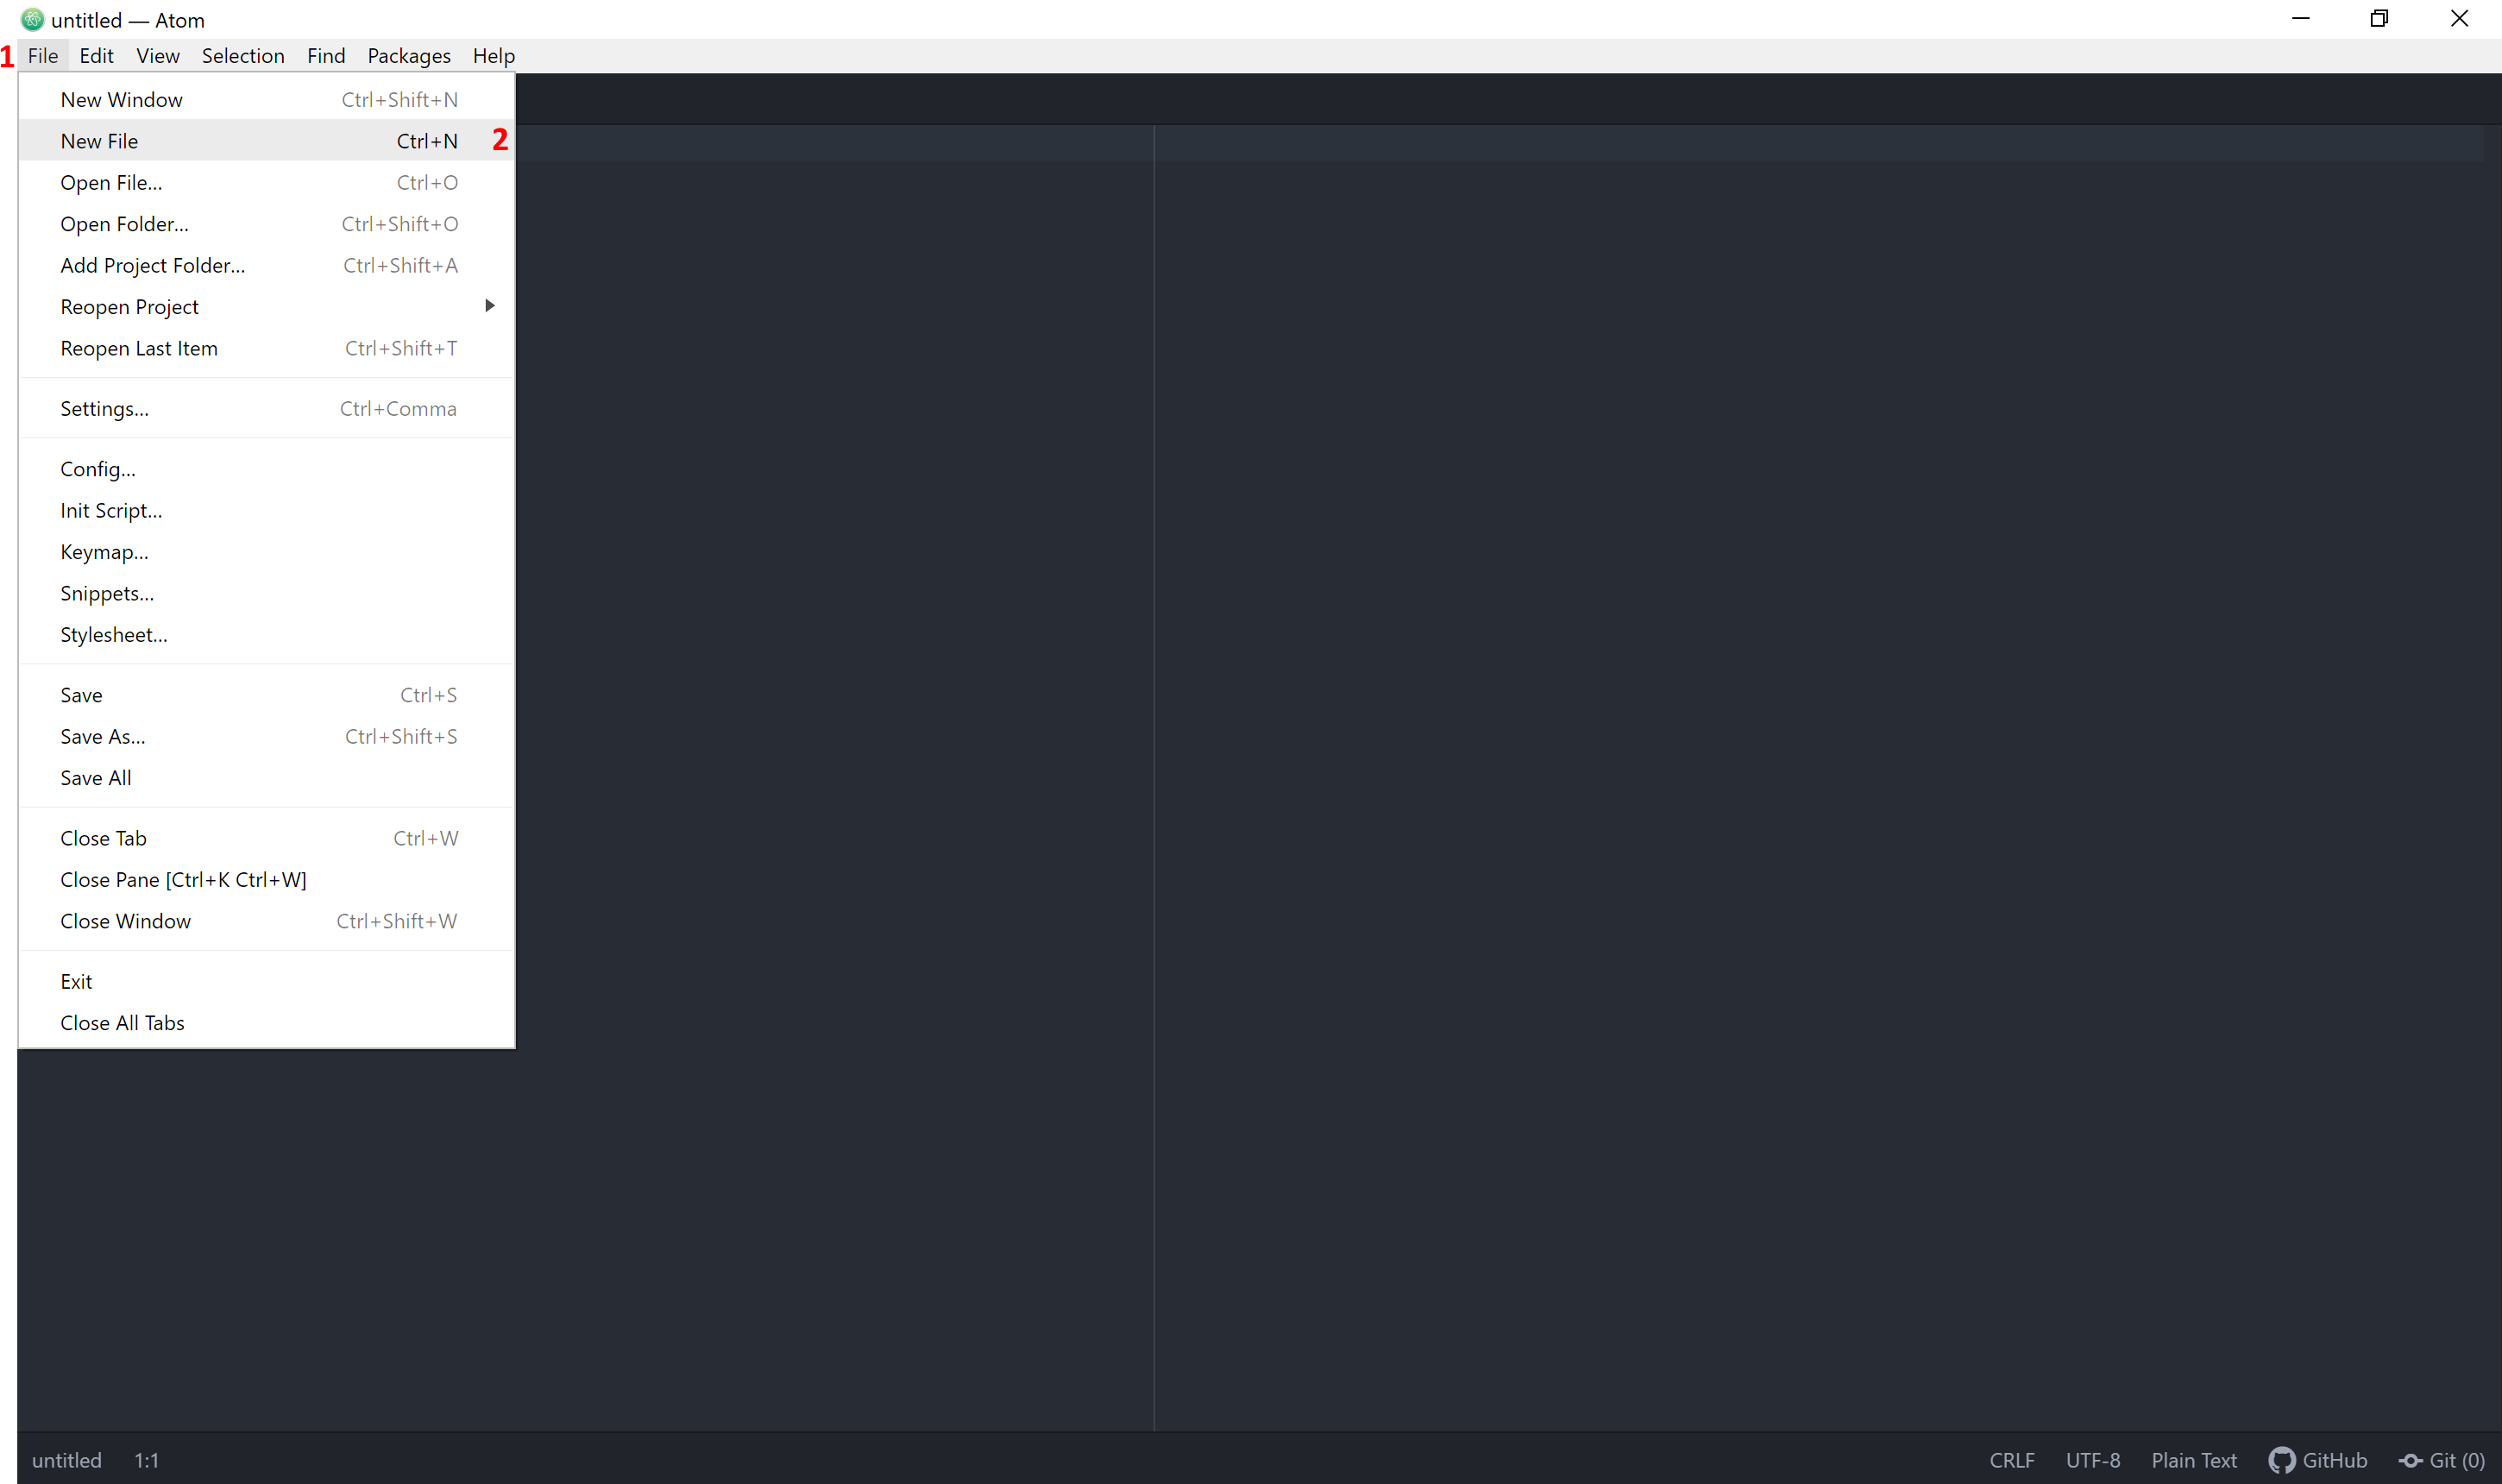
Type the following Go codes
package main
func main(){
}
Save the file into your src folder


Now comes the interesting part which is specifying your GOPATH in order to create the workspace. To set your GOPATH in Windows, just go to Control Panel -> Systems -> Advanced system settings -> Advanced -> Environment Variables.

In order to create your workspace, you need to set your GOPATH and GOBIN. The following instructions show you how to set both of them.
Setting GOBIN
Apart from your GOPATH, you must also set your GOBIN in which on creation of your workspace, the bin folder will be created that stores all executable files. Follow these steps to set your GOBIN:
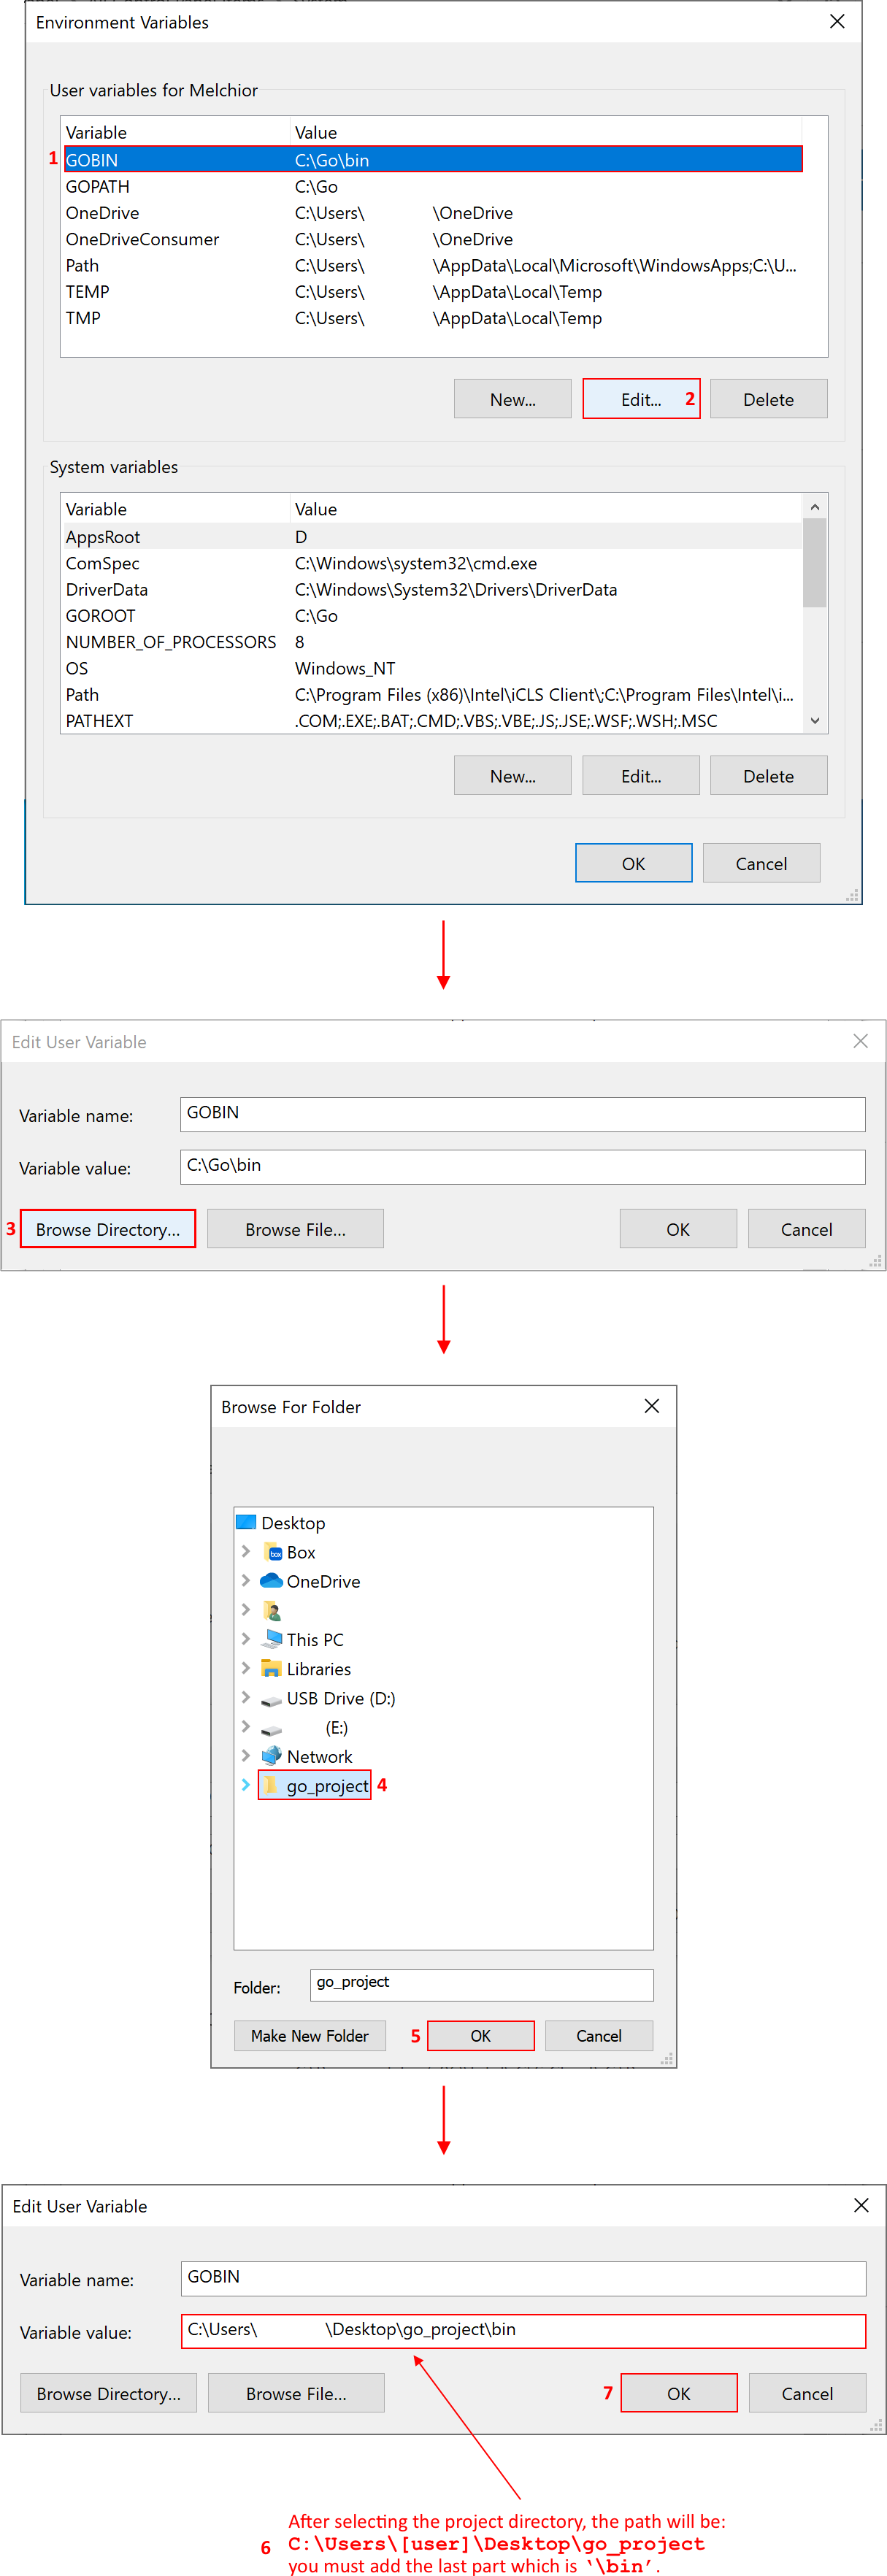
Setting GOPATH
Similar way you set the GOPATH:
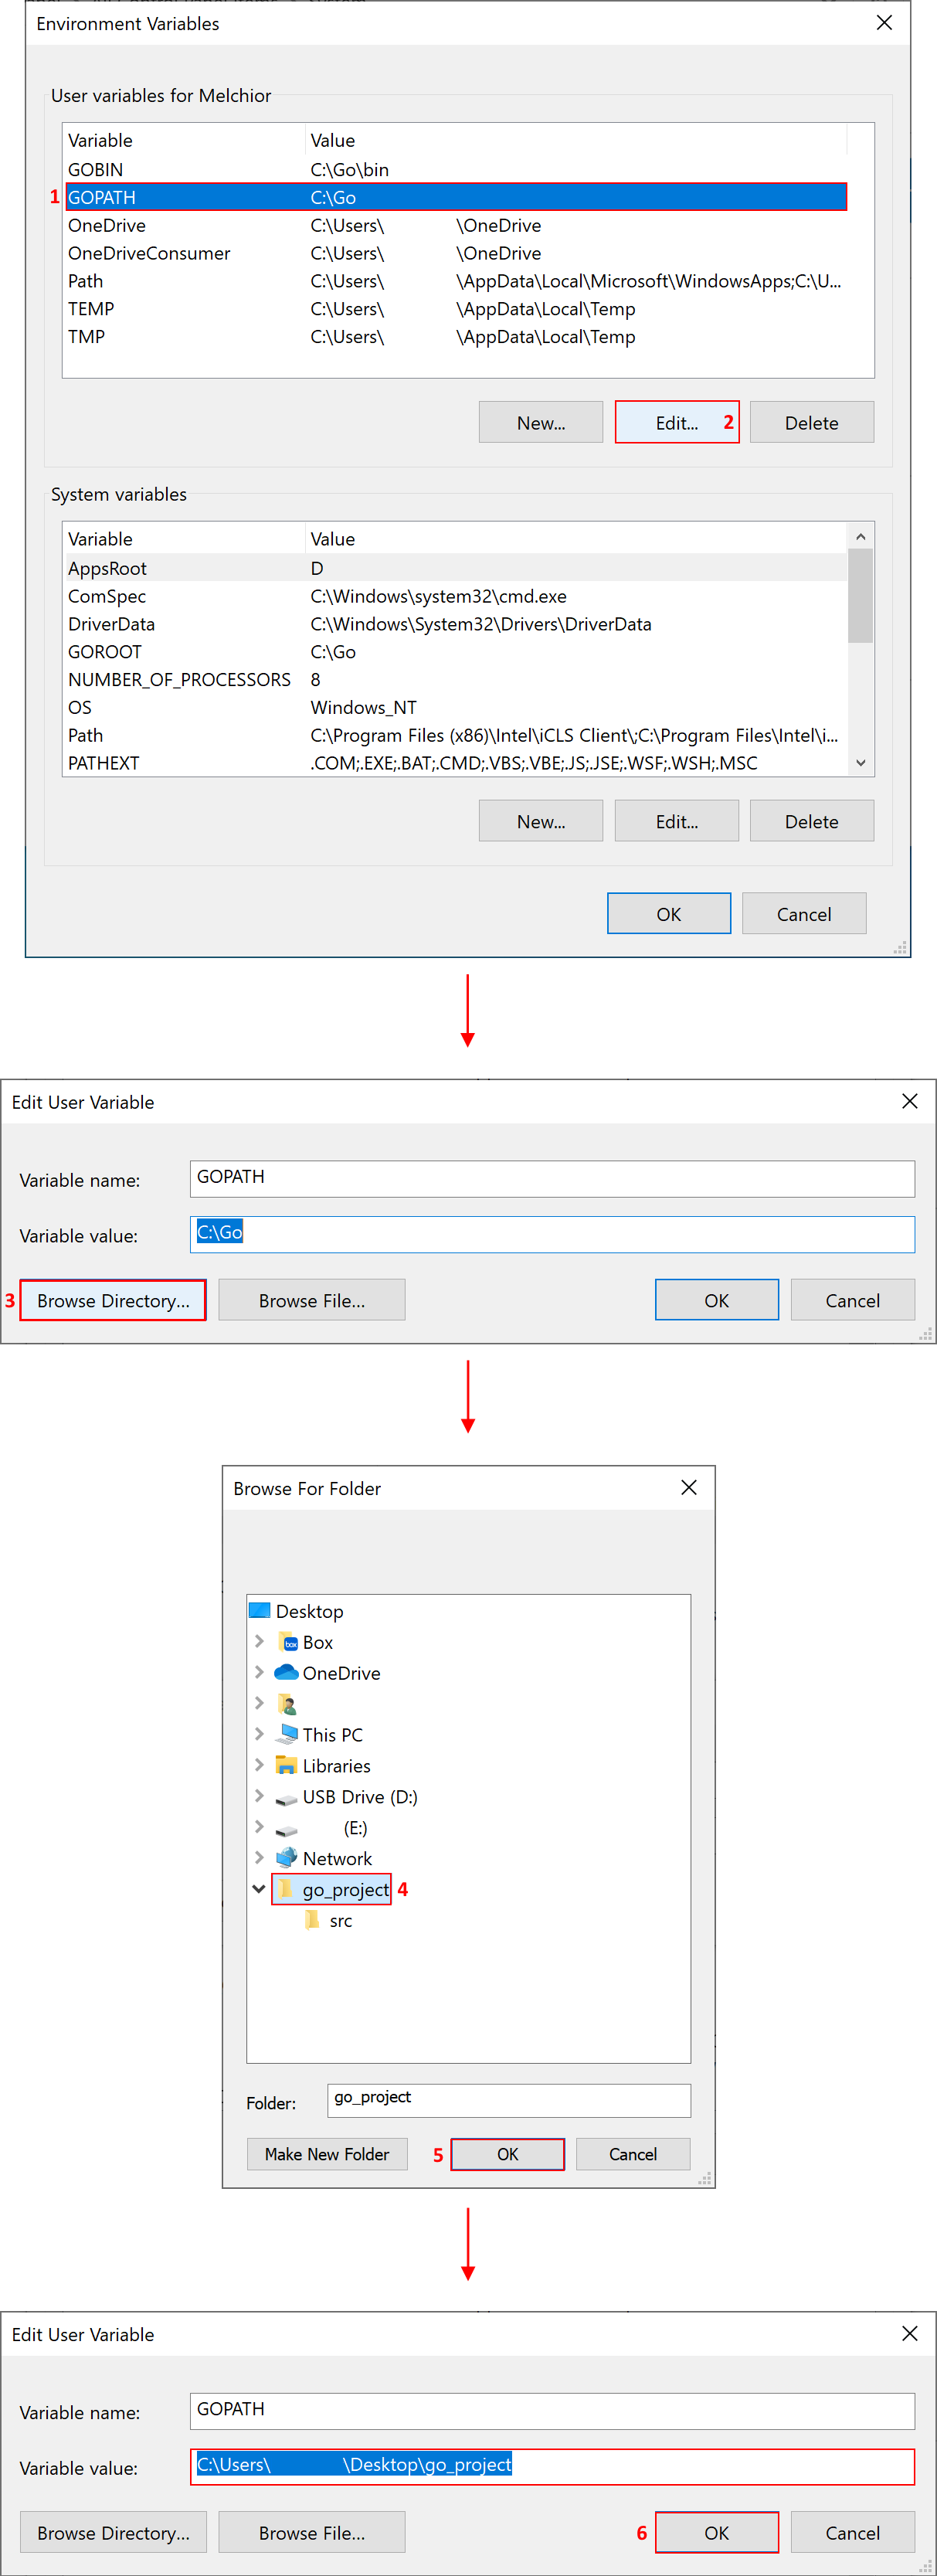
After setting both your GOPATH and GOBIN, just click on OK.
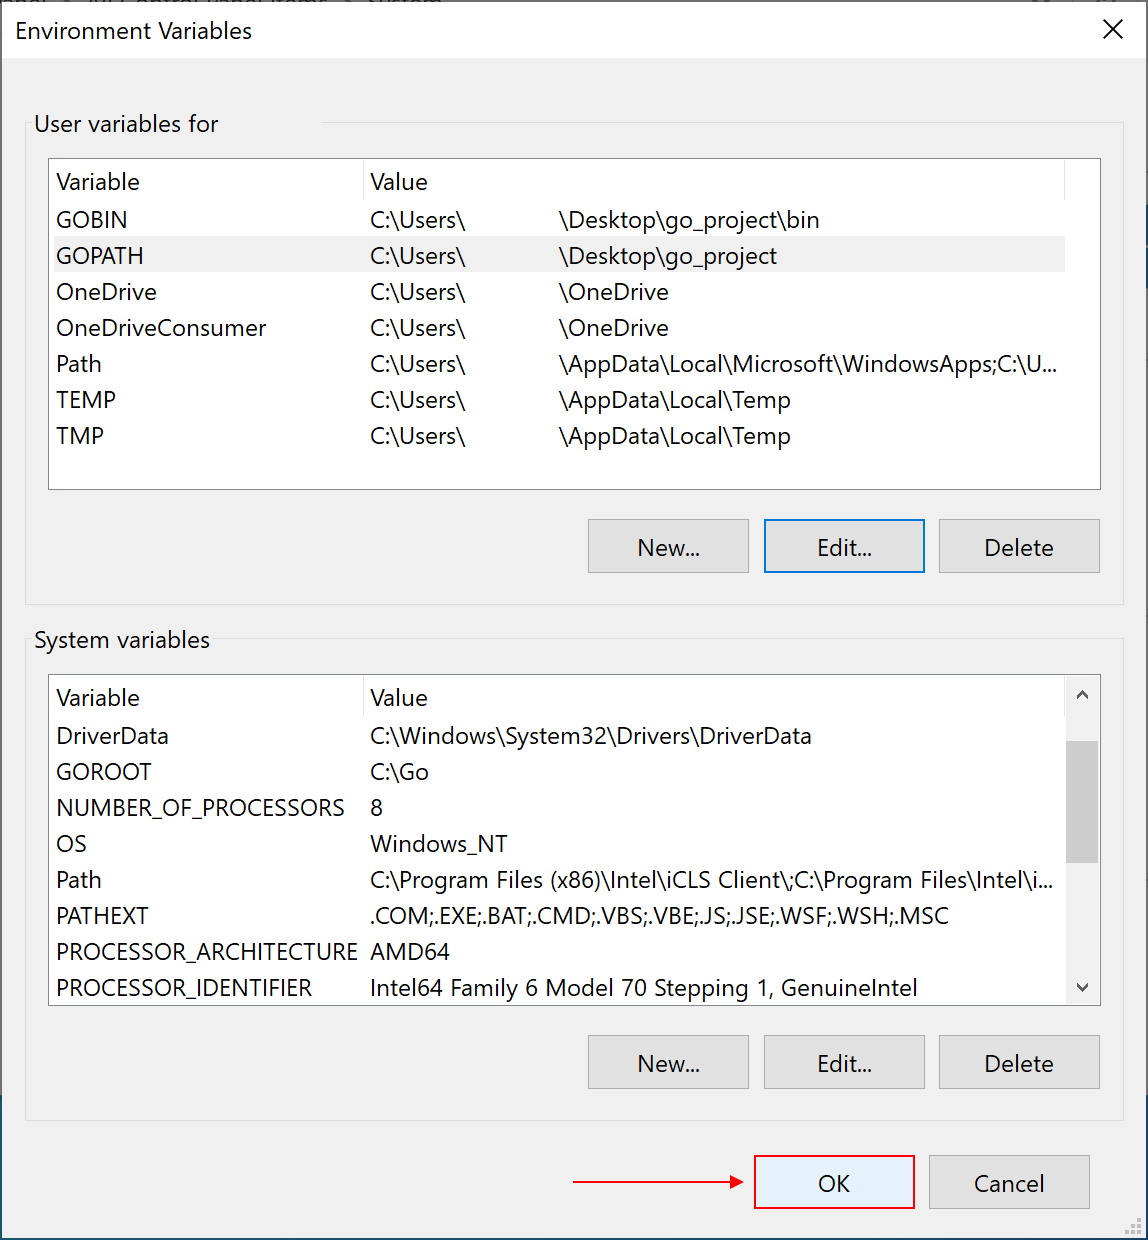
In order for the changes to take effect, close Command Prompt and reopen it. To verify if the changes took effect, execute the following command:
go env
From the Go environment result check if the GOBIN and GOPATH are set.

If everything is set accordingly, only the last step remains which is creating your workspace. To complete this last step, just open the Command prompt, navigate to the project directory src folder were the .go file is located:
cd Desktop\go_project\src
and execute the following command:
go install
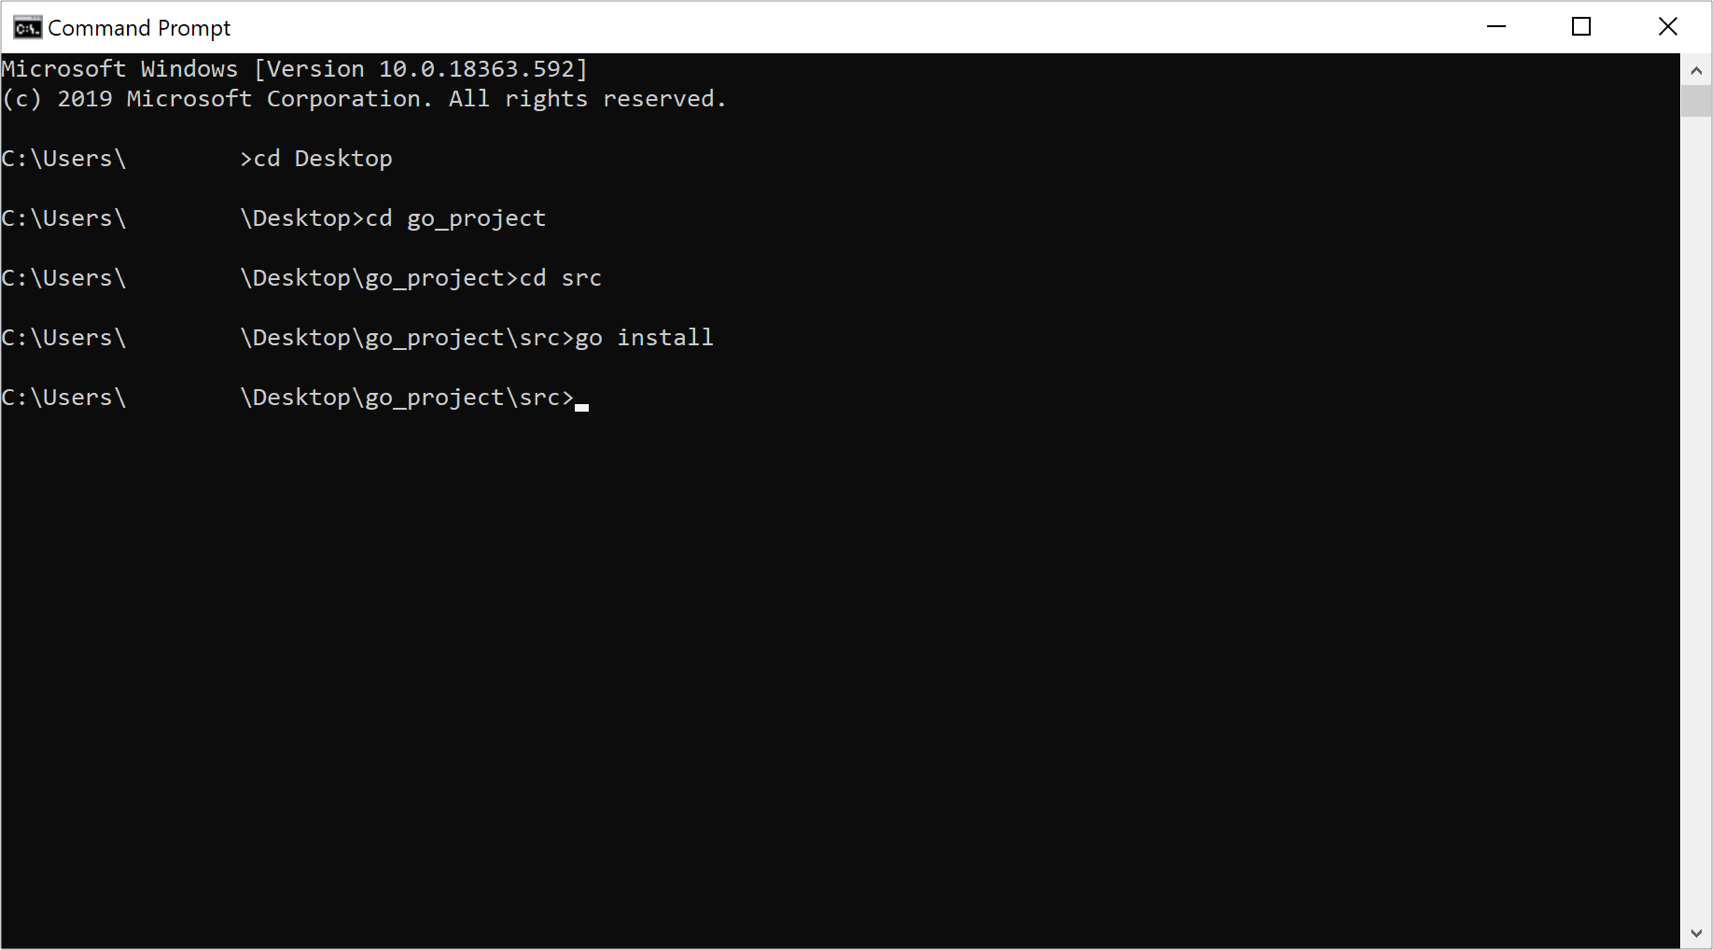
When you run this command on a project, executables will be compiled and written to bin.
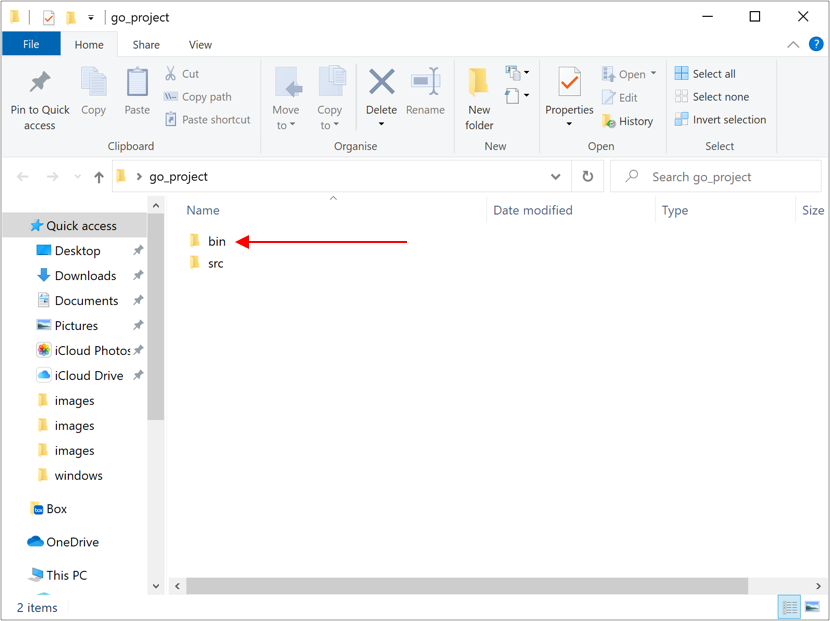
Congratulations your workspace is created and now you can start importing packages to your project by using the go get command. For example, execute the following command:
go get -u github.com/gorilla/mux
and your pkg folder appear with your package in your environment.
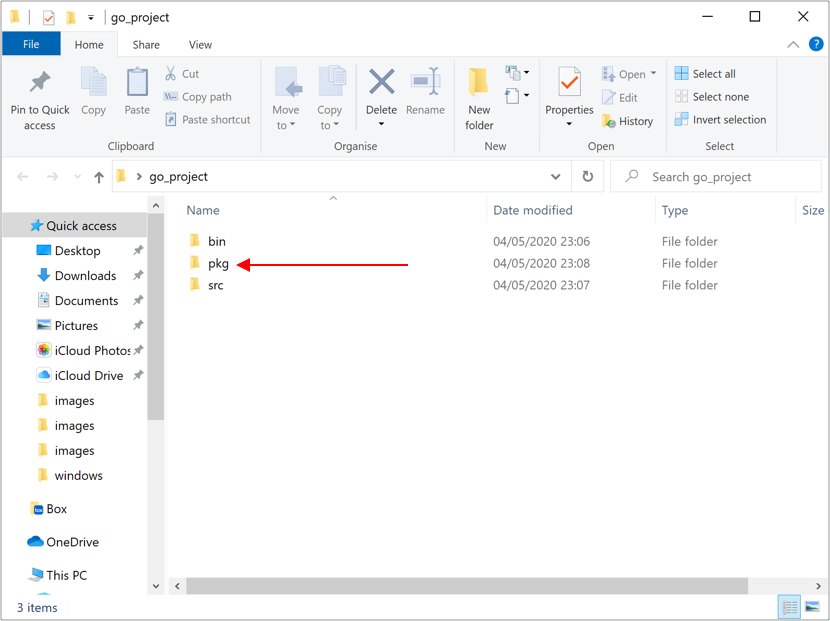
Go will walk through the codebase and get any referenced external packages. In this case, it sees the external reference, gets the package, and makes it available in the current workspace.
Import packages
Most packages are imported from other repositories through the version-control system such as Git, Mercurial, SVN and Bazaar. When you import a package Go retrieves codebase from Git and checks out the latest commit from the default branch.
Go build
To build Go application, you must use the go build command and an executable file will be generated. When creating an executable, it means that it does not require any external libraries in order to run.
Before building an executable Go goes through a set of strict rules to avoid silly errors and bugs in your code. This command also helps you make your code easier to read among the Go community. One thing you always need to remember is that the Go compiler is here to help you and not making your life miserable. The purpose of the compiler is to compile and increase the quality of your Go code.
One of the Go rules is you cannot just include any package that you might think you will need and not use it afterward.
package main
import (
“fmt”
“os”
)
func main() {
fmt.Println(“Hello world!”)
}
This will generate the following error message when trying building this Go file:
# command-line-arguments
./main.go:5:1: imported and not used: “os”
Although you can break this rule by using an underscore which bypasses this restriction.
package main
import (
“fmt”
_”os”
)
func main() {
fmt.Println(“Hello world!”)
}
The use of semicolons is strictly checked by the compiler because Go requires the use of semicolons as statement terminators in many contexts. The compiler automatically inserts the required semicolons when it thinks it is necessary. Look at the following example:
package main
import (
“fmt”
)
func main()
{
fmt.Println(“Hello world!”)
}
Although it looks just OK, if you try to execute it, you will be fairly disappointed because you will get the next syntax error message, and the code will not compile and therefore not run:
# command-line-arguments
./main.go:7:6: missing function body
./main.go:8:1: syntax error: unexpected semicolon or newline before {
This is because putting the opening braces { in its own line will make the Go compiler insert a semicolon at the end of main(). This will produce the error message.
Go format (fmt)
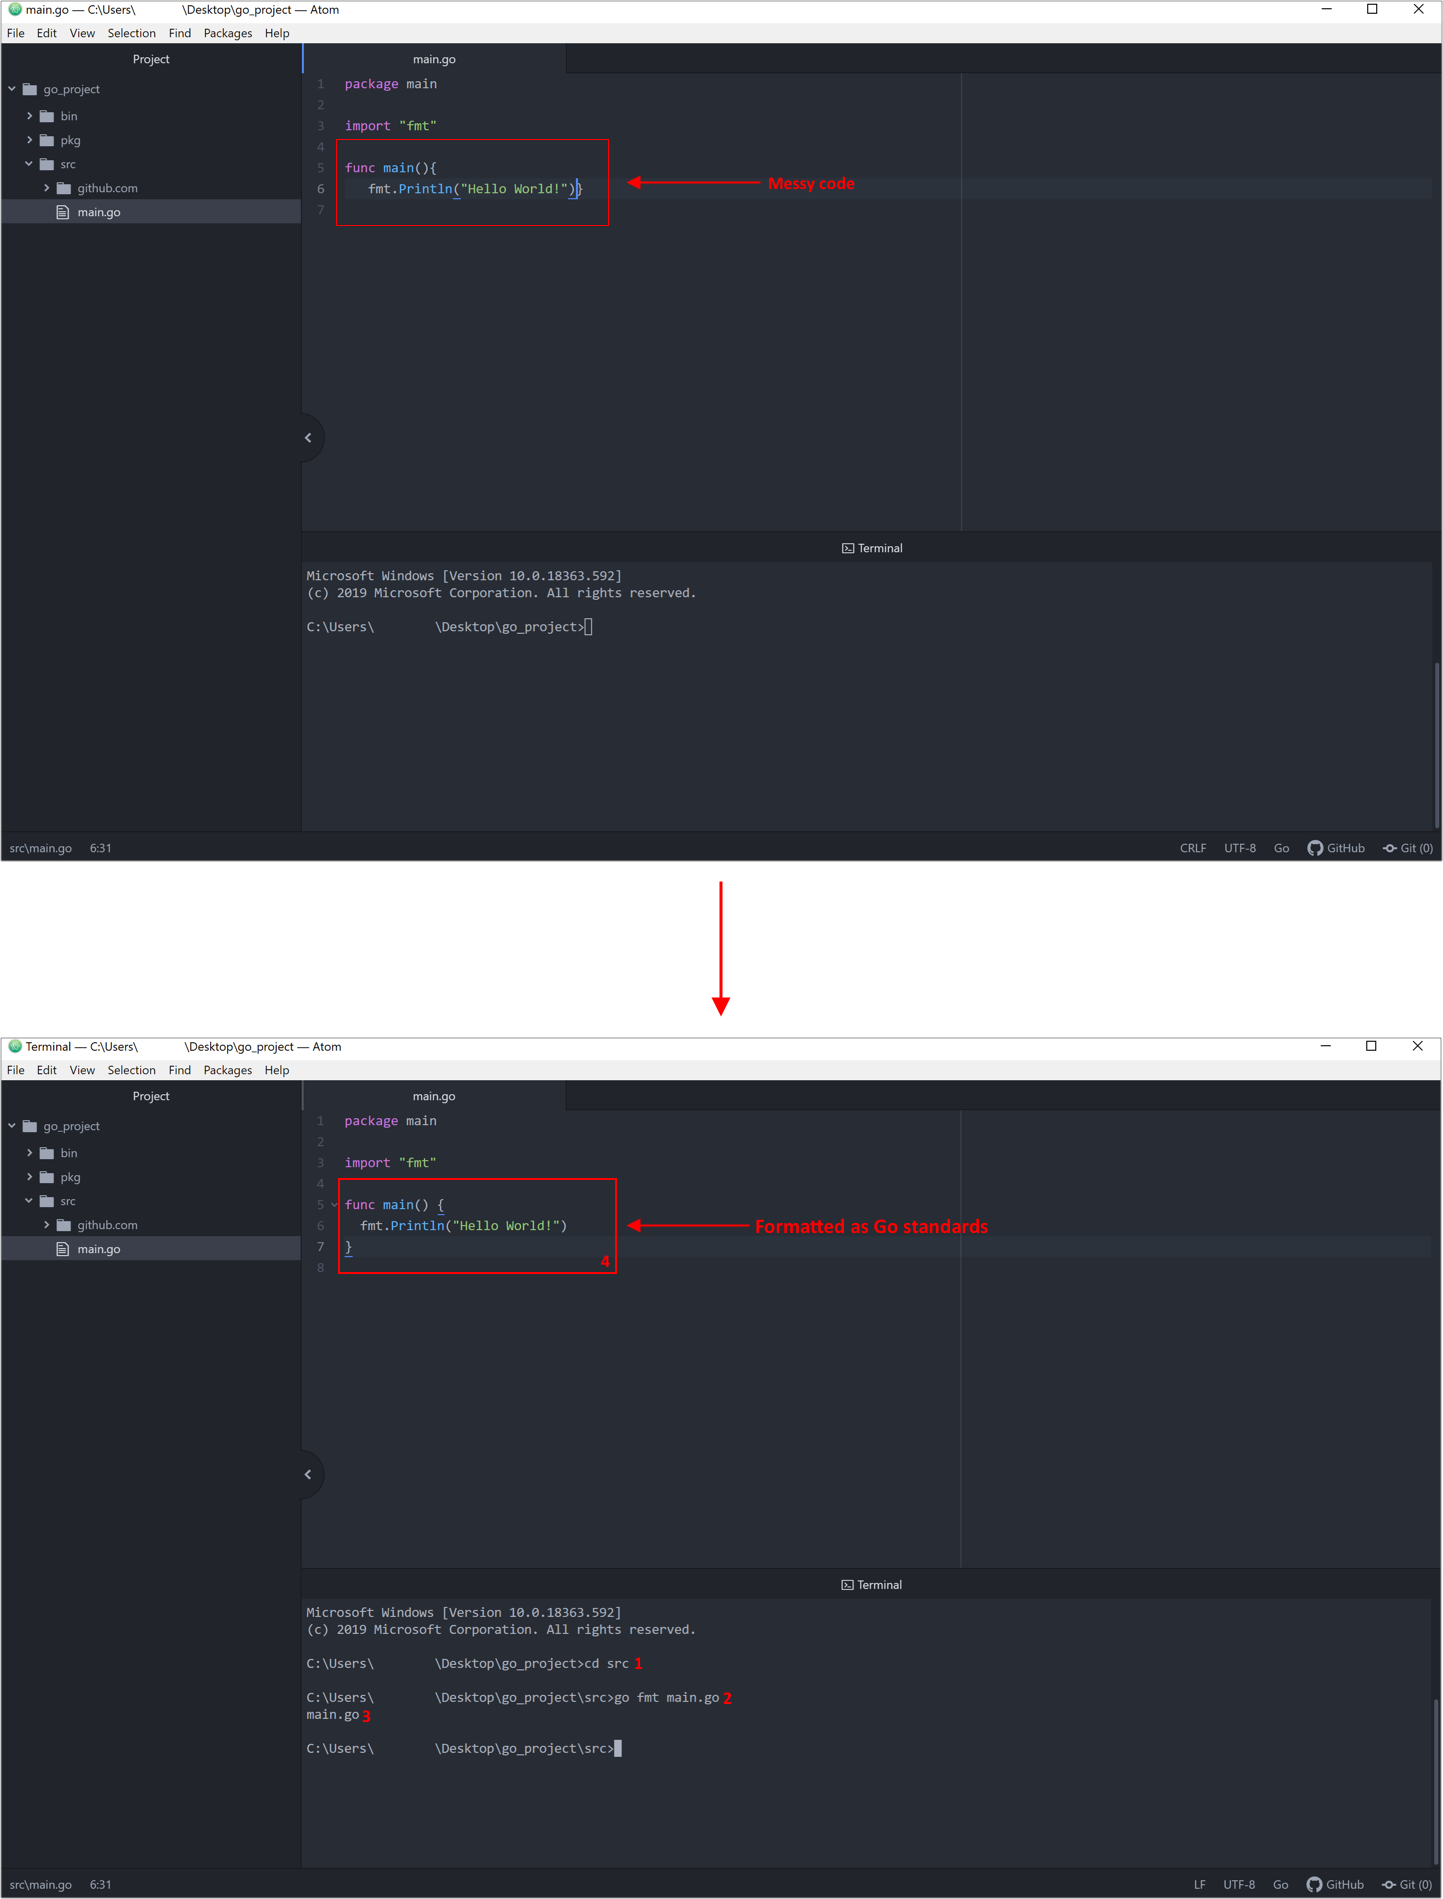
The go fmt command set your code to the correct format. Which means if you code looks messy, you can just launch this command to format your code accordingly.
Cross-compile
Cross-compilation is important if you want to generate executable to run on different machine with a different architecture. Luckily, Go has built-in support for cross-compilation which means you only need a single machine for your development.
To cross-compile a Go file, you need to set the GOOS (target Operating System) and GOARCH (target Architecture). In order to retrieve this information, execute the following command:
go versiongo version go1.13.4 windows/amd64
In this example, the GOOS is windows and amd64 the GOARCH. The cross-compilation can be done through the following command:
env GOOS=[target OS] GOARCH=[target architecture] go build [target go file]
In Windows, you cannot execute this command in Command Prompt. Hence, we will be using Git Bash to execute this command. In this example, the command will be as following:
env GOOS=windows GOARCH=arm64 go build main.go

The result consists of the following example:

This command generates a binary file that works on windows machines that use the ARM architecture. See the list of the available Go values for the GOOS and GOARCH environment.
Execute Go codes
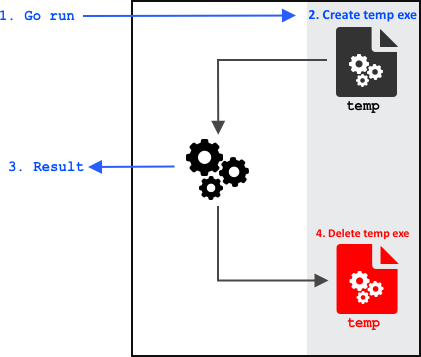
The go run command has been used in most of our examples in previous articles. When executing the go run command, the Go compiler creates a temporary executable file. During and after the execution of the Go application with the go run command, you will not see this temporary executable. Since the application is automatically executed, this temporary executable will be created and deleted after the program is finished executing. This means that Go does not leave any files on your hard drive.
To create an executable file, you need to use the go build command. This command creates this standalone executable which can be executed directly without needing to use go run command. The go build command consists of the following order:
go build [go filename]
In an example where you have the filename main.go, the execution will be as following:
go build main.go
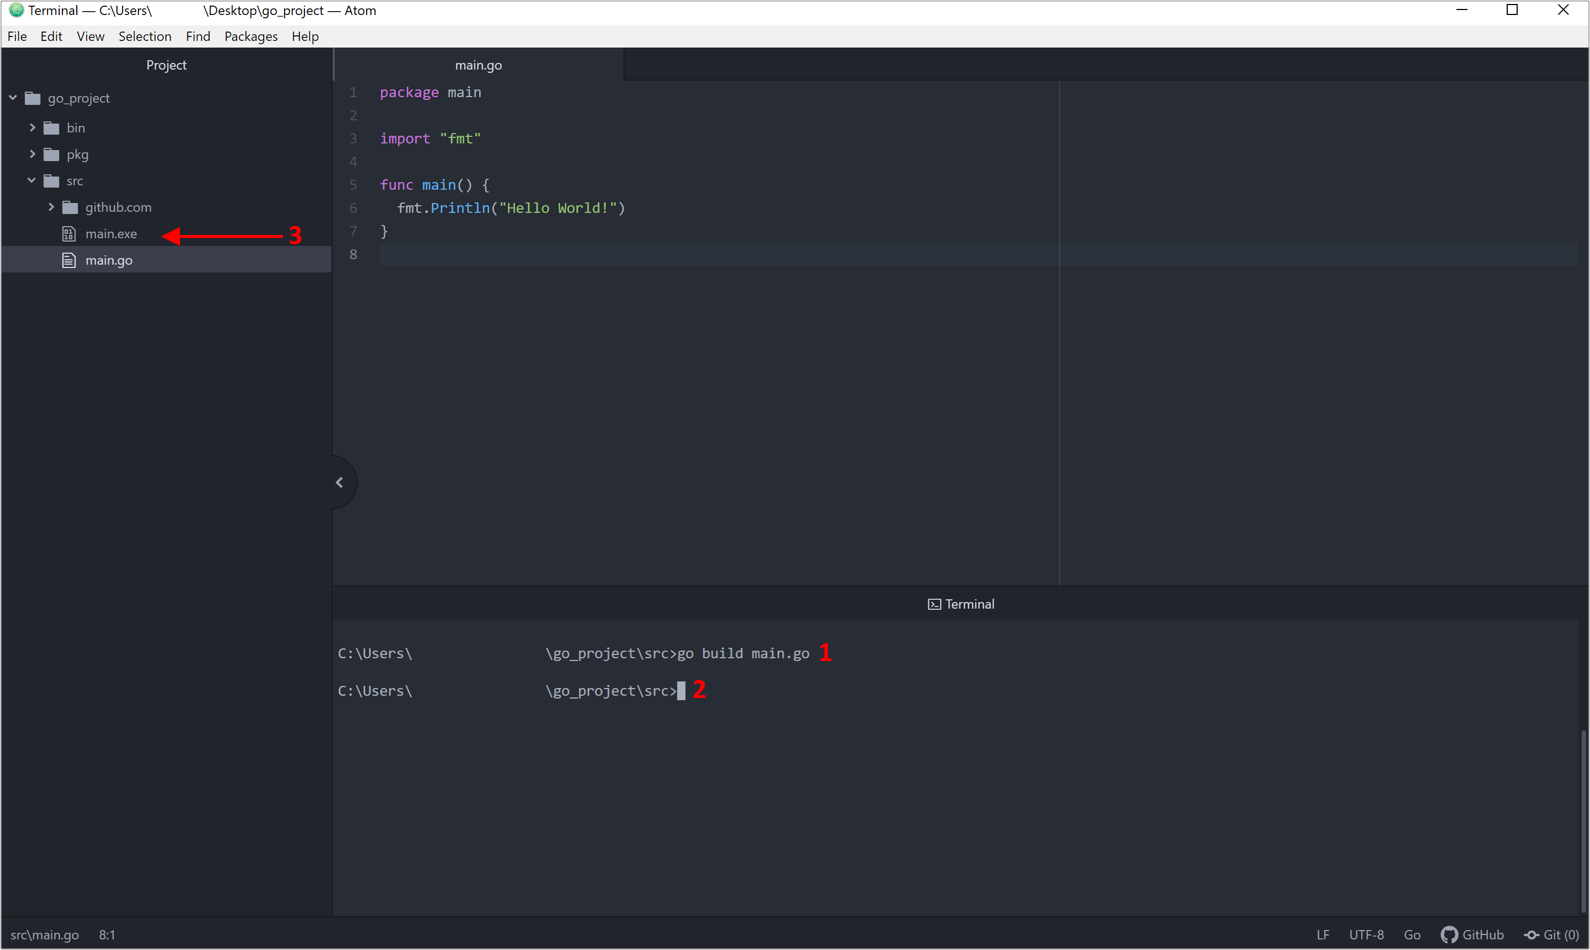
Ones the execution is completed, the main executable will be created in your current directory. To execute this executable, first navigate to your directory in your workspace and enter the following command:
./main
Follow us:

